Kubernetes Metadata: Empower Your Apps With Content From Your Pods.

black laptop computer turned on on table

Discover how to extract all the information available to inject it into your pods

Empower Your Pods With Content From Your Kubernetes Metadata

Photo by James Harrison on Unsplash

Kubernetes Metadata is how you will access some of the information from your pods in your application at runtime. When you are moving from a traditional kind of development to a cloud-native one, you usually need to access some out-of-the-box information available in a conventional environment.

This happens especially when we are talking about a platform that in the past was deployed on any platform that was populated with some information such as application name, version, domain, and so on. But this is tricky in a cloud-native approach. Or maybe not, But at least for some time, you have been wondering how you can get access to some of the information you know about your cloud-native workload, so the running application inside the pod knows it as well.

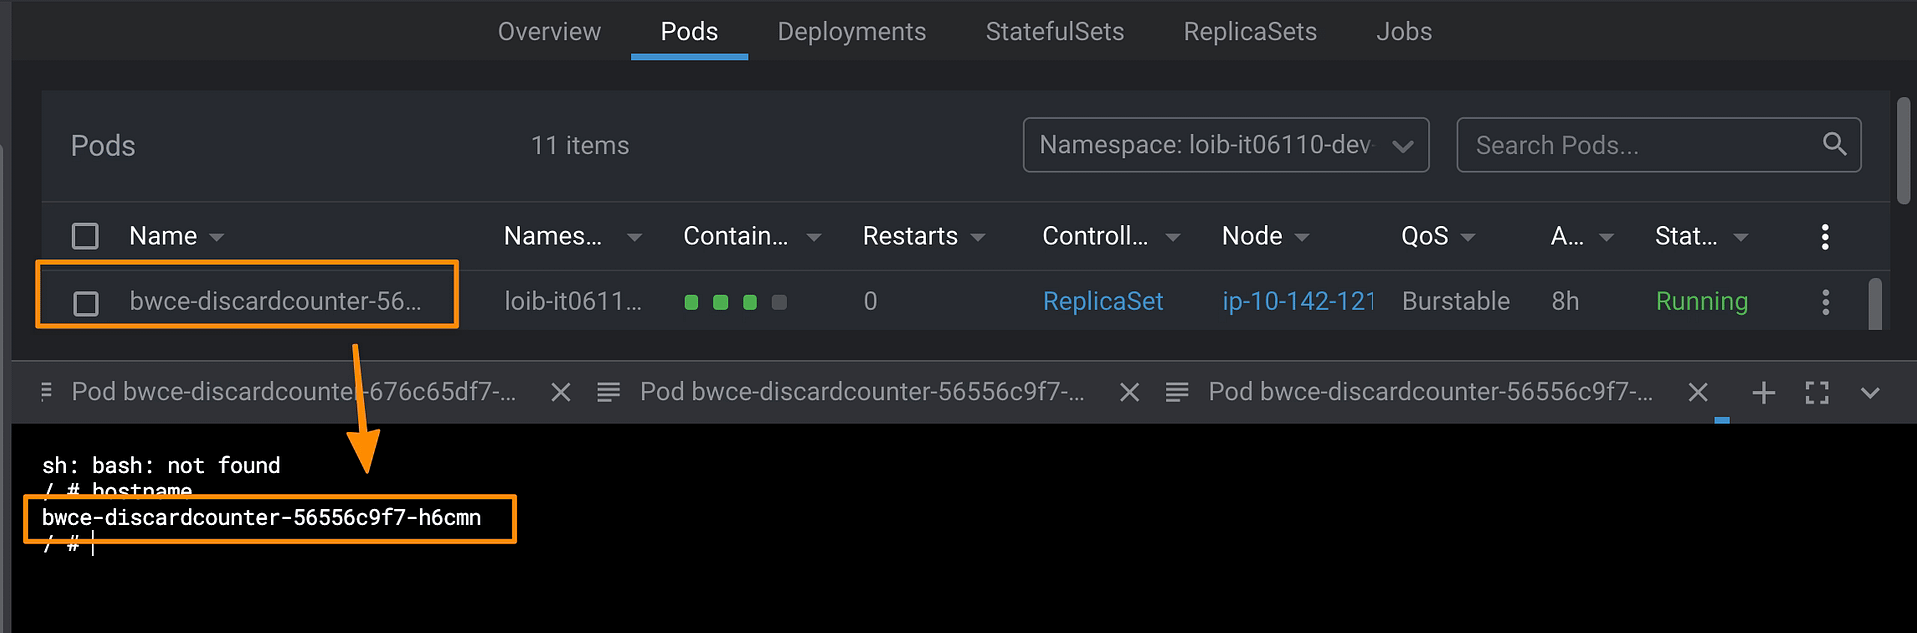
Because when you define a cloud-native, you describe a lot of very relevant information. For example, let’s think about that. When you start your pod, you know your pod name because it is your hostname:

But when you define your workload, you have a deployment name; how can you get it from your pod? How do you get which namespace your pod has been deployed to? Or what about all the metadata we define as labels and annotations?

The good thing is that there is a way to get any single data we have commented on, so don’t worry; you will get all this information available to use if you need to.

The standard way to access any information is through environment variables. This is the traditional way that we provide initial data to our pod. We already have seen we know we can use ConfigMaps to populate environment variables, but this is not the only way to provide data to our pods. There is much more, so take a look at it.

Discovering the fieldRef option

When we discussed using ConfigMap as environment variables, we had two ways to populate that information. Providing all the ConfigMap content, in which case we used the envFrom option, we can also use the valueFrom and provide the configMap name and the same key we would like to get the valueFrom.

So, following this section approach, we have an even more helpful command called fieldRef. fieldRef is the command name for a reference to a field, and we can use it inside the valueFrom directive. In a nutshell, we can provide a field reference as a value to an environment variable key.

So let’s take a look at the data that we can get from this object:

  • metadata.name: This gets the pod name as a value for an environment value
  • metadata.namespace: Provides the namespace that the pod is running as the value
  • metadata.lables[LABELNAME]: Extract the value of the label as the value for the environment key
  • metadata.annotations[ANNOTATIONNAME]: Extract the value of the annotation as value for the environment key

So here, you can see a snippet that defines different environment variables using this metadata as the value so you can use it inside the pod just gathering as standard environment variables:

        env:
        - name: APP_NAME
          valueFrom:
            fieldRef:
              fieldPath: metadata.labels['app']
        - name: DOMAIN_NAME
          valueFrom:
            fieldRef:
              fieldPath: metadata.labels['domain']
        - name: POD_NAMESPACE
          valueFrom:
            fieldRef:
              fieldPath: metadata.namespace
        - name: POD_NAME
          valueFrom:
            fieldRef:
              fieldPath: metadata.name 

Going Even Beyond

But this is not everything that the fieldRef option can provide, there is much more, and if you would like to take a look, you can do it here:

Discovering The Truth Behind Kubernetes Secrets

man in white dress shirt wearing black framed eyeglasses

Photo by krakenimages on Unsplash

We have been talking recently about ConfigMap being one of the objects to store a different configuration for Kubernetes based-workloads. But what happens with sensitive data?

This is an interesting question, and the initial answer from the Kubernetes platform was to provide a Secrets object. Based on its definition from the Kubernetes official website, they define secrets like this:

A Secret is an object that contains a small amount of sensitive data such as a password, a token, or a key. Such information might otherwise be put in a Pod specification or in a container image. Using a Secret means that you don’t need to include confidential data in your application code

So, by default, secrets are what you should use to store your sensitive data. From the technical perspective, to use them, they behave very similar to ConfigMap, so you can link it to the different environment variables, mount it inside a pod, or even have specific usages for managing credentials for different kinds of accounts such as Service Accounts. This classifies the different types of secrets that you can create:

  • Opaque: This defines a generic secret that you can use for any purpose (mainly configuration data or configuration files)
  • Service-Account-Token: This defines the credentials for service accounts, but this is deprecated and no longer in use since Kubernetes 1.22.
  • Docker-Registry Credentials: This defines credentials to connect to the Docker registry to download images as part of your deployment process.
  • Basic or SSH Auth: This defines specific secrets to handle authentication.
  • TLS Secret:
  • Bootstrap Secrets:

But is it safe to use Kubernetes Secrets to store sensitive data? The main answer for any question in any tech-related topic is: It depends. But some controversy has arisen that this topic is also covered in the official Kubernetes page, highlighting the following aspects:

Kubernetes Secrets are, by default, stored unencrypted in the API server’s underlying data store (etcd). Anyone with API access can retrieve or modify a Secret, and so can anyone with access to etcd. Additionally, anyone who is authorized to create a Pod in a namespace can use that access to read any Secret in that namespace; this includes indirect access such as the ability to create a Deployment.

So, the main thing is, by default, this is a very, very insecure way. It seems more like a categorization of the data than a proper secure handle. Also, Kubernetes provide some tips to try to make this alternative more secure:

  • Enable Encryption at Rest for Secrets.
  • Enable or configure RBAC rules that restrict reading data in Secrets (including indirect means).
  • Where appropriate, also use mechanisms such as RBAC to limit which principals are allowed to create new Secrets or replace existing ones.

But that can be not enough, and that has created room for third-party and cloud providers to provide their solution that covers these needs and at the same time also offer additional features. Some of these options are the ones shown below:

  • Cloud Key Management Systems: Pretty much all the big cloud providers provide some way of Secret Management to go beyond these features and mitigate those risks. If we talk about AWS, there is AWS Secrets Manager , if we are talking about Azure, we have Azure Key Vault , and in the case of Google, we also have Google Secret Manager.
  • Sealed Secrets is a project that tries to extend Secrets to provide more security, especially on the Configuration as a Code approach, offers a safe way to store those objects in the same kind of repositories as you expose any other Kubernetes resource file. In its own words, “ The SealedSecret can be decrypted only by the controller running in the target cluster, and nobody else (not even the original author) can obtain the original Secret from the SealedSecret.”
  • Third-party Secrets Managers that are similar to the ones from the Cloud Providers that allows a more independent approach, and there are several players here such as Hashicorp Vault or CyberArk Secret Manager
  • Finally also, Spring Cloud Config can provide security to store data that are related to sensitive configuration concepts such as passwords and at the same time covers the same need as the ConfigMap provides from a unified perspective.

I hope this article has helped to understand the purpose of the Secrets in Kubernetes and, at the same time, the risks regarding its security and how we can mitigate them or even rely on other solutions that provide a more secure way to handle this critical piece of information.

Why You Should Empower ConfigMaps in Your Kubernetes Deployments?

black and silver laptop computer beside yellow ceramic mug
Photo by Sigmund on Unsplash

ConfigMaps is one of the most known and, at the same time, less used objects in the Kubernetes ecosystem. It is one of the primary objects that has been there from the beginning, even if we tried so many other ways to implement a Config Management solution (such as Consul, Spring Cloud Config, and others).

Based on its own documentation words:

A ConfigMap is an API object used to store non-confidential data in key-value pairs.

https://kubernetes.io/docs/concepts/configuration/configmap/

Its motivation was to provide a native solution for configuration management for cloud-native deployments. A way to manage and deploy configuration focusing on different code from the configuration. Now, I still remember the WAR files with the application.properties file inside of it.

ConfigMap is a resource as simple as you can see in the snippet below:

apiVersion: v1
kind: ConfigMap
metadata:
  name: game-demo
data:
  player_initial_lives: "3"
  ui_properties_file_name: "user-interface.properties"

ConfigMaps are objects that belong to a namespace. They have a strong relationship with Deployment and Pod and enable the option to have different logical environments using namespace where they can deploy the same application. Still, with a specific configuration, so they will need a particular configMap to support that, even if it is based on the same resource YAML file.

From a technical perspective, the content of the ConfigMap is stored in the etcd database as it happens for any information that is related to the Kubernetes environment, and you should remember that etcd by default is not encrypted, so all the data can be retrieved for anyone that has access to it.

Purposes of ConfigMaps

Configuration Parameters

The first and foremost purpose of the configMap is to provide configuration parameters to your workload. An industrialized way to remove the need for env variables is to link the environment configuration from your application.

Providing Environment Dependent Files

Another significant usage is providing or replacing files inside your containers containing the critical configuration file. One of the primary samples that illustrate this is to give a logging configuration for your app if your app is using the logback library. In this case, you need to provide a logback.xml file, so it knows how to apply your logging configuration.

Other options can be properties. The file needs to be located there or even public-key certificates to handle SSL connections with safelisted servers only.

Read-Only Folders

Another option is to use the ConfigMap as a read-only folder to provide an immutable way to link information to the container. One use-case of this can be Grafana Dashboards that you are adding to your Grafana pod (if you are not using the Grafana operator)

Different ways to create a ConfigMap

You have several ways to create a ConfigMap using the interactive mode that simplifies its creation. Here are the ones that I use the most:

Create a configMap to host key-value pairs for configuration purposes

kubectl create configMap name  --from-literal=key=value

Create a configMap using a Java-like properties file to populate the ConfigMap in a key-value pair.

 kubectl create configMap name --from-env-file=filepath

Create a configMap using a file to be part of the content of the ConfigMap

 kubectl create configMap name --from-file=filepath

 ConfigMap Refresh Lifecycle

ConfigMaps are updated in the same way as any other Kubernetes object, and you can use even the same commands such as kubctl apply to do that. But you need to be careful because one thing is to update the ConfigMap itself and another thing is that the resource using this ConfigMap is updated.

In all the use-cases that we have described here, the content of the ConfigMap depends on the Pod’s lifecycle. That means that the content of the ConfigMap is read on the initialization process of the Pod. So to update the ConfigMap data inside the pod, you will need to restart or bring a new instance of the pod after you have modified the ConfigMap object itself.

How To Improve Your Chances To Master Your Kubernetes Certification (CKAD) Exam?

person writing on white paper

Learn From My Own Experience To Clear Your Kubernetes Certification Exam

person writing on white paper
Photo by Nguyen Dang Hoang Nhu on Unsplash

But I would also like to provide some practical advice based on my own experience if this can help anyone else going through the same process. I know there are a lot of similar articles, and most of them are worth it because each of them provides a different perspective and approach. So here it is mine:

  • Fast but Safe. You will have around 2 hours to complete between 15 to 20 practical questions, which pretty much gives you about 6 minutes each on average. That’s enough time to do it, but also you must go fast. So, try to avoid the approach of reading the whole exam first or moving across questions. It is better to start with the first one right away and if you are blocked, move to the next one. At the same time, you must validate the output you are getting to ensure that you are not missing anything. Try to run any command to validate if the objects have been created correctly and have the right attributes and configuration before moving to the next one. Time is precious. I had a lot of time at the end of the exam to review the questions, but it is also true that I spent 20 minutes because I wrote ngnix instead of nginx, and I was unable to see it!!
  • Imperative commands is the way to go: You must learn the YAML structure for the main objects. Deployment, Pod, CronJob, Jobs, etc. You will also need to master the imperative commands to generate the initial output quickly. Imperative commands such as kubectl run, kubectl create, kubectl expose will not provide 100% of the answer, but maybe 80% is the base to make arrangements to have the solution to your question quickly. I recommend taking a look at this resource:
  • kubectl explain to avoid going through documentation on thinking a lot. I have a problem learning the exact name of a field or the location in the YAML file. So I used a lot of the kubectl explain, especially with the —rescursive flag. It provides the YAML structure so, if you don’t remember if the key name is configMap or ConfigMapRef or claimName or persitentVolumeClaim, this will be an incredible help. If you also add a grep -A 10 -B 5 command to find your field and its context, you will master it. This doesn’t replace knowing the YAML structure, but it will help to be efficient when you don’t remember the exact name or location.
kubectl explain pod –recursive
  • Don’t forget about docker/podman and helm: With the changes in the certification in September 2021 also, the building process is essential, so it is excellent if you have enough time in your preparation to play with tools such as docker/podman or helm so you will master any question related to that that you could find.
  • Use the simulator: LinuxFoundation is providing you two sessions on the simulator that, from one side, will give you an authentic exam experience, so you will face similar kinds of questions and interface to feel that you are not the first time that you are facing and at the same time you could feel familiar with the environment. I recommend using both sessions (both have the same question), one in the middle of your training and the second one just one or two days before your exam.

So, here are my tips, and I hope you will like them. If they were helpful to you, please let me know on social networks or by mail or another way of contacting your preference! All the best in your preparation, and I’m sure you will get your goals!

My Take On the Kubernetes Certification (CKAD)

girl in black t-shirt writing on white paper

My Experience and Feelings After Clearing the Certified Kubernetes Application Developer

girl in black t-shirt writing on white paper
Photo by Jeswin Thomas on Unsplash

Last week I cleared the Certified Kubernetes Application Developer (CKAD) certification with a 95/100 score, and it was more difficult than it sounds even though this is the easiest of the Kubernetes certifications, the way the exam is designed and the skills that are evaluated on it make you unsure of your knowledge.

I have been using Kubernetes daily for more than three years now. Because of my work, it is required to deploy, define, troubleshoot Kubernetes-based workloads on different platforms (Openshift, EKS, AKS… anything), so you could think that I shouldn’t need to prepare for this kind of exam, and that could be the impression too. But this is far from reality.

I feel that there is no certification that you can clear without preparation because the certification does not measure how skilled you are on any other topic than the certification process itself. You can be the master of any technology, but if you go to a certification exam without any specific exam preparation, you have a lot of chances to fail.

Even in this case that we have shifted from the traditional theoretical test-case question to a more practical one, it is no different. Because yes, you don’t need to learn anything, and yes, it requires that you can really do things, not just know about a thing, but everything else is the same.

You will be asked about things you will never use in real life, you will need to use commands that you only are going to use in the exam, and you will need to do it in the specific way the expected too because this is how certification works. Is it bad? Probably… is there any other way to do it? We didn’t find it yet any better.

I have to admit that I think this process is much fairer than the test-case one, even though I prefer the test case just for a matter of timing during the process.

So, probably, you are asking if that is my view, why I try to clear the certification in the first place? There are several reasons to do it. First of all, I think certification is a great way to set a standard of knowledge for anyone. That doesn’t mean that people with the certification are more competent or better skilled than people without the certification. I don’t consider myself more qualified today than one month ago when I started to prepare for the certification, but at least it settled some foundation of what you can expect.

Additional to that is a challenge to yourself, to show you that you can do it, and it is always great to push your limits a bit beyond what is mandatory for work. And finally, it is something that looks good in your CV, that is for sure.

Do I learn something new? Yes, for sure, a lot of things. I even improved myself because I usually do some tasks, and just that alone made it worth it. Even if I failed, I think it was worth it because it always gives you something more to add to your toolchain, and that is always good.

Also, this exam doesn’t ensure that you are a good Kubernetes Application Developer. In my view, I think the exam approach is focused on showing that you are a fair Kubernetes Implementer. Why am I saying that? Let’s add some points:

  • You don’t get any points to provide the best solution for a problem. The ask is so specific that there is a matter of translating what is written in plain English to Kubernetes actions and objects.
  • There are troubleshooting questions, yes, but there are also quite basic ones that don’t ensure that your thought process is efficient. Again, efficiency is not evaluated on the process.

So, I am probably missing a Certified Kubernetes Architecture exam where you can have the definition of a problem, and you need to provide a solution. You will get evaluated based on that. Even with some way to justify the decision you are making and the thought process, I don’t think we ever see that. Why? Because, and that’s very important because any new certification exam we are going to face needs to be specific enough so it can be evaluated automatically.

From Docker Desktop to Rancher Desktop: Quick and Simple

assorted-color filed intermodal containers
Photo by frank mckenna on Unsplash

As most of you already know, the 31st of January is the last day to use Docker Desktop without applying the new licensing model that pretty much generates a cost for any company usage. Of course, it is still free to use for open-source and small companies, but it is better to meet the requirements using Docker official documentation.

So because of that situation, I started a journey to find an alternative to Docker Desktop because I used docker-desktop a lot. The primary use I do is to startup server-like things for temporary usage that I don’t like to have installed in my machine to keep it as clean as possible (even though this is not always true, but it is an attempt).

So, on that search, I discovered Rancher Desktop was released not a long time ago and promised to be the most suitable alternative. The goal of this post is not to compare both platforms, but if you like to have more information I leave here a post that can provide it to you:

The idea here is to talk more about the journey of that migration. So I installed the Rancher Desktop 1.0.0 on my Mac and the installation was very, very easy. The main difference with Docker Desktop is that Rancher Desktop is built with Kubernetes in mind and for Docker Desktop, that came as an afterthought. So, by default we will have a Kubernetes environment running in our system, and we can even select the version of that cluster as you can see in the picture below:

But also in Rancher, they noticed the opportunity window they have in front of them, and they were very aggressive in providing an easy migration path from Docker Desktop. And the first thing you will notice is that you can configure Docker Desktop to be compliant with the Docker CLI API as you can see in the picture below.

This is not enabled by default, but it is very easy to do it and it will make you not need to change all your “docker-like” commands (docker build, docker ps.. ) so it will smooth a lot of the transition.

Maybe in the future, you want to move away from everything resembling docker even at the client-side and move to a Containers kind of approach, but for now, what I needed is to simplify the process.

So, after enabling that and restarting my Rancher Desktop, I can type my commands as you can see in the picture below:

So, the only thing I need to do is migrate my images and containers. Because I’m not a pure docker usage, I don’t follow sometimes the thing to have your container stateless and using volumes especially when you are doing a small use for some time and that’s it. So, that means that some of my containers also need to be moved to the new platform to avoid any data loss.

So, my migration journey had different steps:

  • First of all, I will commit the stateful containers that I need to keep on the new system using the command docker commit with the documentation that you can find here:
  • Then, I will export all the images that I have now in TAR files using the command docker save with the documentation that you can find it here:
  • And finally, I will load all those images on the new system using docker load command to have it available there. Again, you can find the documentation of that specific command here

To automate a little bit the process even that I don’t have much images loaded because I try to clean up from time to time using the docker system prune command:

I prefer not to do it manually, so I will use some simple scripts to do the job.

So, to perform the export job I need to run the following command:

docker image ls -q | xargs -I {} docker image save {} -o {}.tar

This script will save to have all my images on different tar files into a specific folder. Now, I just need to run the following command from the same folder I had run the previous one to have all the images back into the new system:

find . -name "*.tar" -exec docker load -i {} \;

The reason why I’m not doing both actions at the same time is that I need to have running Docker Desktop for the first part and Rancher Desktop for the other. So even though I can automate that as well, I think it is not worth it.

And that’s it, now I can remove the Docker Desktop from my laptop, and my life will continue to be the same. I will try to provide more feedback on how it feels, especially regarding resource utilization and similar topics in the near future.

Untangling Reclaim Policies for Persistent Volume in Kubernetes

Discover how the policy can affect how your data is managed inside Kubernetes Cluster

Photo by benjamin lehman on Unsplash

As you know, everything is fine on Kubernetes until you face a stateful workload and you need to manage its data. All the powerful capabilities that Kubernetes brings to the game face many challenges when we talk about stateful services that require a lot of data.

Most of the things challenges have a solution today. That is why many stateful workloads such as databases and other backend systems also require a lot of knowledge about how to define several things. One of them is the retain policy of the persistent volume.

First, let’s define what the Reclaim Policy is, and to do that, I will use the official definition from the documentation:

When a user is done with their volume, they can delete the PVC objects from the API that allows reclamation of the resource. The reclaim policy for a PersistentVolume tells the cluster what to do with the volume after it has been released of its claim. Currently, volumes can either be Retained, Recycled, or Deleted.

So, as you can see, we have three options: Retain, Recycle or Delete. Let’s see what the behavior for each of them is.

Retain

That means the data will still be there even if the claim has been deleted. All these policies apply when the original PVC is removed. Before that situation, the data will always remain no matter which policy we use.

So, retain means that even if we delete the PVC, the data will still be there, and it will be stored so that no other PVC can claim that data. Only an administrator can do so with the following flow:

  1. Delete the PersistentVolume.
  2. Manually clean up the data on the associated storage asset accordingly.
  3. Manually delete the associated storage asset.

Delete

That means that as soon as we remove the PVC the PV and the data will be released.

This will simplify the cleanup and housekeeping task of your volumes but at the same time, it increases the possibility that has some data loss because of unexpected behavior. As always, this is a trade-off you need to do.

We always need to remind you that if you try to delete PVC in active use by a Pod, the PVC is not removed immediately. PVC removal is postponed until the PVC is no longer actively used by any Pods to ensure that no data is lost, at least when some component is still bound to it. On the same policy similar thing happens to the PV. If an admin deletes a PV attached to a PVC, the PV is not removed immediately. PV removal is postponed until the PV is no longer bound to a PVC.

Recycle

That means something in the middle works similar to the Delete policy we explained above, but it doesn’t delete the volume itself, but it will remove the content of the PV, so in practice, it will be similar. So, in the end, it will perform a command similar to this rm -rf on the storage artifact itself.

But just for you to be aware, this policy is nowadays deprecated, and you should not use it in your new workloads, but it is still supported so you can find some workloads that are still using it.

Why is the Prometheus Agent Mode So Great?

Prometheus has included a new capability in the 2.32.0 release to optimize the single pane of glass approach

Photo by Chris Liverani on Unsplash

From the new upcoming release of Prometheus v2.32.0, we will have an important new feature at our disposal: the Agent Mode. And there is a fantastic blog post announcing this feature from our of the rockstar from the Prometheus team: Bartlomiej Plotka, that I recommend reading. I will add a reference section at the end of the article. I will try to summarise some of the most relevant points here.

Another post about Prometheus, the most critical monitoring system in nowadays cloud-native architectures, has its inception in the Borgmon monitoring system created by Google in ancient times (around the 2010–2014 period).

Based on this importance, its usage has been growing incredibly and making its relationship with the Kubernetes ecosystem stronger. We have reached a point that Prometheus is the default option for monitoring in pretty much any scenario that has a Kubernetes workload related to it; some examples are the ones shown below:

  • Prometheus is the default option, including the Openshift Monitoring System
  • Prometheus has an Amazon Managed Service at your disposal to be used for your workloads.
  • Prometheus is included in the Reference Architecture for Cloud-Native Azure Deployments.

Because of this popularity and growth, many different use-cases have raised some improvements that can be done. Some of them are related to specific use-cases such as edge deployment or providing a global view, or a single pane of glass.

Until now, if I have several Prometheus deployments, monitor a specific subset of your workloads because of their resides on different networks or because there are various clusters, you can rely on the remote write capability to aggregate that into a global view approach.

Remote Write is a capability that has existed in Prometheus since its inception. The metrics that Prometheus is scraping can be sent automatically to a different system using their integrations. This can be configured for all the metrics or just a subset. But even with all of these, they are jumping ahead on this capability, which is why they are introducing the Agent mode.

Agent Mode optimizes the remote write use case configuring the Prometheus instance in a specific mode to do this job in an optimized way. That model implies the following configuration:

  • Disable querying and alerting.
  • Switch the local storage with a customized TSDB WAL

And the remarkable thing is that everything else is the same, so we will still use the same API, discover capabilities, and related configuration. And what all of this will provide to you? Let’s take a look at the benefits you will get of doing so:

  • Efficiency: Customised TSDB WAL will keep only the data that could not be sent to the target location; as soon as it succeeds, it will remove that piece of data.
  • Scalability: It will improve scalability, enabling easier horizontal scalability for ingestion. This is because this agent mode disables some of the reasons auto-stability is complex in normal server-mode Prometheus. A stateful workload makes scalability complex, especially in scale-down scenarios. So this mode will lead to a “more-stateless” workload that will simplify this scenario and be close to the dream of an auto-scalability metric ingestion system.

This feature is available as an experimental flag in the new release, but this was already tested with Grafana Labs’ works, especially on the performance side.

If you want to take a look at more details about this feature, I would recommend taking a look at the following article: https://prometheus.io/blog/2021/11/16/agent/

[visual-link-preview encoded=”eyJ0eXBlIjoiZXh0ZXJuYWwiLCJwb3N0IjowLCJwb3N0X2xhYmVsIjoiIiwidXJsIjoiaHR0cHM6Ly9wcm9tZXRoZXVzLmlvL2Jsb2cvMjAyMS8xMS8xNi9hZ2VudC8iLCJpbWFnZV9pZCI6MCwiaW1hZ2VfdXJsIjoiIiwidGl0bGUiOiIiLCJzdW1tYXJ5IjoiIiwidGVtcGxhdGUiOiJ1c2VfZGVmYXVsdF9mcm9tX3NldHRpbmdzIn0=”]

How To Set Up an Openshift Local Cluster ?

Learn how you can use CodeReady Containers to set up the latest version of Openshift  Local just on your computer.

Run Openshift Local
Photo by pawel szvmanski on Unsplash

At this time, we all know that the default deployment mode for any application we would like to launch will be a container-based platform and, especially, it will be a Kubernetes-based platform.

But we already know that there are a lot of different flavors of Kubernetes distributions, I even wrote an article about it that you can find here:

Some of these distributions try to follow as close as they could the Kubernetes experience but others are trying to enhance and increase the capabilities the platform provides.

Because of that sometimes it is important to have a way to really test our development in the target platform without waiting for a server-based developer mode. We know that we have in our own laptop a Kubernetes-based platform to help do the job.

minikube is the most common option to do this and it will provide a very vanilla view of Kubernetes, but something we need a different kind of platform.

[visual-link-preview encoded=”eyJ0eXBlIjoiZXh0ZXJuYWwiLCJwb3N0IjowLCJwb3N0X2xhYmVsIjoiIiwidXJsIjoiaHR0cHM6Ly9taW5pa3ViZS5zaWdzLms4cy5pby9kb2NzLyIsImltYWdlX2lkIjowLCJpbWFnZV91cmwiOiIiLCJ0aXRsZSI6IiIsInN1bW1hcnkiOiIiLCJ0ZW1wbGF0ZSI6InVzZV9kZWZhdWx0X2Zyb21fc2V0dGluZ3MifQ==”]

Openshift from RedHat is becoming one of the de-facto solutions for private cloud deployments and especially for any company that is not planning to move to a public-cloud managed solution such as EKS, GKE, or AKS. In the past we have a similar project as minikube known as minishift that allow running in their own words:

Minishift is a tool that helps you run OpenShift locally by running a single-node OpenShift cluster inside a VM. You can try out OpenShift or develop with it, day-to-day, on your localhost.

[visual-link-preview encoded=”eyJ0eXBlIjoiZXh0ZXJuYWwiLCJwb3N0IjowLCJwb3N0X2xhYmVsIjoiIiwidXJsIjoiaHR0cHM6Ly9naXRodWIuY29tL2NvZGUtcmVhZHkvY3JjIiwiaW1hZ2VfaWQiOi0xLCJpbWFnZV91cmwiOiJodHRwczovL29wZW5ncmFwaC5naXRodWJhc3NldHMuY29tL2I4NTI3NjdhZTZiZjRmOTk3MWMyMTMxZGZmZGU2M2NkZDY3MzhhMTA0NDlhN2IwN2MxNzc4OGNjMjY0NDE0M2EvY29kZS1yZWFkeS9jcmMiLCJ0aXRsZSI6IkdpdEh1YiAtIGNvZGUtcmVhZHkvY3JjOiBSZWQgSGF0IENvZGVSZWFkeSBDb250YWluZXJzIGlzIGEgdG9vbCB0aGF0IG1hbmFnZXMgYSBsb2NhbCBPcGVuU2hpZnQgNC54IGNsdXN0ZXIgb3B0aW1pemVkIGZvciB0ZXN0aW5nIGFuZCBkZXZlbG9wbWVudCBwdXJwb3NlcyIsInN1bW1hcnkiOiJSZWQgSGF0IENvZGVSZWFkeSBDb250YWluZXJzIGlzIGEgdG9vbCB0aGF0IG1hbmFnZXMgYSBsb2NhbCBPcGVuU2hpZnQgNC54IGNsdXN0ZXIgb3B0aW1pemVkIGZvciB0ZXN0aW5nIGFuZCBkZXZlbG9wbWVudCBwdXJwb3NlcyAtIEdpdEh1YiAtIGNvZGUtcmVhZHkvY3JjOiBSZWQgSGF0IENvZGVSZWFkeSBDb250YWluZXJzIGlzIGEgdG9vbCB0aC4uLiIsInRlbXBsYXRlIjoidXNlX2RlZmF1bHRfZnJvbV9zZXR0aW5ncyJ9″]

The only problem with minishift is that they only support the 3.x version of Openshift but we are seeing that most of the customers are already upgrading to the 4.x release, so we can think that are a little alone in that duty, but this is far from the truth!

Because we have CodeReady Containers or CRC to help us on that duty.

[visual-link-preview encoded=”eyJ0eXBlIjoiZXh0ZXJuYWwiLCJwb3N0IjowLCJwb3N0X2xhYmVsIjoiIiwidXJsIjoiaHR0cHM6Ly9naXRodWIuY29tL2NvZGUtcmVhZHkvY3JjIiwiaW1hZ2VfaWQiOi0xLCJpbWFnZV91cmwiOiJodHRwczovL29wZW5ncmFwaC5naXRodWJhc3NldHMuY29tL2I4NTI3NjdhZTZiZjRmOTk3MWMyMTMxZGZmZGU2M2NkZDY3MzhhMTA0NDlhN2IwN2MxNzc4OGNjMjY0NDE0M2EvY29kZS1yZWFkeS9jcmMiLCJ0aXRsZSI6IkdpdEh1YiAtIGNvZGUtcmVhZHkvY3JjOiBSZWQgSGF0IENvZGVSZWFkeSBDb250YWluZXJzIGlzIGEgdG9vbCB0aGF0IG1hbmFnZXMgYSBsb2NhbCBPcGVuU2hpZnQgNC54IGNsdXN0ZXIgb3B0aW1pemVkIGZvciB0ZXN0aW5nIGFuZCBkZXZlbG9wbWVudCBwdXJwb3NlcyIsInN1bW1hcnkiOiJSZWQgSGF0IENvZGVSZWFkeSBDb250YWluZXJzIGlzIGEgdG9vbCB0aGF0IG1hbmFnZXMgYSBsb2NhbCBPcGVuU2hpZnQgNC54IGNsdXN0ZXIgb3B0aW1pemVkIGZvciB0ZXN0aW5nIGFuZCBkZXZlbG9wbWVudCBwdXJwb3NlcyAtIEdpdEh1YiAtIGNvZGUtcmVhZHkvY3JjOiBSZWQgSGF0IENvZGVSZWFkeSBDb250YWluZXJzIGlzIGEgdG9vbCB0aC4uLiIsInRlbXBsYXRlIjoidXNlX2RlZmF1bHRfZnJvbV9zZXR0aW5ncyJ9″]

Code Ready Containers purpose is to provide to you a minimal Openshift cluster optimized for development purposes. Their installation process is very very simple.

It works in a way similar to the previous VM and OVA distribution mode, so you will need to get some binaries to be able to set up this directly from Red Hat using the following direction: https://console.redhat.com/openshift/create/local

You will need to create an account but it is free and in a few steps you will get a big binary about 3–4 GB and your sign code to be able to run the platform and that’s it, in a few minutes you will have at your disposal a complete Openshift Platform ready for you to use.

CodeReadyContainers local installation on your laptop

You will be able to switch on and off the platform using the commands crc start and crc stop.

Console output of execution of the crc start command

As you can imagine this is only suitable for the local environment and in no way for production deployment and also it has some restrictions that can affect you such as:

  • The CodeReady Containers OpenShift cluster is ephemeral and is not intended for production use.
  • There is no supported upgrade path to newer OpenShift versions. Upgrading the OpenShift version may cause issues that are difficult to reproduce.
  • It uses a single node that behaves as both a master and worker node.
  • It disables the monitoring Operator by default. This disabled Operator causes the corresponding part of the web console to be non-functional.
  • The OpenShift instance runs in a virtual machine. This may cause other differences, particularly with external networking.

I hope you find this useful and that you can use it as part of your deployment process.

Kubernetes Advanced Topics: Init Containers

Discover how Init Containers can provide additional capabilities to your workloads in Kubernetes

Photo by Rinson Chory on Unsplash

There are a lot of new challenges that come with the new development pattern in a much more distributed and collaborative way, and how we manage the dependencies is crucial to our success.

Kubernetes and dedicated distributions have become the new standard of deployment for our cloud-native application and provide many features to manage those dependencies. But, of course, the most usual resource you will use to do that is the probes.

Kubernetes provides different kinds of probes that will let the platform know the status of your app. It will help us to tell if our application is “alive” (liveness probe), has been started (startup probe), and if it is ready to process requests (readiness probe).

Kubernetes Probes lifecycle by Andrew Lock (https://andrewlock.net/deploying-asp-net-core-applications-to-kubernetes-part-6-adding-health-checks-with-liveness-readiness-and-startup-probes/)

Kubernetes Probes are the standard way of doing so, and if you have deployed any workload to a Kubernetes cluster, you probably have used one. But there are some times that this is not enough.

That can be because the probe you would like to do is too complex or because you would like to create some startup order between your components. And in that cases, you rely on another tool: Init Containers.

The Init Containers are another kind of container in that they have their image that can have any tool that you could need to establish the different checks or probes that you would like to perform.

They have the following unique characteristics:

  • Init containers always run to completion.
  • Each init container must complete successfully before the next one starts.

Why would you use init containers?

#1 .- Manage Dependencies

The first use-case to use init containers is to define a relationship of dependencies between two components such as Deployments, and you need for one to the other to start. Imagine the following situation:

We have two components: a Web App and a Database; both are managed as containers in the platform. So if you deploy them in the usual way, both of them will try to start simultaneously, or the Kubernetes scheduler will define the order, so it could be possible the situation of the web app will try to start when the database is not available.

You could think that is not an issue because this is why you have a readiness or a liveness probe in your containers, and you are right: Pod will not be ready until the database is ready, but there are several things to note here:

  • Both probes have a limit of attempts; after that, you will enter into a CrashLoopBack scenario, and the pod will not try to start again until you manually restart it.
  • Web App pod will consume more resources than needed when you know the app will not start at all. So, in the end, you are wasting resources on the process.

So defining an init container as part of the web app deployment that checks if the database is available, maybe just including a database client to quickly see if the database and all the tables are appropriately populated, will be enough to solve both situations.

#2 .- Optimizing resources

One critical thing when you define your containers is to ensure that they have everything they need to perform their task and that they don’t have anything that is not required for that purpose.

So instead of adding more tools to check the component’s behavior, especially if this is something to manage at specific times, you can offload that to an init container and keep the main container more optimized in terms of size and resources used.

#3.- Preloading data

Sometimes you need to do some activities at the beginning of your application, and you can separate that for the usual work of your application, so you would like to avoid the kind of logic to check if the component has been initialized or not.

Using this pattern, you will have an init container managing all the initialization work and ensuring that all the initialization work has been performed when the main container is executed.

Initialization process sample (https://www.magalix.com/blog/kubernetes-patterns-the-init-container-pattern)

How to define an Init Container?

To be able to define an init container, you need to use a specific section of the specification section of your YAML file, as it is shown in the picture below:

apiVersion: v1
kind: Pod
metadata:
name: myapp-pod
labels:
app: myapp
spec:
containers:
  - name: myapp-container
image: busybox:1.28
command: ['sh', '-c', 'echo The app is running! && sleep 3600']
initContainers:
  - name: init-myservice
image: busybox:1.28
command: ['sh', '-c', "until nslookup myservice.$(cat /var/run/secrets/kubernetes.io/serviceaccount/namespace).svc.cluster.local; do echo waiting for myservice; sleep 2; done"]
  - name: init-mydb
image: busybox:1.28
command: ['sh', '-c', "until nslookup mydb.$(cat /var/run/secrets/kubernetes.io/serviceaccount/namespace).svc.cluster.local; do echo waiting for mydb; sleep 2; done"]

You can define as many Init Containers as you need. Still, you will note that all the init containers will run in sequence as described in the YAML file, and one init container can only be executed if the previous one has been completed successfully.

Summary

I hope this article will have provided you with a new way to define the management of your dependencies between workloads in Kubernetes and, at the same time, also other great use-cases where the capability of the init container can provide value to your workloads.