Discover the different options to scale your platform based on the traffic load you receive

When talking about Kubernetes, you’re always talking about the flexibility options that it provides. Usually, one of the topics that come into the discussion is the elasticity options that come with the platform — especially when working on a public cloud provider. But how can we really implement it?
Before we start to show how to scale our Kubernetes platform, we need to do a quick recap of the options that are available to us:
- Cluster Autoscaler: When the load of the whole infrastructure reaches its peak, we can improve it by creating new worker nodes to host more service instances.
- Horizontal Pod Autoscaling: When the load for a specific pod or set of pods reaches its peak, we deploy a new instance to ensure that we can have the global availability that we need.
Let’s see how we can implement these using one of the most popular Kubernetes-managed services, Amazon’s Elastic Kubernetes Services (EKS).
Setup
The first thing that we’re going to do is create a cluster with a single worker node to demonstrate the scalability behavior easily. And to do that, we’re going to use the command-line tool eksctl to manage an EKS cluster easily.
To be able to create the cluster, we’re going to do it with the following command:
eksctl create cluster --name=eks-scalability --nodes=1 --region=eu-west-2 --node-type=m5.large --version 1.17 --managed --asg-access
After a few minutes, we will have our own Kubernetes cluster with a single node to deploy applications on top of it.
Now we’re going to create a sample application to generate load. We’re going to use TIBCO BusinessWorks Application Container Edition to generate a simple application. It will be a REST API that will execute a loop of 100,000 iterations acting as a counter and return a result.
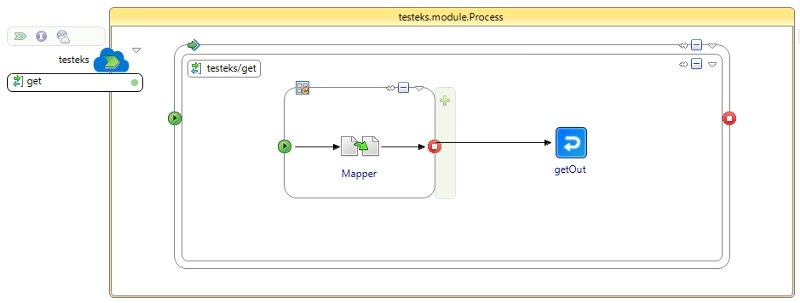
And we will use the resources available in this GitHub repository:
We will build the container image and push it to a container registry. In my case, I am going to use my Amazon ECR instance to do so, and I will use the following commands:
docker build -t testeks:1.0 .
docker tag testeks:1.0 938784100097.dkr.ecr.eu-west-2.amazonaws.com/testeks:1.0
docker push 938784100097.dkr.ecr.eu-west-2.amazonaws.com/testeks:1.0
And once that the image is pushed into the registry, we will deploy the application on top of the Kubernetes cluster using this command:
kubectl apply -f .\testeks.yaml
After that, we will have our application deployed there, as you can see in the picture below:
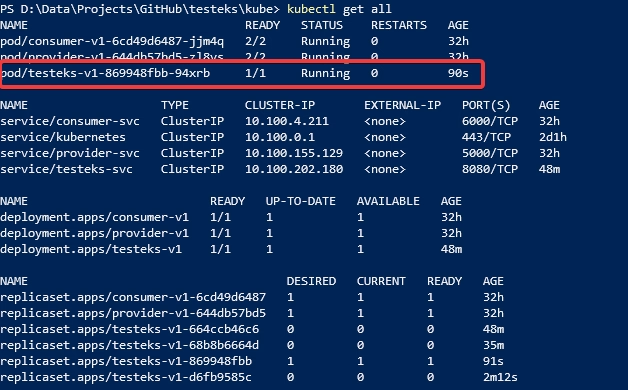
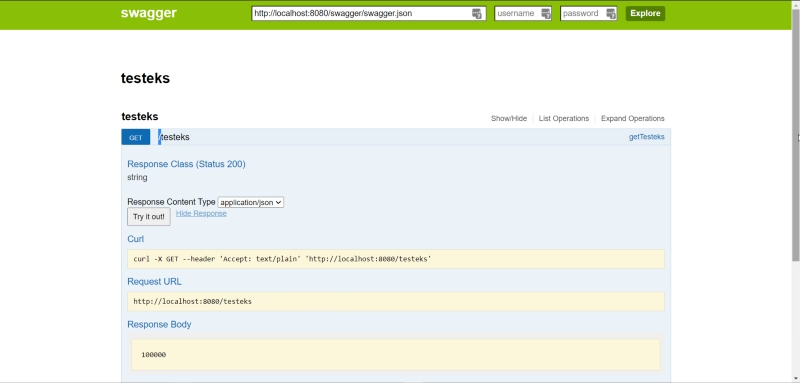
So, now we can test the application. To do so, I will make port 8080 available using a port-forward command like this one:
kubectl port-forward pod/testeks-v1-869948fbb-j5jh7 8080:8080
With that, I can see and test the sample application using the browser, as shown below:
Horizontal pod autoscaling
Now, we need to start defining the autoscale rules, and we will start with the Horizontal Pod Autoscaler (HPA) rule. We will need to choose the resource that we would like to use to scale our pod. In this test, I will use the CPU utilization to do so, and I will use the following command:
kubectl autoscale deployment testeks-v1 --min=1 --max=5 --cpu-percent=80
That command will scale the replica set testeks from one (1) instance to five (5) instances when the CPU utilization percent is higher than 80%.
If now we check the status of the components, we will get something similar to the image below:
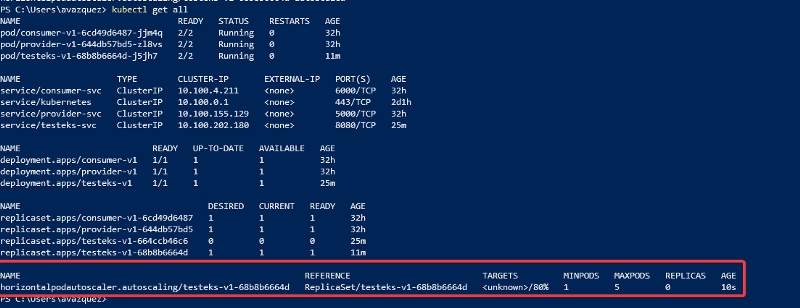
If we check the TARGETS column, we will see this value: <unknown>/80%. That means that 80% is the target to trigger the new instances and the current usage is <unknown>.
We do not have anything deployed on the cluster to get the metrics for each of the pods. To solve that, we need to deploy the Metrics Server. To do so, we will follow the Amazon AWS documentation:

So, running the following command, we will have the Metrics Server installed.
kubectl apply -f https://github.com/kubernetes-sigs/metrics-server/releases/download/v0.3.7/components.yaml
And after doing that, if we check again, we can see that the current user has replaced the <unknown>:
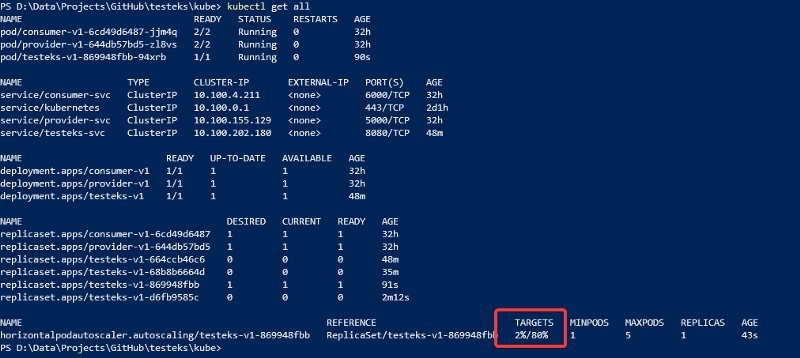
If that works, I am going to start sending requests using a Load Test inside the cluster. I will use the sample app defined below:
To deploy, we will use a YAML file with the following content:
And we will deploy it using the following command:
kubectl apply -f tester.yaml
After doing that, we will see that the current utilization is being increased. After a few seconds, it will start spinning new instances until it meets the maximum number of pods defined in the HPA rule.
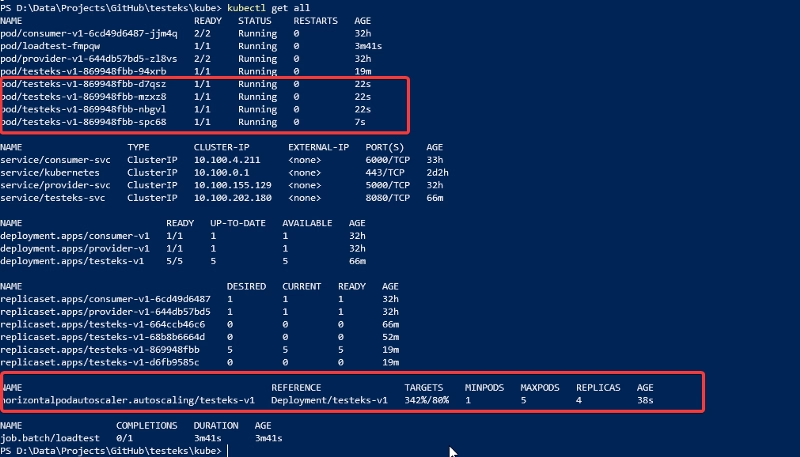
Then, as soon as the load also decreases, the number of instances will be deleted.
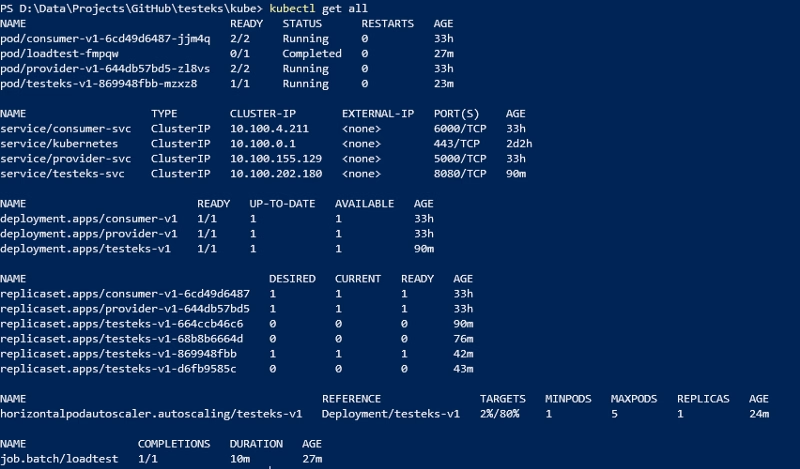
Cluster autoscaling
Now, we need to see how we can implement the Cluster Autoscaler using EKS. We will use the information that Amazon provides:
https://github.com/alexandrev/testeks
The first step is to deploy the cluster autoscaling, and we will do it using the following command:
kubectl apply -f https://raw.githubusercontent.com/kubernetes/autoscaler/master/cluster-autoscaler/cloudprovider/aws/examples/cluster-autoscaler-autodiscover.yaml
Then we will run this command:
kubectl -n kube-system annotate deployment.apps/cluster-autoscaler cluster-autoscaler.kubernetes.io/safe-to-evict=”false”
And we will edit the deployment to provide the current name of the cluster that we are managing. To do that, and we will run the following command:
kubectl -n kube-system edit deployment.apps/cluster-autoscaler
When your default text editor opens with the text content, you need to make the following changes:
- Set your cluster name in the placeholder available.
- Add these additional properties:
- --balance-similar-node-groups
- --skip-nodes-with-system-pods=false
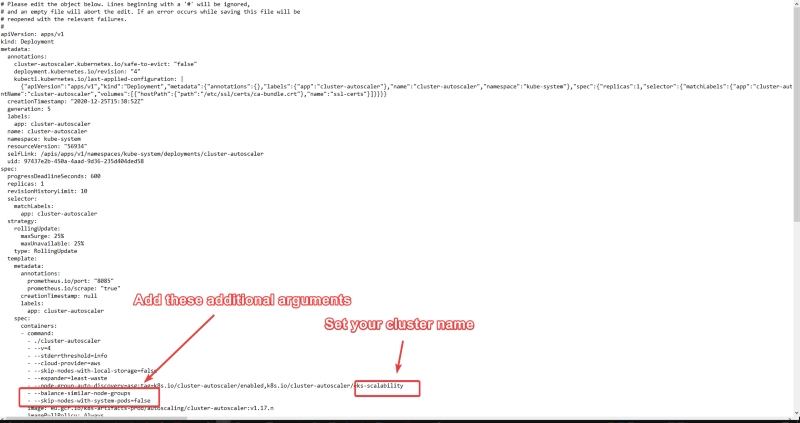
Now we need to run the following command:
kubectl -n kube-system set image deployment.apps/cluster-autoscaler cluster-autoscaler=eu.gcr.io/k8s-artifacts-prod/autoscaling/cluster-autoscaler:v1.17.4
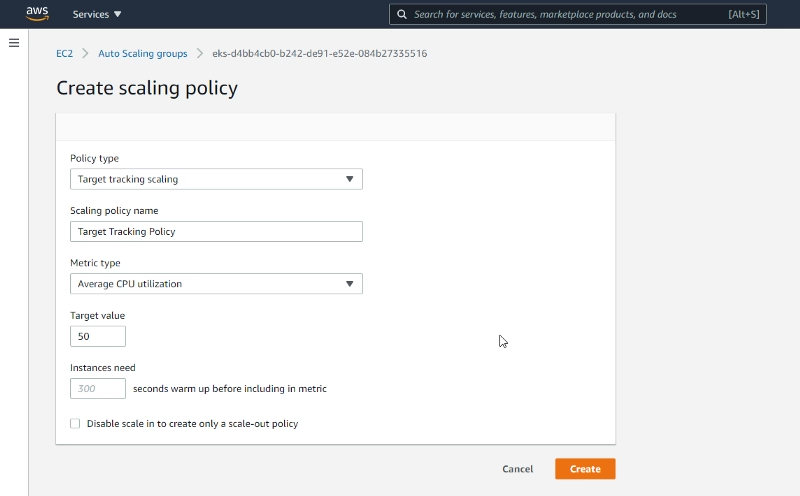
The only thing that is left is to define the AutoScaling policy. To do that, we will use the AWS Services portal:
- Enter into the EC service page on the region in which we have deployed the cluster.
- Select the Auto Scaling Group options.
- Select the Auto Scaling Group that has been created as part of the EKS cluster-creating process.
- Go to the Automatic Scaling tab and click on the Add Policy button available.
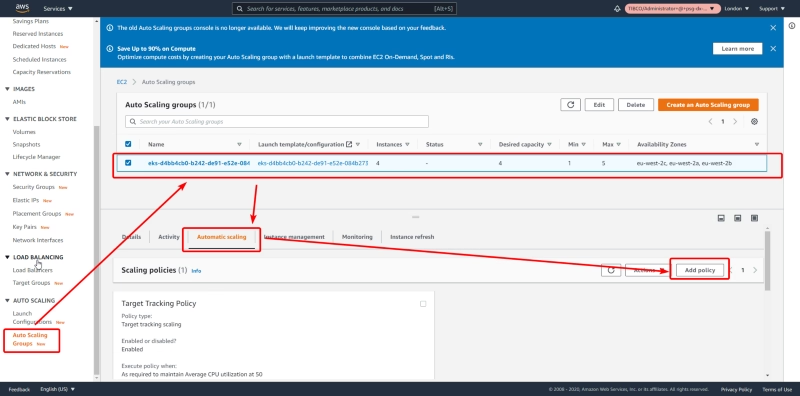
Then we should define the policy. We will use the Average CPU utilization as the metric and set the target value to 50%:
To validate the behavior, we will generate load using the tester as we did in the previous test and validate the node load using the following command:
kubectl top nodes

Now we deploy the tester again. As we already have it deployed in this cluster, we need to delete it first to deploy it again:
kubectl delete -f .\tester.yaml
kubectl apply -f .\tester.yaml
As soon as the load starts, new nodes are created, as shown in the image below:

After the load finishes, we go back to the previous situation:

Summary
In this article, we have shown how we can scale a Kubernetes cluster in a dynamic way both at the worker node level using the Cluster Autoscaler capability and at the pod level using the Horizontal Pod Autoscaler. That gives us all the options needed to create a truly elastic and flexible environment able to adapt to each moment’s needs with the most efficient approach.


