Saltar al contenido

¿Cómo analizar y mejorar el tamaño de tus imágenes de Docker?

Descubre cómo puedes mejorar el tamaño de tus imágenes de Docker para una mejor experiencia y ahorros dentro de tu organización.

Foto de Charles Deluvio en Unsplash

La contenedorización es la nueva normalidad. Todos somos conscientes de eso. Todas las nuevas versiones del software corporativo y todos los proyectos de código abierto están incluyendo las opciones para usar una imagen de Docker para ejecutar su software.

Probablemente ya hayas estado haciendo tus pruebas o incluso ejecutando cargas de trabajo en producción basadas en imágenes de Docker que has construido tú mismo. Si ese es el caso, probablemente conozcas uno de los grandes desafíos cuando realizas este tipo de tarea: ¿Cómo optimizar el tamaño de la imagen que generas?

Una de las principales razones por las que la imagen de Docker puede ser tan grande es porque se construyen siguiendo un concepto de capas. Y eso significa que cada una de las imágenes se crea como la adición de capas, cada una asociada con los diferentes comandos que tienes en tu Dockerfile.
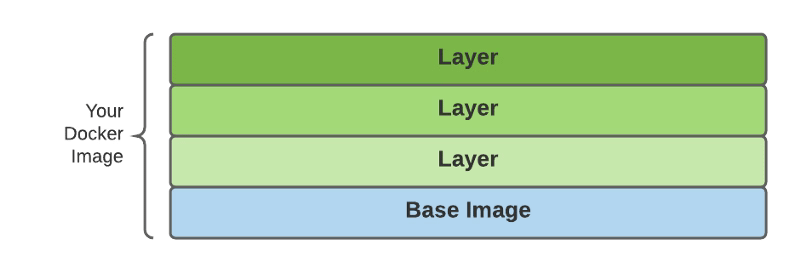
Explicación gráfica de cómo se compone una imagen de Docker.

Usa dive para analizar el tamaño de tus imágenes

dive es un proyecto de código abierto que proporciona una vista detallada de la composición de tus imágenes de Docker. Funciona como una aplicación de interfaz de línea de comandos que tiene una gran vista del contenido de las capas, como puedes ver en la imagen a continuación:
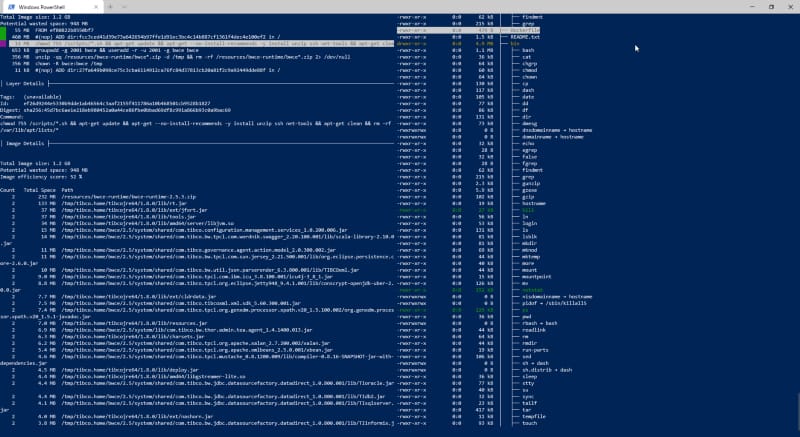
Ejecución de Dive de una imagen de BusinessWorks Container Edition 

La herramienta sigue una interfaz n-curses (si eres lo suficientemente mayor para recordar cómo eran las herramientas antes de que las interfaces gráficas de usuario fueran algo; debería parecerte familiar) y tiene estas características principales:

  • Esta herramienta proporcionará la lista de capas en la parte superior izquierda de la pantalla y el tamaño asociado con cada una de ellas.
  • Proporciona estadísticas generales sobre la eficiencia de la imagen (un valor porcentual), una vista potencial del tamaño desperdiciado y el tamaño total de la imagen.
  • Para cada una de las capas seleccionadas, obtienes una vista en el sistema de archivos para esta vista con los datos del tamaño de cada carpeta.
  • También obtén una vista de los elementos más grandes y el número de replicaciones de estos objetos.

Ahora, tienes una herramienta que te ayudará primero a saber cómo se construye tu imagen y obtener datos de rendimiento de cada uno de los ajustes que haces para mejorar ese tamaño. Así que, comencemos con los trucos.

1.- ¡Limpia tu imagen!

Este primero es bastante obvio, pero eso no significa que no sea importante. Por lo general, cuando creas una imagen de Docker, sigues el mismo patrón:

  • Declaras una imagen base para aprovechar.
  • Agregas recursos para hacer algún trabajo.
  • Haces algún trabajo.

Por lo general, olvidamos un paso adicional: ¡Limpiar los recursos agregados cuando ya no son necesarios! Por lo tanto, es importante asegurarse de eliminar cada uno de los archivos que ya no necesitamos.

Esto también se aplica a otros componentes como la caché de apt cuando estamos instalando un nuevo paquete que necesitamos o cualquier carpeta temporal que necesitemos para realizar una instalación o algún trabajo para construir la imagen.

2.- Ten cuidado con cómo creas tu Dockerfile

Como ya mencionamos, cada uno de los comandos que declaramos en nuestro Dockerfile genera una nueva capa. Por lo tanto, es importante tener mucho cuidado con las líneas que tenemos en el Dockerfile. Incluso si esto es un compromiso con respecto a la legibilidad del Dockerfile, es importante intentar fusionar comandos en la misma primitiva RUN para asegurarnos de no estar creando capas adicionales.
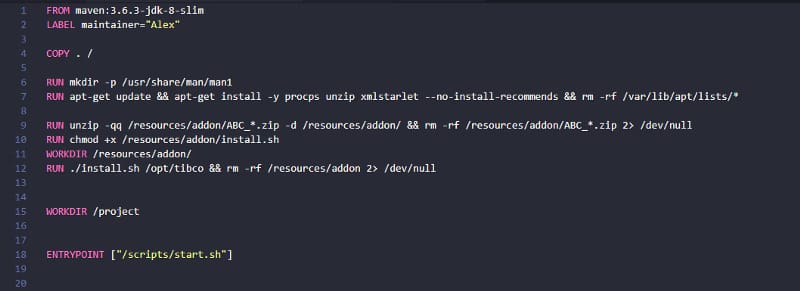
Ejemplo de un Dockerfile con comandos fusionados

También puedes usar linters de Docker como Hadolint que te ayudarán con esto y otros anti-patrones que deberías evitar cuando estás creando un Dockerfile.

3.- Opta por docker build — squash

Las últimas versiones del motor de Docker proporcionan una nueva opción cuando construyes tus imágenes para crear con el tamaño minimizado squashing de las capas intermedias que pueden ser creadas como parte del proceso de creación del Dockerfile.

Eso funciona, proporcionando una nueva bandera cuando estás haciendo la construcción de tu imagen. Así que, en lugar de hacer esto:

docker build -t <your-image-name>:<tag> <Dockerfile location>

Deberías usar una bandera adicional:

docker build --squash -t <your-image-name>:<tag> <Dockerfile location>

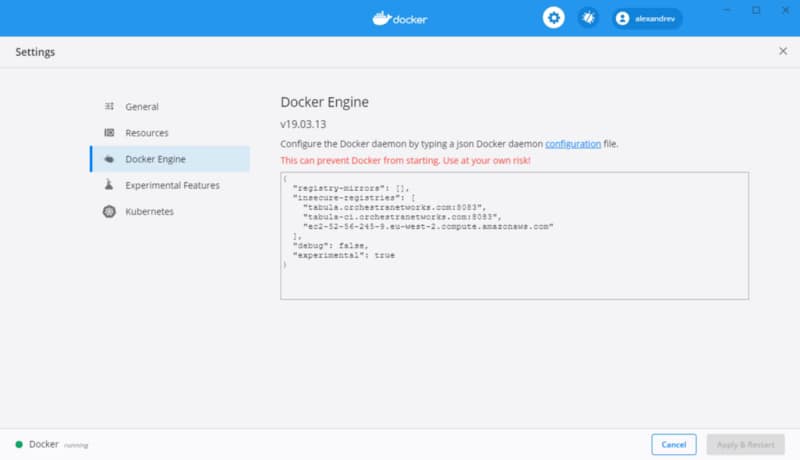
Para poder usar esta opción, debes habilitar las características experimentales en tu Docker Engine. Para hacer eso, necesitas habilitarlo en tu archivo daemon.json y reiniciar el motor. Si estás usando Docker para Windows o Docker para Mac, puedes hacerlo usando la interfaz de usuario como se muestra a continuación:
Resumen

Estos ajustes te ayudarán a hacer tus imágenes de Docker más delgadas y mucho más agradable el proceso de extraer y empujar y, al mismo tiempo, incluso ahorrar algo de dinero con respecto al almacenamiento de las imágenes en el repositorio de tu elección. Y no solo para ti, sino para muchos otros que pueden aprovechar el trabajo que estás haciendo. Así que piensa en ti mismo, pero también piensa en la comunidad.

Etiquetas:

How to analyze and improve the size of your docker images?

Find how you can improve the size of your Docker images for a better experience and savings inside your organization.

Photo by Charles Deluvio on Unsplash

Containerization is the new normal. We are all aware of that. All the new versions of the corporate software and all the open-source projects are including the options to use a docker image to run their software.

Probably you already have been doing your tests or even running in production workloads based on docker images that you have built yourself. If that is the case, you probably know one of the big challenges when you’re doing this kind of task: How to optimize the size of the image you generate?

One of the main reasons the docker image can be so big is because they are built following a layered concept. And that means that each of the images is being created as the addition of layers, each associated with the different commands you have in your Dockerfile.

Graphical explanation of how a Docker image is compounded.

Use dive to analyze the size of your images

dive is an open-source project that provides a detailed view of the composition of your docker images. It works as a command-line interface application that has a great view of the content of the layers, as you can see in the picture below:

Dive execution of a BusinessWorks Container Edition image

The tool follows an n-curses interface (if you are old enough to remember how tools were before Graphical User Interfaces was a thing; it should look familiar) and has these main features:

  • This tool will provide the list of layers in the top-left of the screen and the size associated with each of them.
  • Provides general stats about image efficiency (a percentage value), a potential view of the wasted size, and the image’s total size.
  • For each of the layers selected, you get a view on the file system for this view with the data of each folder’s size.
  • Also, get a view of the bigger elements and the number of replication of these objects.

Now, you have a tool that will help you first to know how your image is built and get performance data of each of the tweaks that you do to improve that size. So, let’s start with the tricks.

1.- Clean your image!

This first is quite obvious, but that doesn’t mean that it is not important. Usually, when you create a Docker image, you follow the same pattern:

  • You declare a base image to leverage on.
  • You add resources to do some work.
  • You do some work.

Usually, we forget an additional step: To clean the added resources when they are not needed anymore! So, it is important to be sure that we remove each of the files that we don’t need anymore.

This also applies to other components like the apt cache when we are installing a new package that we need or any temporary folder that we need to perform an installation or some work to build the image.

2.- Be careful about how you create your Dockerfile

As we already mentioned, each of the commands that we declare in our Dockerfile generates a new layer. So, it is important to be very careful with the lines that we have in the Dockerfile. Even if this is a tradeoff regarding the readability of the Dockerfile, it is important to try to merge commands in the same RUN primitive to make sure we are not creating additional layers.

Sample for a Dockerfile with merged commands

You can also use Docker linters like Hadolint that will help you with this and other anti-patterns that you should avoid when you are creating a Dockerfile.

3.- Go for docker build — squash

The latest versions of the Docker engine provide a new option when you build your images to create with the minimized size squashing of the intermediate layers that can be created as part of the Dockerfile creation process.

That works, providing a new flag when you are doing the build of your image. So, instead of doing this:

docker build -t <your-image-name>:<tag> <Dockerfile location>

You should use an additional flag:

docker build --squash -t <your-image-name>:<tag> <Dockerfile location>

To be able to use this option, you should enable the experimental features on your Docker Engine. To do that, you need to enable that in your daemon.json file and restart the engine. If you are using Docker for Windows or Docker for Mac, you can do it using the user interface as shown below:

Summary

These tweaks will help you make your Docker images thinner and much more pleasant the process of pulling and pushing and, at the same time, even saving some money regarding the storage of the images in the repository of your choice. And not only for you but for many others that can leverage the work that you are doing. So think about yourself but also think about the community.

Etiquetas: