KubeEye te apoya en la tarea de asegurar que tu clúster esté funcionando bien y asegurar que se sigan todas tus mejores prácticas.
Kubernetes se ha convertido en la nueva norma para desplegar nuestras aplicaciones y otras opciones sin servidor, por lo que la administración de estos clústeres se ha vuelto crítica para la mayoría de las empresas, y realizar una Verificación de Salud de Kubernetes adecuada se está volviendo crítico.
Esta tarea está clara que no es una tarea fácil. Como siempre, la flexibilidad y el poder que la tecnología proporciona a los usuarios (en este caso, los desarrolladores) también viene con una compensación con la complejidad de la operación y gestión. Y esto no es una excepción a eso.
Hemos evolucionado, incluyendo opciones gestionadas que simplifican toda la configuración subyacente y la gestión de bajo nivel de la infraestructura detrás de ella. Sin embargo, hay muchas cosas que deben hacerse para que la administración del clúster tenga una experiencia feliz en el viaje de un Administrador de Kubernetes.
Muchos conceptos con los que lidiar: namespaces, límites de recursos, cuotas, ingreso, servicios, rutas, crd… Cualquier ayuda que podamos obtener es bienvenida. Y con este propósito en mente, KubeEye ha nacido.
KubeEye es un proyecto de código abierto que ayuda a identificar algunos problemas en nuestros Clústeres de Kubernetes. Usando las palabras de sus creadores:
KubeEye tiene como objetivo encontrar varios problemas en Kubernetes, como la mala configuración de aplicaciones (usando Polaris), componentes de clúster no saludables y problemas de nodos (usando Node-Problem-Detector). Además de las reglas predefinidas, también admite reglas definidas por el usuario.
Así que podemos pensar en él como un compañero que está revisando el entorno para asegurarse de que todo esté bien configurado y saludable. Además, nos permite definir reglas personalizadas para asegurarnos de que todas las acciones que los diferentes equipos de desarrollo están realizando estén de acuerdo con los estándares predefinidos y las mejores prácticas.
Así que veamos cómo podemos incluir KubeEye para hacer una verificación de salud de nuestro entorno. Lo primero que necesitamos hacer es instalarlo. En este momento, KubeEye solo ofrece una versión para sistemas basados en Linux, por lo que si estás usando otros sistemas como yo, necesitas seguir otro enfoque y escribir los siguientes comandos:
git clone https://github.com/kubesphere/kubeeye.git
cd kubeeye
make install
Después de hacer eso, terminamos con un nuevo binario en nuestro PATH llamado `ke`, y este es el único componente necesario para trabajar con la aplicación. El segundo paso que necesitamos hacer para obtener más detalles sobre esos diagnósticos es instalar el componente detector de problemas de nodos.
Este componente es un componente instalado en cada nodo del clúster. Ayuda a hacer más visibles para las capas superiores los problemas relacionados con el comportamiento del clúster de Kubernetes. Este es un paso opcional, pero proporcionará datos más significativos, y para instalarlo, necesitamos ejecutar el siguiente comando.
ke install npd
Y ahora estamos listos para comenzar a verificar nuestro entorno, y el orden es tan fácil como este.
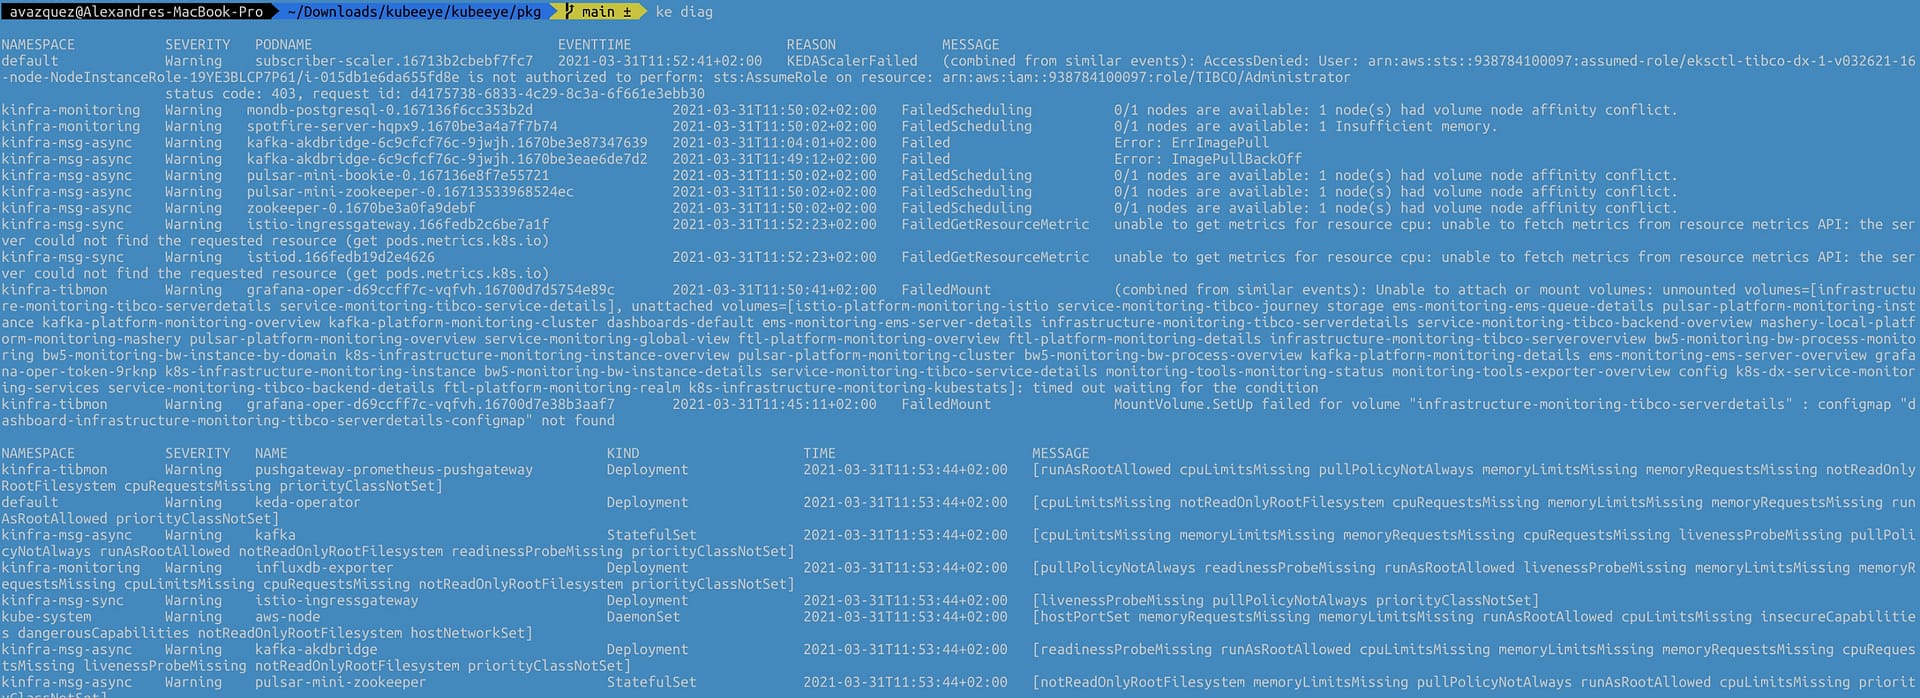
ke diag
Esto proporcionará una salida similar a esta que se compone de dos tablas diferentes. La primera se centrará en el Pod y los problemas y eventos planteados como parte del estado de la plataforma, y la otra se centrará en el resto de los elementos y tipos de objetos para los Clústeres de Kubernetes.

La tabla para los problemas a nivel de pod tiene los siguientes campos:
- Namespace al que pertenece el pod.
- Severidad del problema.
- Nombre del Pod que es responsable del problema
- Hora del Evento en la que se ha planteado este evento
- Razón del problema
- Mensaje con la descripción detallada del problema
La segunda tabla para los otros objetos tiene la siguiente estructura:
- Namespace donde se despliega el objeto que tiene un problema que está siendo detectado.
- Severidad del problema.
- Nombre del componente
- Tipo del componente
- Hora en la que se ha planteado este problema
- Mensaje con la descripción detallada del problema
La salida del comando también puede mostrar otras tablas si se detectan algunos problemas a nivel de nodo.
Hoy cubrimos un tema fascinante como es la Administración de Kubernetes e introducimos una nueva herramienta que ayuda en tu tarea diaria.
¡Realmente espero que esta herramienta pueda ser añadida a tu caja de herramientas y facilite el camino para una administración feliz y saludable del Clúster de Kubernetes!
📚 Want to dive deeper into Kubernetes? This article is part of our comprehensive Kubernetes Architecture Patterns guide, where you’ll find all fundamental and advanced concepts explained step by step.

