- ¿Qué es un patrón de Dockerfile de múltiples etapas?
- ¿Por qué el patrón de construcción de múltiples etapas ayuda a reducir el tamaño de las imágenes de contenedores?
- ¿Cómo defines un Dockerfile de múltiples etapas?
- ¿Cómo copias recursos de una etapa a otra?
- ¿Cuál es la mejora que puedes obtener?
- ¿Dónde puedo leer más sobre esto?
El Dockerfile de múltiples etapas es el patrón que puedes usar para asegurar que tu imagen de Docker esté en un tamaño optimizado. Ya hemos cubierto la importancia de mantener el tamaño de tu imagen de Docker al mínimo y qué herramientas podrías usar, como dive, para entender el tamaño de cada una de tus capas. Pero hoy, vamos a seguir un enfoque diferente y ese enfoque es una construcción de múltiples etapas para nuestros contenedores Docker.
¿Qué es un patrón de Dockerfile de múltiples etapas?
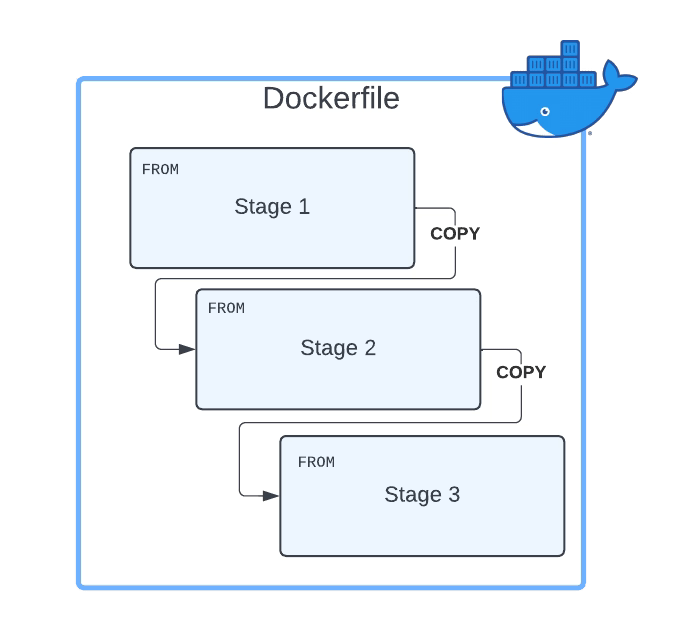
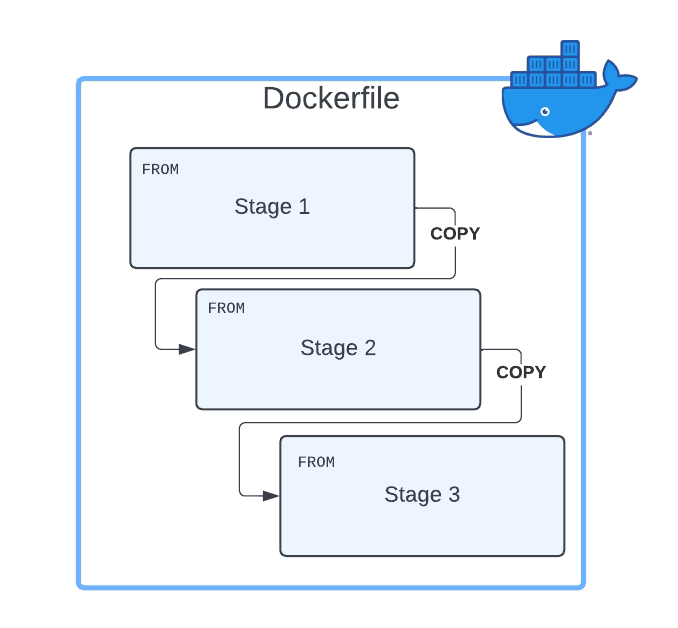
El Dockerfile de múltiples etapas se basa en el principio de que el mismo Dockerfile puede tener diferentes sentencias FROM y cada una de las sentencias FROM inicia una nueva etapa de la construcción.

¿Por qué el patrón de construcción de múltiples etapas ayuda a reducir el tamaño de las imágenes de contenedores?
La razón principal por la que el uso de patrones de construcción de múltiples etapas ayuda a reducir el tamaño de los contenedores es que puedes copiar cualquier artefacto o conjunto de artefactos de una etapa a otra. Y esa es la razón más importante. ¿Por qué? Porque eso significa que todo lo que no copias es descartado y no estás llevando todos estos componentes no requeridos de capa en capa, generando un tamaño innecesario mayor de la imagen final de Docker.
¿Cómo defines un Dockerfile de múltiples etapas?
Primero, necesitas tener un Dockerfile con más de un FROM. Como se comentó, cada uno de los FROM indicará el inicio de una etapa del Dockerfile de múltiples etapas. Para diferenciarlos o referenciarlos, puedes nombrar cada una de las etapas del Dockerfile usando la cláusula AS junto al comando FROM, como se muestra a continuación:
FROM eclipse-temurin:11-jre-alpine AS builder
Como una buena práctica, también puedes agregar una nueva etiqueta de etapa con el mismo nombre que proporcionaste antes, pero eso no es necesario. Así que, en resumen, un Dockerfile de múltiples etapas será algo como esto:
FROM eclipse-temurin:11-jre-alpine AS builder
LABEL stage=builder
COPY . /
RUN apk add  --no-cache unzip zip && zip -qq -d /resources/bwce-runtime/bwce-runtime-2.7.2.zip "tibco.home/tibcojre64/*"
RUN unzip -qq /resources/bwce-runtime/bwce*.zip -d /tmp && rm -rf /resources/bwce-runtime/bwce*.zip 2> /dev/null


FROM  eclipse-temurin:11-jre-alpine
RUN addgroup -S bwcegroup && adduser -S bwce -G bwcegroup
¿Cómo copias recursos de una etapa a otra?
Esta es la otra parte importante aquí. Una vez que hemos definido todas las etapas que necesitamos, y cada una está haciendo su parte del trabajo, necesitamos mover datos de una etapa a la siguiente. Entonces, ¿cómo podemos hacer eso?
La respuesta es usando el comando COPY. COPY es el mismo comando que usas para mover datos desde tu almacenamiento local a la imagen del contenedor, por lo que necesitarás una forma de diferenciar que esta vez no lo estás copiando desde tu almacenamiento local sino desde otra etapa, y aquí es donde vamos a usar el argumento --from. El valor será el nombre de la etapa que aprendimos a declarar en la sección anterior. Así que un comando COPY completo será algo como el fragmento mostrado a continuación:
COPY --from=builder /resources/ /resources/
¿Cuál es la mejora que puedes obtener?
Esa es la parte esencial y dependerá de cómo se crean tus Dockerfiles e imágenes, pero el factor principal que puedes considerar es el número de capas que tiene tu imagen actual. Cuanto mayor sea el número de capas, más significativo será el ahorro que probablemente puedas lograr en la cantidad de la imagen final del contenedor en un Dockerfile de múltiples etapas.
La razón principal es que cada capa duplicará parte de los datos, y estoy seguro de que no necesitarás todos los datos de la capa en la siguiente. Y usando el enfoque comentado en este artículo, obtendrás una forma de optimizarlo.
¿Dónde puedo leer más sobre esto?
Si quieres leer más, debes saber que el Dockerfile de múltiples etapas está documentado como una de las mejores prácticas en la página web oficial de Docker, y tienen un gran artículo sobre esto por Alex Ellis que puedes leer aquí.
📚 Want to dive deeper into Kubernetes? This article is part of our comprehensive Kubernetes Architecture Patterns guide, where you’ll find all fundamental and advanced concepts explained step by step.

