Saltar al contenido

Configuración de TIBCO BW Hashicorp Vault: Más Potente y Mejor Protegida en 3 Pasos

Introducción

Este artículo tiene como objetivo mostrar la Configuración de TIBCO BW Hashicorp Vault para integrar su aplicación TIBCO BW con los secretos almacenados en Hashicorp Vault, principalmente para la externalización y gestión de recursos de contraseñas y credenciales.

Como probablemente sepa, en la aplicación TIBCO BW, la configuración se almacena en Propiedades a diferentes niveles (propiedades de Módulo o Aplicación). Puede leer más sobre ellas aquí. Y el propósito principal de esas propiedades es proporcionar flexibilidad a la configuración de la aplicación.

Estas propiedades pueden ser de diferentes tipos, como String, Integer, Long, Double, Boolean y DateTime, entre otros recursos técnicos dentro de TIBCO BW, como se muestra en la imagen a continuación:
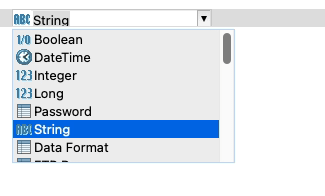
Configuración de TIBCO BW Hashicorp Vault: Tipos de Propiedades BW

La integración de TIBCO BW Hashicorp Vault afectará solo a aquellas propiedades de tipo Contraseña (al menos hasta la versión 2.7.2/6.8.1 de BW). La razón detrás de esto es que esas propiedades son el tipo de datos relevantes para la información que es sensible y necesita ser segura. Otros conceptos pueden ser gestionados a través de componentes estándar de Kubernetes como ConfigMaps.

Definición de la Aplicación BW

Vamos a comenzar con una aplicación sencilla, como puede ver en la imagen a continuación:
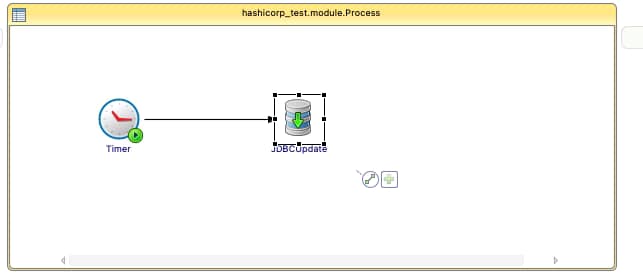
Configuración de TIBCO BW Hashicorp Vault: Ejemplo de Propiedad

Solo un temporizador simple que se ejecutará una vez e insertará la hora actual en la base de datos PostgreSQL. Usaremos Hashicorp Vault para almacenar la contraseña del usuario de la base de datos para poder conectarnos a ella. El nombre de usuario y la cadena de conexión residirán en un ConfigMap.

Omitiremos la parte de la configuración relacionada con el despliegue de los Contenedores de la aplicación TIBCO BW y enlazaremos a un ConfigMap. Tiene un artículo que cubre eso en detalle en caso de que necesite seguirlo, y nos centraremos solo en el tema relacionado con la integración de TIBCO BW Hashicorp Vault.

Así que necesitaremos decirle a TIBCO BW que la contraseña del Recurso Compartido JDBC estará vinculada a la configuración de Hashicorp Vault, y para hacer eso, lo primero es haber vinculado la Contraseña de los Recursos Compartidos a una Propiedad de Módulo como se muestra en la imagen a continuación:
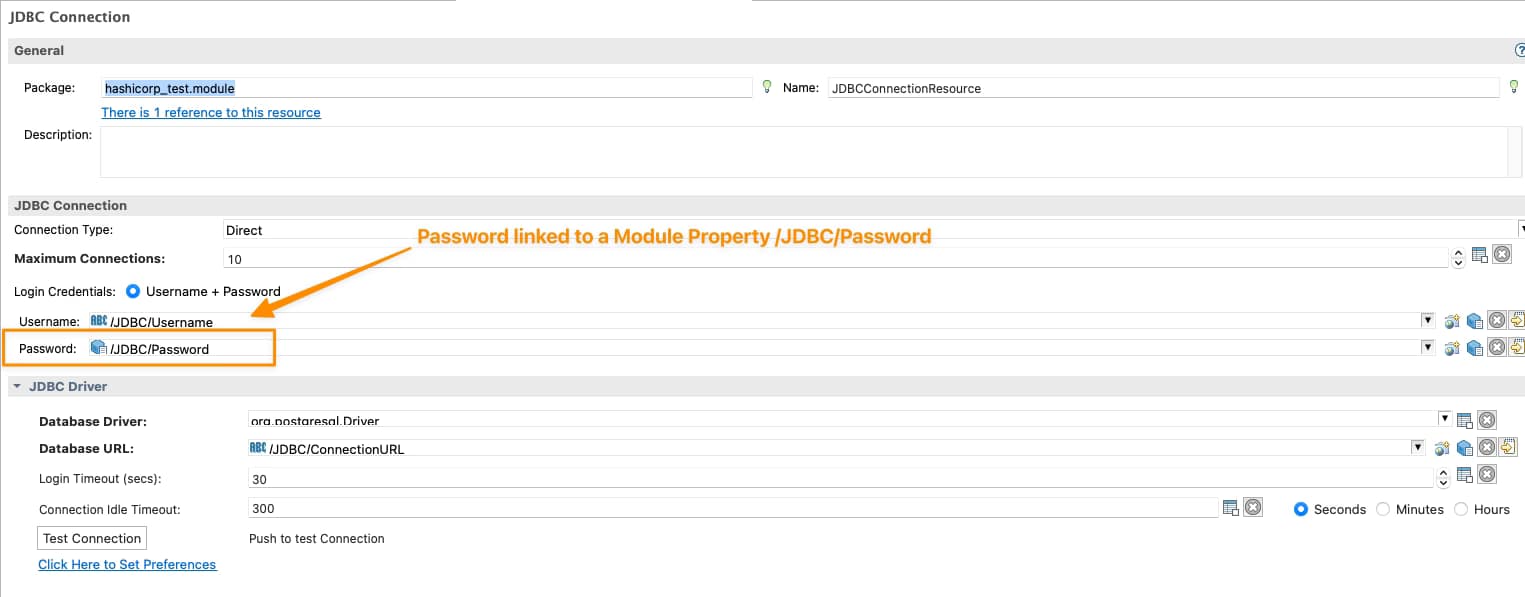
Configuración de TIBCO BW Hashicorp Vault: Contraseña vinculada a Propiedad de Módulo

Ahora, necesitamos decirle a esta Propiedad de Módulo que está vinculada a Hashicorp Vault, y lo haremos en la Vista de Propiedades de la Aplicación, seleccionando que esta propiedad está vinculada a una Solución de Gestión de Credenciales como se muestra en la imagen a continuación:

Configuración de TIBCO BW Hashicorp Vault: Configuración de Gestión de Credenciales para Propiedad

Y es ahora cuando establecemos la relación de TIBCO BW Hashicorp Vault. Necesitamos hacer clic directamente en el signo más verde, y tendremos una ventana modal que nos pedirá la tecnología de gestión de credenciales que vamos a usar y los datos necesarios para cada una de ellas, como puede ver en la siguiente imagen:
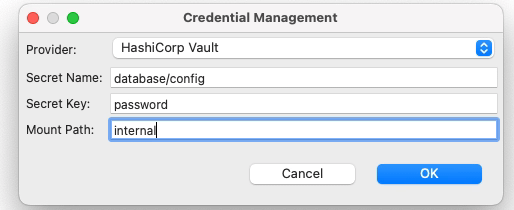
Configuración de TIBCO BW Hashicorp Vault: Configuración de Gestión de Credenciales para Propiedad

Seleccionaremos Hashicorp Vault como el proveedor. Luego necesitaremos proporcionar tres atributos que ya comentamos en el artículo anterior cuando comenzamos a crear secretos en Hashicorp Vault:

  • Nombre del Secreto: este es el nombre del secreto después de la ruta raíz del elemento.
  • Clave del Secreto: Esta es la clave dentro del propio secreto
  • Ruta de Montaje: Esta es la ruta raíz del secreto

Para obtener más detalles sobre estos tres conceptos, por favor, consulte nuestro artículo sobre cómo crear secretos en Hashicorp Vault.

Así que con todo esto, tenemos prácticamente todo lo que necesitamos para conectarnos a Hashicorp Vault y obtener el secreto, y desde el lado de TIBCO BW BusinessStudio, todo está hecho; podemos generar el archivo EAR y desplegarlo en Kubernetes porque aquí está la última parte de nuestra configuración.

 Despliegue en Kubernetes

Hasta este momento, ya hemos proporcionado la siguiente información:

  • Proceso BW que tiene el inicio de sesión para conectarse a la Base de Datos e insertar información
  • Enlace entre la propiedad de contraseña utilizada para conectar y la definición del Secreto de Hashicorp

Así que, prácticamente todo está ahí, pero falta un concepto. ¿Cómo se conectará el Pod de Kubernetes a Hashicorp una vez que el pod esté desplegado? Hasta este punto, no proporcionamos la ubicación del servidor de Hashicorp Vault del método de autenticación para conectarse a él. Esta es la parte que falta de la integración de TIBCO BW Hashicorp Vault y será parte del archivo YAML de Despliegue de Kubernetes.

Lo haremos usando las siguientes propiedades de entorno en este ejemplo:

Configuración de TIBCO BW Hashicorp Vault: Variables de Entorno de Hashicorp
  • HASHICORP_VAULT_ADDR: Esta variable apuntará a donde se encuentra el servidor de Hashicorp Vault
  • HASHICORP_VAULT_AUTH: Esta variable indicará qué opciones de autenticación se utilizarán. En nuestro caso, usaremos la de token como usamos en el artículo anterior
  • HASHICORP_VAULT_KV_VERSION: Esta variable indica qué versión de la solución de almacenamiento KV estamos usando y será dos por defecto.
  • HASHICORP_VAULT_TOKEN: Este será solo el valor del token para poder autenticarse contra el servidor de Hashicorp Vault

Si está utilizando otros métodos de autenticación o simplemente quiere saber más sobre esas propiedades, por favor, eche un vistazo a esta documentación de TIBCO.

Con todo eso agregado a las propiedades de entorno de nuestra aplicación TIBCO BW, podemos ejecutarla, y obtendremos una salida similar a esta, que muestra que la integración de TIBCO BW Hashicorp Vault se ha realizado y la aplicación pudo iniciarse sin ningún problema

Configuración de TIBCO BW Hashicorp Vault: Ejecución de ejemplo
Etiquetas:

TIBCO BW Hashicorp Vault Configuration: More Powerful and Better Secured in 3 Steps

Introduction

This article aims to show the TIBCO BW Hashicorp Vault Configuration to integrate your TIBCO BW application with the secrets stored in Hashicorp Vault, mainly for the externalization and management of password and credentials resources.

As you probably know, in the TIBCO BW application, the configuration is stored in Properties at different levels (Module or Application properties). You can read more about them here. And the primary purpose of that properties is to provide flexibility to the application configuration.

These properties can be of different types, such as String, Integer, Long, Double, Boolean, and DateTime, among other technical resources inside TIBCO BW, as shown in the picture below:

TIBCO BW Hashicorp Vault Configuration: BW Property Types

The TIBCO BW Hashicorp Vault integration will affect only those properties of Password type (at least up to 2.7.2/6.8.1 BW version). The reason behind that is that those properties are the kind of data relevant to the information that is sensitive and needs to be secure. Other concepts can be managed through standard Kubernetes components such as ConfigMaps.

BW Application Definition

We are going to start with a straightforward application, as you can see in the picture below:

TIBCO BW Hashicorp Vault Configuration: Property sample

Just a simple timer that will be executed once and insert the current time into the PostgreSQL database. We will use Hashicorp Vault to store the password of the database user to be able to connect to it. The username and the connection string will reside on a ConfigMap.

We will skip the part of the configuration regarding the deployment of the TIBCO BW application Containers and link to a ConfigMap you have an article covering that in detail in case you need to follow it, and we will focus just on the topic regarding TIBCO BW Hashicorp Vault integration.

So we will need to tell TIBCO BW that the password of the JDBC Shared Resource will be linked to Hashicorp Vault configuration, and to do that, the first thing is to have tied the Password of the Shared Resources to a Module Property as shown in the picture below:

TIBCO BW Hashicorp Vault Configuration: Password linked to Module Property

Now, we need to tell this Module Property that is Linked to Hashicorp Vault, and we will do that on the Application Property View, selecting that this property is linked to a Credential Management Solution as shown in the picture below:

TIBCO BW Hashicorp Vault Configuration: Credential Management Configuration for Property

And it is now when we establish the TIBCO BW Hashicorp Vault relationship. We need to click directly on the green plus sign, and we will have a modal window asking for the technology of credentials management that we’re going to use and the data needed for each of them, as you can see in the following picture:

TIBCO BW Hashicorp Vault Configuration: Credential Management Configuration for Property

We will select Hashicorp Vault as the provided. Then we will need to provide three attributes that we already commented on in the previous article when we start creating secrets in Hashicorp Vault:

  • Secret Name: this is the secret name path after the root path of the element.
  • Secret Key: This is the key inside the secret itself
  • Mount Path: This is the root path of the secret

To get more details about these three concepts, please look at our article about how to create secrets in Hashicorp Vault.

So with all this, we have pretty much everything we need to connect to Hashicorp Vault and grab the secret, and from the TIBCO BW BusinessStudio side, everything is done; we can generate the EAR file and deploy it into Kubernetes because here it is the last part of our configuration.

 Kubernetes Deployment

Until this moment, we have the following information already provided:

  • BW Process that has the login to connect to the Database and insert information
  • Link between the password property used to connect and the Hashicorp Secret definition

So, pretty much everything is there, but one concept is missing. How will the Kubernetes Pod connect to Hashicorp once the pod is deployed? Until this point, we didn’t provide the Hashicorp Vault server location of the authentication method to connect to it. This is the missing part of the TIBCO BW Hashicorp Vault integration and will be part of the Kubernetes Deployment YAML file.

We will do that using the following environment properties in this sample:

TIBCO BW Hashicorp Vault Configuration: Hashicorp Environment Variables
  • HASHICORP_VAULT_ADDR: This variable will point to where the Hashicorp Vault server is located
  • HASHICORP_VAULT_AUTH: This variable will indicate which authentication options will be used. In our case, we will use the token one as we used in the previous article
  • HASHICORP_VAULT_KV_VERSION: This variable indicates which version of the KV storage solution we are using and will be two by default.
  • HASHICORP_VAULT_TOKEN: This will be just the token value to be able to authentication against the Hashicorp Vault server

If you are using other authentication methods or just want to know more about those properties please take a look at this documentation from TIBCO.

With all that added to the environment properties of our TIBCO BW application, we can run it, and we will get an output similar to this one, and that shows that the TIBCO BW Hashicorp Vault integration has been done and the application was able to start without any issue

TIBCO BW Hashicorp Vault Configuration: Running sample

Deja una respuesta

Tu dirección de correo electrónico no será publicada. Los campos obligatorios están marcados con *