Security is the most relevant topic in modern architecture. It needs to be handled from all different perspectives. Having a single team auditing the platforms and the developments that we built is not enough.
The introduction of DevSecOps as the new normal, including the security teams and policies being part of the development process to avoid security becoming a blocker of innovation and make sure that the artifacts we deploy are secured, have made this clear.
Docker image scanning is one of the most important topics we can cover regarding the container images to know that all the internal components that are part of the image are safe from vulnerabilities. We usually rely on some systems to do so.
I wrote an article regarding the usage of one of the most relevant options (Harbor) from the open source world to do this job.
And this is also being done by different Docker repositories from cloud providers like Amazon ECR as of this year. But why do we need to wait until we push the images to an external Docker registry? Why can’t we do it in our local environment?
Now we can. Version 2.5.0.1 of the Docker engine also includes the Snyk components needed to inspect the Docker images directly from the command line:
So, let’s start. Let’s open a new terminal and type the following command:
docker scan <image-name>
As soon as we type this, the command will tell us that this scanning process will use Snyk to do that and we need to authorize access to those services to do the scanning process.
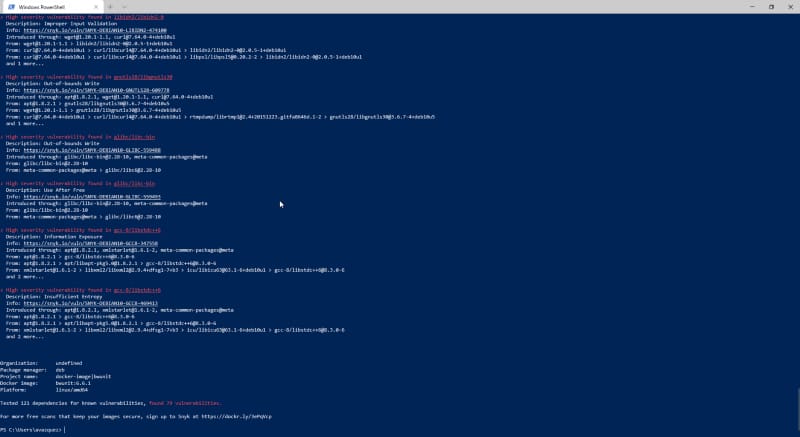
After that, we get a list of all the vulnerabilities detected, as you can see in the picture below:
Vulnerability scanning using your local Docker client
For each of the vulnerabilities, you can see the following data:
Detailed information provided for each of the vulnerabilities detected
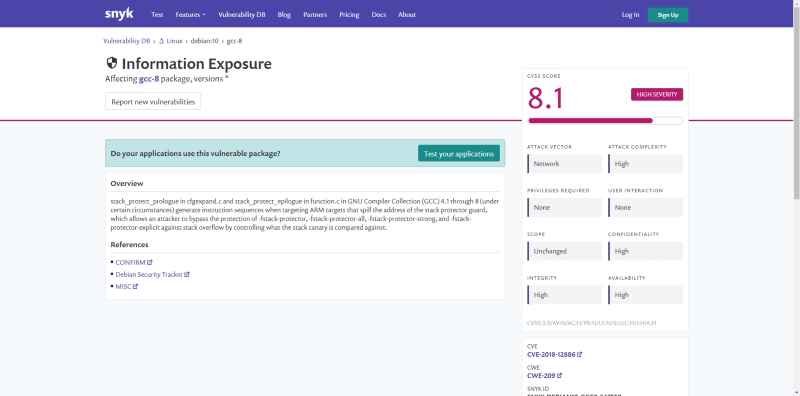
We get the library with the vulnerability, the severity level, and a short description of it. If you need more details, you can also check the provided URL that is linked to a description page for that vulnerability:
Vulnerability detailed page from snyk
Finally, it also provides the sources introducing this library in your image so this can be solved quickly.
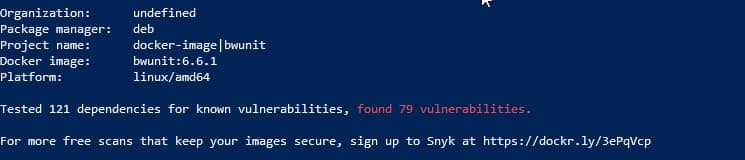
It provides a high-level view of the whole image too, as you can see here:
Overview of your Docker images with all the vulnerabilities detected
So, now you don’t have any excuse to not have all your images safe and secure before pushing to your local repository. Let’s do it!
Containerization is the new normal. We are all aware of that. All the new versions of the corporate software and all the open-source projects are including the options to use a docker image to run their software.
Probably you already have been doing your tests or even running in production workloads based on docker images that you have built yourself. If that is the case, you probably know one of the big challenges when you’re doing this kind of task: How to optimize the size of the image you generate?
One of the main reasons the docker image can be so big is because they are built following a layered concept. And that means that each of the images is being created as the addition of layers, each associated with the different commands you have in your Dockerfile.
Graphical explanation of how a Docker image is compounded.
Use dive to analyze the size of your images
dive is an open-source project that provides a detailed view of the composition of your docker images. It works as a command-line interface application that has a great view of the content of the layers, as you can see in the picture below:
Dive execution of a BusinessWorks Container Edition image
The tool follows an n-curses interface (if you are old enough to remember how tools were before Graphical User Interfaces was a thing; it should look familiar) and has these main features:
This tool will provide the list of layers in the top-left of the screen and the size associated with each of them.
Provides general stats about image efficiency (a percentage value), a potential view of the wasted size, and the image’s total size.
For each of the layers selected, you get a view on the file system for this view with the data of each folder’s size.
Also, get a view of the bigger elements and the number of replication of these objects.
Now, you have a tool that will help you first to know how your image is built and get performance data of each of the tweaks that you do to improve that size. So, let’s start with the tricks.
1.- Clean your image!
This first is quite obvious, but that doesn’t mean that it is not important. Usually, when you create a Docker image, you follow the same pattern:
You declare a base image to leverage on.
You add resources to do some work.
You do some work.
Usually, we forget an additional step: To clean the added resources when they are not needed anymore! So, it is important to be sure that we remove each of the files that we don’t need anymore.
This also applies to other components like the apt cache when we are installing a new package that we need or any temporary folder that we need to perform an installation or some work to build the image.
2.- Be careful about how you create your Dockerfile
As we already mentioned, each of the commands that we declare in our Dockerfile generates a new layer. So, it is important to be very careful with the lines that we have in the Dockerfile. Even if this is a tradeoff regarding the readability of the Dockerfile, it is important to try to merge commands in the same RUN primitive to make sure we are not creating additional layers.
Sample for a Dockerfile with merged commands
You can also use Docker linters like Hadolint that will help you with this and other anti-patterns that you should avoid when you are creating a Dockerfile.
3.- Go for docker build — squash
The latest versions of the Docker engine provide a new option when you build your images to create with the minimized size squashing of the intermediate layers that can be created as part of the Dockerfile creation process.
That works, providing a new flag when you are doing the build of your image. So, instead of doing this:
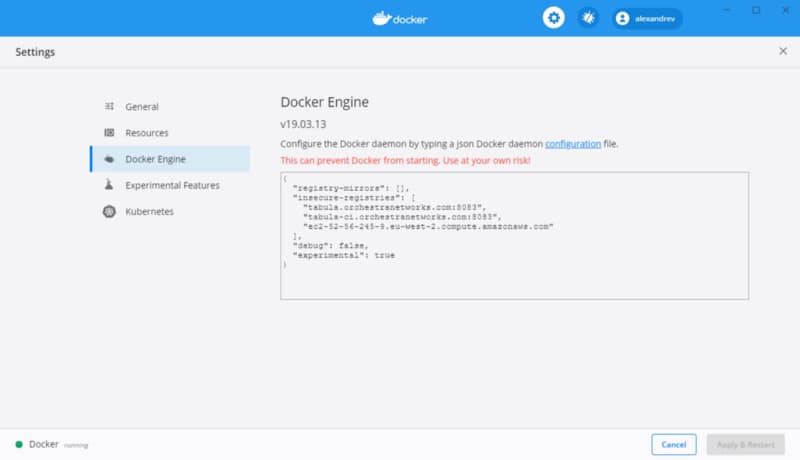
To be able to use this option, you should enable the experimental features on your Docker Engine. To do that, you need to enable that in your daemon.json file and restart the engine. If you are using Docker for Windows or Docker for Mac, you can do it using the user interface as shown below:
Summary
These tweaks will help you make your Docker images thinner and much more pleasant the process of pulling and pushing and, at the same time, even saving some money regarding the storage of the images in the repository of your choice. And not only for you but for many others that can leverage the work that you are doing. So think about yourself but also think about the community.
In the previous post of these series regarding how to set up a Hybrid EKS cluster making use of both traditional EC2 machines but also serverless options using Fargate, we were able to create the EKS cluster with both deployment fashion available. If you didn’t take a look at it yet, do it now!
At that point, we have an empty cluster with everything ready to deploy new workloads, but we still need to configure a few things before doing the deployment. First thing is to decide which workloads are going to be deployed using the serverless option and which ones will use the traditional EC2 option.
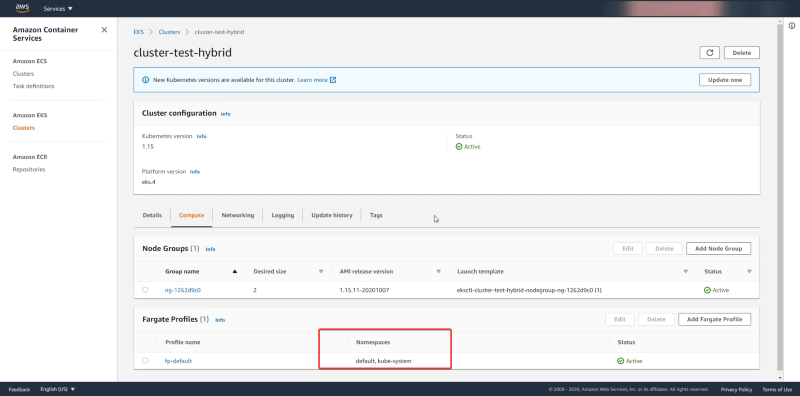
By default, all the workloads deployed on the namespaces default and kube-system as you can see in the picture below form the AWS Console:
So that means that all workloads from the default namespace and the kube-system namespace will be deployed in a serverless fashion. If that’s what you’d like perfect. But sometimes you’d like to start with a delimited set of namespaces where you’d like to use the serverless option and rely on the traditional deployment.
We can check that same information using eksctl and to do that we need to type the following command:
eksctl get fargateprofile --cluster cluster-test-hybrid -o yaml
The output of that command should be something similar of the information that we can see in the AWS Console:
NOTE: If you don’t remember the name of your cluster you just need to type the command eksctl get clusters
So, this is what we’re going to do and to do that the first thing we need to do is to create a new namespace named “serverless” that is going to hold our serverless deployment and to do that we use a kubectl command as follows:
kubectl create namespace serverless
And now, we just need to create a new fargate profile that is going to replace the one that we have at the moment and to do that we need to make use again of eksctl to handle that job:
NOTE: We also can use not only namespace to limit the scope of our serverless deployment but also tags, so we can have in the same namespace workloads that are deployed using traditional deployment and others using serverless fashion. That will give us all the posibilities to design your cluster as you wish. To do that we will append the argument labels in a key=value fashion.
And we will get an output similar to this:
[ℹ] creating Fargate profile “fp-serverless-profile” on EKS cluster “cluster-test-hybrid”
[ℹ] created Fargate profile “fp-serverless-profile” on EKS cluster “cluster-test-hybrid”
If now we check the number of profiles that we have available we should get two profiles handling three namespaces (the ones that are managed by the default profile — default and kube-system — and the one — serverless — handled by the one we just created now)
We just will use the following command to delete the default profile:
And the output of that command should be similar to this one:
[ℹ] deleted Fargate profile “fp-default” on EKS cluster “cluster-test-hybrid”
And after that, we have now ready our cluster with limited scope for serverless deployments. In the next post of the series, we will just deploy workloads on both fashions to see the difference between them. So, don’t miss the updates regarding this series making sure that you follow my posts, and if you’d like the article, or you have some doubts or comments, please leave your feedback using the comments below!
We know that there are several movements and paradigms that are pushing us hard to change our architectures trying to leverage much more managed services and taking care of the operational level so we can focus on what’s really important for our own business: creating applications and deliver value through them.
AWS from Amazon has been a critical partner during that journey, especially in the container world. With the release of EKS some time ago were able to provide a managed Kubernetes service that everyone can use, but also introducing the CaaS solution Fargate also gives us the power to run a container workload in a serverless fashion, without needing to worry about anything else.
But you could be thinking about if those services can work together. And the short answer is yes. But even more important than that we’re seeing that also they can work in a mixed mode:
So you can have an EKS cluster that has some nodes that are Fargate services and some nodes that are normal EC2 machines for workloads that are working in a state-full fashion or fits better in a traditional EC2 approach. And everything works by the same rules and is managed by the same EKS Cluster.
So, that sounds amazing but, How we can do that? Let’s see.
eksctl
To get to that point there is a tool that we need to introduce first, and that tool is named eksctl and it is a command-line utility that helps us to do any action to interact with the EKS service and simplifies a lot the work to do and also be able to automate most of the tasks in a non-human required mode. So, the first thing we need to is to get eksctl in our platforms ready. Let’s see how we can get that.
We have here all the detailed from Amazon itself about how to install eksctl in different platforms, no matter if you’re using Windows, Linux, or MacOS X:
Installing or updating eksctl – Amazon EKS
Learn how to install or update the eksctl command line tool. This tool is used to create and work with an Amazon EKS cluster.
After doing that we can check that we have installed the eksctl software running the command:
eksctl version
And we should get an output similar to this one:
eksctl version output command
So after doing that we can see that we have access to all the power behind the EKS service just typing these simple commands into our console window.
Creating the EKS Hybrid Cluster
Now, we’re going to create a mixed environment with some EC2 machines and enable the Fargate support for EKS. To do that, we will start with the following command:
eksctl create cluster --version=1.15 --name=cluster-test-hybrid --region=eu-west-1 --max-pods-per-node=1000 --fargate
[ℹ]  eksctl version 0.26.0
[ℹ]  using region eu-west-1
[ℹ]  setting availability zones to [eu-west-1c eu-west-1a eu-west-1b]
[ℹ]  subnets for eu-west-1c - public:192.168.0.0/19 private:192.168.96.0/19
[ℹ]  subnets for eu-west-1a - public:192.168.32.0/19 private:192.168.128.0/19
[ℹ]  subnets for eu-west-1b - public:192.168.64.0/19 private:192.168.160.0/19
[ℹ]  using Kubernetes version 1.15
[ℹ]  creating EKS cluster "cluster-test-hybrid" in "eu-west-1" region with Fargate profile
[ℹ]  if you encounter any issues, check CloudFormation console or try 'eksctl utils describe-stacks --region=eu-west-1 --cluster=cluster-test-hybrid'
[ℹ]  CloudWatch logging will not be enabled for cluster "cluster-test-hybrid" in "eu-west-1"
[ℹ]  you can enable it with 'eksctl utils update-cluster-logging --region=eu-west-1 --cluster=cluster-test-hybrid'
[ℹ]  Kubernetes API endpoint access will use default of {publicAccess=true, privateAccess=false} for cluster "cluster-test-hybrid" in "eu-west-1"
[ℹ]  2 sequential tasks: { create cluster control plane "cluster-test-hybrid", create fargate profiles }
[ℹ]  building cluster stack "eksctl-cluster-test-hybrid-cluster"
[ℹ]  deploying stack "eksctl-cluster-test-hybrid-cluster"
[ℹ]  creating Fargate profile "fp-default" on EKS cluster "cluster-test-hybrid"
[ℹ]  created Fargate profile "fp-default" on EKS cluster "cluster-test-hybrid"
[ℹ]  "coredns" is now schedulable onto Fargate
[ℹ]  "coredns" is now scheduled onto Fargate
[ℹ]  "coredns" pods are now scheduled onto Fargate
[ℹ]  waiting for the control plane availability...
[✔]  saved kubeconfig as "C:\\Users\\avazquez/.kube/config"
[ℹ]  no tasks
[✔]  all EKS cluster resources for "cluster-test-hybrid" have been created
[ℹ]  kubectl command should work with "C:\\Users\\avazquez/.kube/config", try 'kubectl get nodes'
[✔]  EKS cluster "cluster-test-hybrid" in "eu-west-1" region is ready
This command will setup the EKS cluster enabling the Fargate support.
NOTE: The first thing that we should notice is that the Fargate support for EKS is not yet available in all the AWS regions. So, depending on the region that you’re using you could get an error. At this moment this is just enabled in US East (N. Virginia), US East (Ohio), US West (Oregon), Europe (Ireland), Europe (Frankfurt), Asia Pacific (Singapore), Asia Pacific (Sydney), Asia Pacific (Tokyo) based on the information from AWS Announcements: https://aws.amazon.com/about-aws/whats-new/2020/04/eks-adds-fargate-support-in-frankfurt-oregon-singapore-and-sydney-aws-regions/
So, now, we should add to that cluster a Node Group. a Node Group is a set of EC2 instances that are going to be managed as part of it. And to do that we will use the following command:
eksctl create nodegroup --cluster cluster-test-hybrid --managed
[ℹ]  eksctl version 0.26.0
[ℹ]  using region eu-west-1
[ℹ]  will use version 1.15 for new nodegroup(s) based on control plane version
[ℹ]  nodegroup "ng-1262d9c0" present in the given config, but missing in the cluster
[ℹ]  1 nodegroup (ng-1262d9c0) was included (based on the include/exclude rules)
[ℹ]  will create a CloudFormation stack for each of 1 managed nodegroups in cluster "cluster-test-hybrid"
[ℹ]  2 sequential tasks: { fix cluster compatibility, 1 task: { 1 task: { create managed nodegroup "ng-1262d9c0" } } }
[ℹ]  checking cluster stack for missing resources
[ℹ]  cluster stack has all required resources
[ℹ]  building managed nodegroup stack "eksctl-cluster-test-hybrid-nodegroup-ng-1262d9c0"
[ℹ]  deploying stack "eksctl-cluster-test-hybrid-nodegroup-ng-1262d9c0"
[ℹ]  no tasks
[✔]  created 0 nodegroup(s) in cluster "cluster-test-hybrid"
[ℹ]  nodegroup "ng-1262d9c0" has 2 node(s)
[ℹ]  node "ip-192-168-69-215.eu-west-1.compute.internal" is ready
[ℹ]  node "ip-192-168-9-111.eu-west-1.compute.internal" is ready
[ℹ]  waiting for at least 2 node(s) to become ready in "ng-1262d9c0"
[ℹ]  nodegroup "ng-1262d9c0" has 2 node(s)
[ℹ]  node "ip-192-168-69-215.eu-west-1.compute.internal" is ready
[ℹ]  node "ip-192-168-9-111.eu-west-1.compute.internal" is ready
[✔]  created 1 managed nodegroup(s) in cluster "cluster-test-hybrid"
[ℹ]  checking security group configuration for all nodegroups
[ℹ]  all nodegroups have up-to-date configuration
So now we should be able to use kubectl to manage this new cluster. If you don’t have installed kubectl or you haven’t heard about it. This is the command line tool that allow us to manage your Kubernetes Cluster and you can install it based on the documentation shown here:
Installing or updating eksctl – Amazon EKS
Learn how to install or update the eksctl command line tool. This tool is used to create and work with an Amazon EKS cluster.
So, now, we should start taking a look at the infrastructure that we have. So if we type the following command to see the nodes at our disposal:
kubectl get nodes
We see an output similar to this:
NAME                                                    STATUS   ROLES    AGE   VERSION
fargate-ip-192-168-102-22.eu-west-1.compute.internal    Ready    <none>   10m   v1.15.10-eks-094994
fargate-ip-192-168-112-125.eu-west-1.compute.internal   Ready    <none>   10m   v1.15.10-eks-094994
ip-192-168-69-215.eu-west-1.compute.internal            Ready    <none>   85s   v1.15.11-eks-bf8eea
ip-192-168-9-111.eu-west-1.compute.internal             Ready    <none>   87s   v1.15.11-eks-bf8eea
As you can see we have 4 “nodes” two that start with the fargate name that are fargate nodes and two that just start with ip-… and those are the traditional EC2 instances. And after that moment that’s it, we have our mixed environment ready to use.
We can check the same cluster using the AWS EKS page to see that configuration more in detail. If we enter in the EKS page for this cluster we see in the Compute tab the following information:
We see under Node Groups the data around the EC2 machines that are managed as part of this cluster and as you can see we saw 2 as the Desired Capacity and that’s why we have 2 EC2 instances in our cluster. And regarding the Fargate profile, we see the namespaces set to default and kube-system and that means that all the deployments to those namespaces are going to be deployed using Fargate Tasks.
Summary
In the following articles in these series, we will see how to progress on our Hybrid cluster, deploy workloads scale it based on the demand that we’re getting, enabling integration with other services like AWS CloudWatch, and so on. So, stay tuned, and don’t forget to follow my articles to not miss any new updates as soon as it’s available to you!
If there is a single truth that this year has provided to most of the business is that we live in a digital world. It’s not the future anymore.
To be ready for this present most of the companies of all verticals have invested a lot in technology. They’ve heard all the benefits that the latest developments in technology have provided to some companies and they’d like the same benefits.
But after a while, they tried to put in place the same principles and tools and they’re not seeing the benefits. For sure, they saw some improvement but nothing compared to what they were expecting. Why this is happening? Why some of these companies are not being able to unlock these achievements
A tool is a tool, nothing more.
Any technologies principle or tool, no matter if we’re talking about a new paradigm like containerization or serverless, or a tool like an API Management platform or a new Event-Driven Architecture, they’re just a tools in hands of people.
And, in the end, what matters the most are the way those human works and how they use the tools they have at hand to achieve the optimal benefits. Companies have computers for maybe 30 years now, do you remember how it was the initial usage of those computers? Do you think people at that time were used at the optimum level? So, here is the same thing.
You shouldn’t expect that just because you’ve installed a tool, deploy a new technology or buy a new SaaS application, after that exactly moment the life of your company is going to change and you’re going to unlock all the benefits that comes with it. It’s the same story as an agenda will not make you more productive just because you have one.
Yes, it is a requirement, but this is far to be the single step you need to take to be able to achieve the success of that investment.
What matter is your thinking
A new paradigm in IT requires a different way of thinking, a trust feeling in this paradigm to be able to unlock those benefits.
If you’re not doing that way you are going to be the one stopping the progress and blocking the benefits you can get. And that’s always hard at the beginning. In the beginning, if we have a formula done in Excel and the same one in the paper we believe that the one on the computer was wrong.
Today is the other way around. We know for sure that the computer is doing it right, so we try to find our own mistake to get the same result.
Some IT managers have now the same feeling with other techniques and they try to manage it and control it using the same principles they’ve always applied. And let’s be honest: That’s normal and that’s human because we all try to use the patterns we know and the ones that have shown to be successful in the past when we face something similar.
But, let’s be honest: Do you think Netflix or Uber succeeded using the same patterns and rules they’ve been using in the path? Of course not.
But maybe you’re thinking that’s not a fair comparison because your company or your vertical is not at stake and in the middle of a revolution, you just need small changes to get those benefits. You don’t need to do everything from scratch. And that’s true.
At the end what’s relevant is if you’re ready to do the leap faith jump into the void. To introduce yourself into the jungle just with your gut and the knowledge you’ve gotten so far to guide you during that path.
Be a researcher
In reality the jump into the void is needed but this is more regarding the way that you think. It is to be ready to open your mind a leave behind some pre-thoughts you can have. At the end this is more similar to be Marie Curie rather than Indiana Jones.
Researchers and scientific always need to be open to a different way of doing things. They have their basis, their experience, the knowledge of everything that has been done in the past, but to go a step further they need to think outside the box, and open to things that were no true several years ago or things that were not the right way to do it until now. Because you’re going further than anyone has gone.
IT is similar, you’re not getting into the unknown but inside your company maybe you’re the one that needs to guide everything one else during that route and being open to thinking that maybe the old rules don’t apply to this new revolution and be ready to leave some old practices in order to unlock bigger benefits.
Summary
In the end, when you adopt a new technology you need to think about the implications that technology require in order to make it successful or even optimize the benefits that you can get from it.
Think about others than have done that path and learn from their rights and their wrongs, so you can be prepared and also be realistic. If you’re not going to get the change that the technology requires in your organization the investment makes no sense. You need to work first on prepare your organization to be ready to the change, and that moment is the moment to introduce yourself into the jungle and get all the benefits that are waiting for you.
Fashion is cyclical and the same thing happens in Software Engineering. We live in a world where each innovation seems similar to one in the past; we advanced some time ago. That’s because what we’re doing is just refining over and over solutions for the same problems.
We’ve lived for the last years a “developer is the new black” rise, where anything related to writing code is excellent. Even devs are now observed as a cool character like the ones from Silicon Valley (the HBO show) instead of the one you can make fun of like in The I.T Crowd.
But, now, it seems we’re going back to a new rise of what is called Low-Code (or No Code) Applications.
Low-Code Application is a piece of software that helps you generate your applications or services without needing to write code in any programming language, instead of doing that, you can drag & drop some boxes that represent what you’d like to do instead of write it yourself.
That has provided advantages that are now again on the table. Let’s take a look at those advantages in more detail
1.- Provides more agility
That’s clear. No matter how high level your programming language is, no matter how many archetypes you have to generate your project skeleton or the framework and libraries that you use. Typing is always slower than drag some boxes into the white canvas and connects them with some links.
And I’m a person that is a terminal guy and VI power-user, and I realize the power of the keyboard, But let’s be honest and ask you one question:
How many of the keywords you type in your code are providing value to the business and how many are just needed for technical reasons?
Not only things like exception handling, auditing, logging, service discovery, configuration management, but stuff like loop structure, function signature definition, variable definition, class definition, and so on…
You can truly focus on the business value that you’re trying to provide to your business instead of spending time around how to manage any technical capabilities.
2.- Easier to maintain
One month after production only the developer and god knows what the code does. After a year, just god knows…
Coding is awesome but it is at the same time complex to maintain. Mainly on enterprises when developers are shifting from one project to the other, from some departments to others, and new people are being onboarded all the time to maintain and evolve some codes.
And the ones that have been in the industry for some time, know for example the situation when people said: “I prefer not to touch that because we don’t know what’s doing”, “We cannot migrate this Mainframe application because we don’t know it will be able to capture all the functionality they’re providing.”
And that’s bad for several reasons. First of all, it is costly to maintain, more complex to do it, but second is also avoiding you to evolve at the pace that you want to do it.
3.- Safer and Cost-Effective
Don’t get me wrong about this: Programming can be as safer as any low-code application. That’s clear because, in the end, any low-code app ends up generating the same binary or bytecode to be executed.
The problem is that this is going to depend on the skills of the programmer. We live in a situation that, even programming and developers are a cool thing, as you need a big number of devs in your team that implies that not all of them are as experienced and skill as you want them to be.
Reality is much more complex and also you need to deal with your budget reality and find the way to get the best of your team.
Using Low-code application, you are guaranteed the quality of the base components that are verified by a company and that they’ve improved with dedicated teams incorporating feedback for customers all over the world, which makes it safer.
4.- As ready as a code-base solution for specific needs
One of the myths that are saying against Low Code is that it is suitable for generic workloads and use-cases, but it is not capable of being adapted and optimized for your needs.
Regarding this usual push-back, first of all, we need to work on the misconception of the level of specification our software needs. In the end, the times when you need to do something so specific that is not covered by the options available out of the box are so low that it is complex to justify. Are you going to make a slower 99% of your development only to be able to do it quicker than 1%? How much of your workloads are not similar to what other companies are doing in the same industry?
But even for the sake of the discussion, let’s assume that’s true, and you need a single piece of logic a low-code application doesn’t provide out of the box. Ok, Low-Code means that you don’t need to write code, not that you cannot do it.
Most of the platforms support the option to add code if needed as an option to cover these cases. So, even in those cases, you still have the same tools to make it specific without losing all the advantages of your daily activities.
Summary
Low-code applications are one of the solutions you have at your disposal to improve your agility and your productivity in your developments to meet the pace of the changes in your business.
The solutions working on that space are not new, but they’ve been renovated to adapt to the modern developer paradigms (microservices, container-based, API-led, event-driven…) so you’re not going to miss anything but to get more time to provide even more value to your business.
Serverless is a passionate topic for many people, and it’s something that’s evolved a lot since its conception. It started by being an approach to getting rid of the servers, not on the technical side (obviously) but on the management side.
The idea behind it is to make developers, and IT people in general, focus on creating code and deploying it in some kind of managed infrastructure. The usual contraposition was against container-based platforms. With managed Kubernetes services, like EKS or AKS, you’re still responsible for the workers that are running your load. You don’t need to worry about the administration component. But again, you need to handle and manage some parts of the infrastructure.
This approach was also incorporated in other systems, like iPaaS and pure SaaS offerings regarding low code or no code. And we include the concept of function as a service to make the difference in this approach. So, the first question is: What’s the main difference between a function that you deploy on your serverless provider and an application that you can use your application on top of your iPaaS?
It depends on the perspective that you want to analyze.
I’m going to skip the technical details about scale to zero capabilities, warm-up techniques, and so on, and focus on the user perspective. The main difference is how these services are going to charge you based on your usage.
iPaaS or similar SaaS offerings are going to charge you based on application instance or something similar. But serverless/function as a service platform is going to cost you based on the usage that you do of that function. That means that they’re going to cost you based on the number of requests that your function receives.
That’s a game-changer. It provides the most accurate implementation of the optimized operations and elasticity approach. In this case, it’s just direct and clear that you’re going to pay only for the use of your platform. The economics are excellent. Take a look at the AWS Lambda offering today:
The AWS Lambda free usage tier includes 1M free requests per month and 400,000 GB-seconds of compute time per month.
And after, that first million of requests, they’re going to charge you 0.20 $ for every additional million requests.
Reading the sentences above, you’re probably thinking, “That’s perfect. I’m going to migrate everything to that approach!”
Not so fast. This architecture style is not valid for all the services that you may have. While the economics are excellent, these services come with limitations and anti-patterns that mean you should avoid this option.
First, let’s start with the restrictions most cloud providers define for these kinds of services:
Execution time: This is usually to be limited by your cloud provider to a maximum number of seconds of execution. That’s fair. If you’re going to be charged by request, and you can do all the work in a single request that takes 10 hours to complete using the resources of the provider, that’s probably not fair to the provider!
Memory resources: Also limited, for the same reasons.
Interface payload: Some providers also limit the payload that you can receive or send as part of one function — something to take into consideration when you’re defining the architecture style for your workload.
In a moment, we’ll look at the anti-patterns or when you should avoid using this architecture and approach
But first, a quick introduction to how this works at the technical level. This solution can be very economical because the time that your function’s not processing any requests is not loaded into their systems. So, it’s not using any resource at all (just a tiny storage part, but this is something ridiculous) and generating any cost for the cloud provider. But that also means that when someone needs to execute your function, the system needs to recover it, launch it and process the request. That’s usually called the “warm-up time,” and its duration depends on the technology you use.
Low-latency services and Services with critical response time: If your service needs low latency or the response time must be aggressive, this approach is probably is not going to work for you because of the warm-up time. Yes, there are workarounds to solve this, but they require dummy requests to the service to keep it loaded and they generate additional cost.
Batch or scheduled process: This is for stateless API for the cloud-native world. If you have a batch process that could take time, perhaps because it’s scheduled at nights or the weekend, it might not be the best idea to run this kind of workload.
Massive services: If you pay by request, it’s important to evaluate the number of requests that your service is going to receive to make sure that the numbers are still on your side. If you have a service with millions of requests per second, this probably isn’t going to be the best approach for your IT budget.
In the end, serverless/function as a service is so great because of its simplicity and how economical it is. At the same time, it’s not a silver bullet to cover all your workloads.
You need to balance it with other architectural approaches and container-based platforms, or iPaaS and SaaS offerings, to keep your toolbox full of options to find the best solution for each workload pattern that your company has.
Log Management doesn’t seem like a very fantastic topic. It is not the topic that you see and says: “Oh! Amazing! This is what I was dreaming about my whole life”. No, I’m aware that this is not to fancy, but that doesn’t make it less critical than other capabilities that you’re architecture needs to have.
Since the start of time, we’ve been used log files as the single trustable data source when it was related to troubleshoot your applications or know what was failed in your deployment or any other actions regarding a computer.
The procedure was easy:
Launch “something”
“something” failed.
Check the logs
Change something
Repeat
And we’ve been doing it that way for a long, long time. Even with other more robust error handling and management approaches like Audit System, we also go back to logs when we need to get the fine-grained detail about the error. Look for a stack trace there, more detail about the error that was inserted into the Audit System or more data than just the error code and description thas was provided by a REST API.
Systems starting to grow, architecture became more complicated, but even with that, we end with the same method over and over. You’re aware of log aggregation architectures like the ELK stack or commercial solutions like Splunk or even SaaS offerings like Loggly, but you just think they’re not just for you.
They’re expensive to buy or expensive to set, and you know very well your ecosystem, and it’s easier to just jump into a machine and tail the log file. Probably you also have your toolbox of scripts to do this as quickly as anyone can open Kibana and try to search for something instance ID there to see the error for a specific transaction.
Ok, I need to tell you something: It’s time to change, and I’m going to explain to you why.
Things are changing, and IT and all the new paradigms are based on some common grounds:
You’re going to have more components that are going to run isolated with its log files and data.
Deployments will be more regular in your production environment, and that means that things are going to be wrong more usual (on a controlled way, but more usual)
Technologies are going to coexist, so logs are going to be very different in terms of patterns and layouts, and you need to be ready for that.
So, let’s discuss these three arguments that I hope make you think in a different way about Log Management architectures and approaches.
1.- Your approach just doesn’t scale
Your approach is excellent for traditional systems. How many machines do you manage? 30? 50? 100? And you’re able to do it quite fine. Imagine now a container-base platform for a typical enterprise. I think an average number could be around 1000 containers just for business purposes, not talking about architecture or basic services. Are you able to be ready to go container by container to check 1000 logs streams to know the error?
Even if that’s possible, are you going to be the bottleneck for the growth of your company? How many container logs do you can keep a trace on? 2000? As I was saying at the beginning, that just not scale.
2.- Logs are not there forever
And now, you read the first topic and probably are you just saying to the screen you’re using to read is. Come on! I already know that logs are not there, they’re getting rotated, they got lost, and so on.
Yeah, that’s true, this is even more important in cloud-native approach. With container-based platforms, logs are ephemeral, and also, if we follow the 12-factor app manifesto there is no file with the log. All log traces should be printed to the standard output, and that’s it.
And where the logs are deleted? When the container fails.. and which records are the ones that you need more? The ones that have been failed.
So, if you don’t do anything, the log traces that you need the most are the ones that you’re going to lose.
3.- You need to be able to predict when things are going to fail
But logs are not only valid when something goes wrong are adequate to detect when something is going to be wrong but to predict when things are going to fail. And you need to be able to aggregate that data to be able to generate information and insights from it. To be able to run ML models to detect if something is going as expected or something different is happening that could lead to some issue before it happens.
Summary
I hope these arguments have made you think that even for your small size company or even for your system, you need to be able to set up a Log Aggregation technique now and not wait for another moment when it will probably be too late.
Find how TIBCO Cloud Integration can help you increase business agility by connecting all your apps, devices, and data no matter where they are hosted
We live in a world where the number of digital assets that need to be integrated, the types of assets, and where they are hosted are all exploding. We’ve transitioned away from a simple enterprise landscape where all of our systems were hosted in a single datacenter, and the number of systems was small. If you still remember those days, you probably could name all the systems that you maintained. Could you imagine doing that today?
This has changed completely. Businesses today are operating more and more on apps and data rather than on manual, documented processes, and that has increased the demands to have them connected together to support the operations of the business. How does a traditional IT team keep up with all connectivity requests coming from all areas of the business to ensure these assets are fully integrated and working seamlessly?
Additionally, the business environment has changed completely. Today everything is hyper-accelerated. You can no longer wait six months to get your new marketing promotions online, or to introduce new digital services.
This is because markets change constantly over time. At times they grow, and at other times they contract. This forced enterprises to change how they do business rapidly.
So, if we need to summarize everything that we need from an application architecture to make sure that it can help us to meet our business requirements, that word is “agility”. And architectural agility creates business agility
Different IT paradigms have been adopted to help increase architectural agility from different perspectives that provide a quick way to adapt, connect, and offer new capabilities to customers:
Infrastructure Agility: Based on cloud adoption, cloud providers offer an agile way to immediately tap into the infrastructure capacity required, allowing for rapid innovation by quickly creating new environments and deploying new services on-demand.
Operation & Management Agility: SaaS-based applications allow you to adopt best-of-breed business suites without having to procure and manage the underlying infrastructure, as you do in your on-premises approach. This allows you to streamline and accelerate the operations of your business.
Development Agility: Based on the application technologies that create small, highly scalable components of software that can be evolved, deployed, and managed in an autonomous way. This approach embeds integration capabilities directly within deployed applications, making integration no longer a separate layer but something that is built-in inside each component. Microservices, API-led development, and event-driven architecture concepts play an essential role and expand the people involved in the development process.
So, all of these forms of agility help build an application architecture that is highly agile — able to quickly respond quickly to changes in the environment within which it operates. And you can achieve all of them with TIBCO® Cloud Integration (TCI).
TCI is an Integration Platform-as-a-Service (iPaaS), a cloud-based integration solution that makes it extremely easy for you to connect all your assets together no matter where they’re hosted. It is a SaaS offering that runs on both AWS and Microsoft Azure, so you don’t have to manage the underlying infrastructure to make sure the integration assets that are critical to your business are always available and scale to any level of demand.
From the development perspective, TCI provides you all the tools needed for your business to develop and connect all your digital assets — including your apps, data sources, devices, business suites, processes, and SaaS solutions — using the most modern standards within an immersive experience.
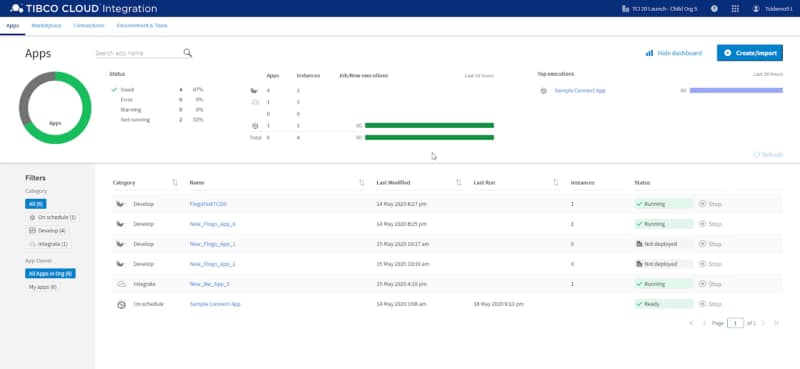
Easily access all of your applications within an immersive user experience.
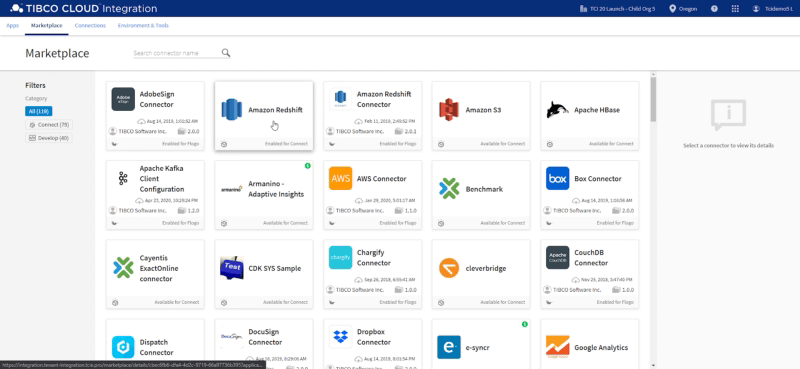
It addresses integration patterns from traditional approaches — such as in data replication — to modern approaches including API-Ied to Event-driven architectures. It also supports the latest connectivity standards such as REST, GraphQL, AsyncAPI, and gRPC. And to reduce the time-to-market of your integrations, it also includes a significant number of pre-packaged connectors that simplify connectivity to legacy and modern business suites, data sources, and more — no matter if they reside in your data center or in the cloud. These connectors are easily accessible within a connector marketplace embedded directly within the user experience to be used across the whole platform.
TCI improves team-based development. With TIBCO® Cloud Mesh, accessible via TCI, your integrators can easily share, discover, and reuse digital assets created across the enterprise within TIBCO Cloud — such as APIs and apps — and utilize them very quickly within integrations in a secure way without the need to worry about technical aspects.
This capability promotes the reuse of existing assets and better collaboration among teams. Combined with pre-packed connectors which are directly accessible within TCI, the development time to introduce new integrations is significantly reduced.
Easily access pre-packaged connectors within an embedded connector marketplace
TCI also expands the number of people in your business that can create integrations, with multiple development experiences that are tailored for different roles providing their own experience and skills. Now not only can integration specialists participate in the integration process, but developers, API product owners, and citizen integrators can as well.
This dramatically increases business agility because your various business units can create integrations in a self-service manner, collaborate to provide solutions even if they span across business units, and reduce their dependencies on overburdened IT teams. This frees up your integration specialists to focus on providing integration best practices for your enterprise and architecting a responsive application architecture.
TCI addresses a number of integration use cases including:
Connecting apps, data, and devices together that reside anywhere (e.g., on-premises, SaaS, private/public cloud)
Designing,, orchestrating, and managing APIs & microservices
Rearchitecting inflexible monolith apps into highly scalable cloud-native apps.
Building event-driven apps that process streams of data (e.g., from IoT devices or Apache Kafka)
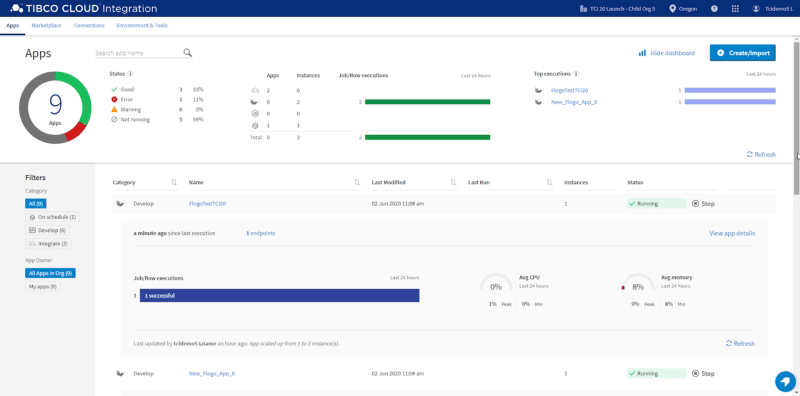
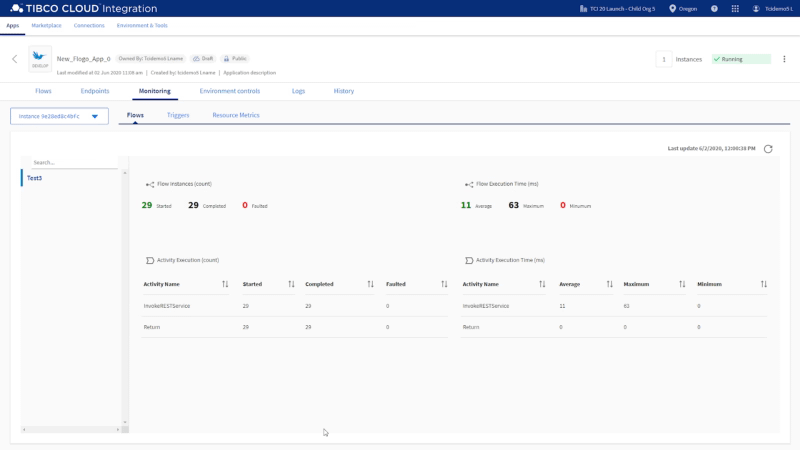
TCI also provides detailed insights on the performance and execution status of your integrations so you can optimize them as needed or easily detect and solve any potential issues with them. This ensures that business processes that depend on your integrations are minimally disrupted.
Get at-a-glance views of application execution and performance details.Drill down for expanded insights on application execution histories and performance trends.
By bringing more people into your integration process, empowering them with an immersive view that helps them seamlessly work together on your integrations, proving capabilities such as TIBCO Cloud Mesh and pre-packaged connectors within a unified connector marketplace that accelerates integration development, your digital business can be connected and reconnected very quickly to respond to changing markets, which greatly increases your business agility.
To experience how easily you can connect all of your digital assets together to boost your business agility, sign up for a free 30-day trial of TIBCO Cloud Integration today.
TIBCO Cloud Integration is a service provided within the TIBCO Connected Intelligence Platform, which provides a complete set of capabilities to connect your business.
Managed Container Platform is disrupting everything. We’re living in a time where development and the IT landscape are changing, new paradigms like microservices and containers seem to be out there for the last few years, and if we trust the reality that the blog posts and the articles show today, we’re all of the users already using them all the time.
Did you see any blog posts about how to develop a J2EE application running on your Tomcat server on-prem? Probably not. The most similar article should probably be how to containerize your tomcat-based application.
But do you know what? Most companies still are working that way. So even if all companies have a new digital approach in some departments, they also have other ones being more traditional.
So, that seems that we need to find a different way to translate the main advantages of a container-based platform to a kind of speech they can see and realize the tangible benefits they can get from there and have the “Hey, this can work for me!” kind of spirit.
1. You will get all components isolated and updated more quickly
That’s one of the great things about container-based platforms compared with previous approaches like application server-based platforms. When you have an application server cluster, you still have one cluster with several applications. So you usually do some isolation, keep related applications, provide independent infrastructure for the critical ones, and so on.
But even with that, at some level, the application continues to be coupled, so some issues with some applications could bring down another one that was not expected for business reasons.
With a container-based platform, you’re getting each application in its bubble, so any issue or error will affect that application and nothing more. Platform stability is a priority for all companies and all departments inside them. Just ask yourself: Do you want to end with those “domino’s chains” of failure? How much will your operations improve? How much will your happiness increase?
Additionally, based on the container approach, you will get smaller components. Each of them will do a single task providing a single capability to your business, which means that it will be much easier to update, test, and deploy in production. So that, in the end will generate more deployments into the production environment and reduce the time to market for your business capabilities.
You will be able to deploy faster and have more stable operations simultaneously.
2.- You will optimize the use of your infrastructure
Costs, everything is about costs. There are no single conversations with customers who are not trying to pay less for their infrastructure. So, let’s face it. We should be able to run operations in an optimized way. So, if our infrastructure cost is going higher, that needs to mean that our business increases.
Container-based platforms will allow optimizing infrastructure in two different ways. First, if using two main concepts: Elasticity and Infrastructure Sharing.
Elasticity is related because I’m only going to have the infrastructure I need to support the load I have at this moment. So, if the load increases, my infrastructure will increase to handle it, but after that moment goes away, it will go back to what it needs now after that peak happened.
Infrastructure sharing is about using each server’s part that is free to deploy other applications. Imagine a traditional approach where I have two servers for my set of applications. Probably I don’t have 100% usage of those servers because I need to have some spare computer to be able to act when the load increases. I probably have 60–70% percent. That means 30% free. If we have different departments with different systems, and each has its infrastructure 30% free, how much of our infrastructure are we just throwing away? How many dollars/euros/pounds are you just throwing off the window?
Container-based platforms don’t need specific tools or software installed on the platform to run a different kind of application. It is not required because everything resides inside the container, so I can use any free space to deploy other applications doing a more efficient usage of those.
3.- You will not need infrastructure for administration
Each system that is big enough has some resources dedicated to being able to manage it. However, even most of the recommended architectures recommend placing those components isolated from your runtime components to avoid any issue regarding administrator or maintenance that can affect your runtime workloads, which means specific infrastructure that you’re using for something that isn’t helping your business. Of course, you can explain to any business user that you need a machine to run that provides the capabilities required. But it is more complex than using additional infrastructure (and generating cost) to place other components that are not helping the business.
So, managed container platforms take that problem away because you’re going to provide the infrastructure you need to run your workloads, and you’re going to be given for free or such low fee the administration capabilities. And addition to that, you don’t even need to worry that administration features are always available and working fine because this is leverage to the provider itself.
Wrap up and next steps
As you can see, we describe very tangible benefits that are not industry-based or development focus. Of course, we can have so many more to add to this list, but these are the critical ones that affect any company in any industry worldwide. So, please, take your time to think about how these capabilities can help to improve your business. But not only that, take your time to quantify how that will enhance your business. How much can you save? How much can you get from this approach?
And when you have in front of you a solid business case based on this approach, you will get all the support and courage you need to move forward during that route!! So I wish you a peaceful transition!