DevSecOps vs DevOps: Fundamentals and Differences Answering 3 Questions

DevSecOps vs. DevOps:  Differences and Similarities Answering 3 Questions

DevSecOps is a concept you probably have heard extensively in the last few months. You will see it in alignment with the traditional idea of DevOps. This probably, at some point, makes you wonder about a DevSecOps vs DevOps comparison, even trying to understand what are the main differences between them or if they are the same concept. And also, with other ideas starting to appear, such as Platform Engineering or Site Reliability, it is beginning to create some confusion in the field that I would like to clarify today in this article.

What is DevSecOps?

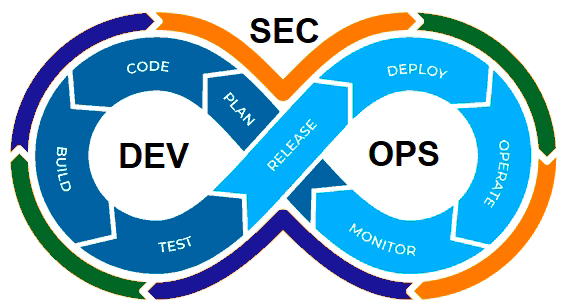
DevSecOps is an extension of the DevOps concept and methodology. Now, it is not a joint effort between Development and Operation practices but a joint effort among Development, Operation, and Security.

Diagram by GeekFlare: A DevSecOps Introduction (https://geekflare.com/devsecops-introduction/)

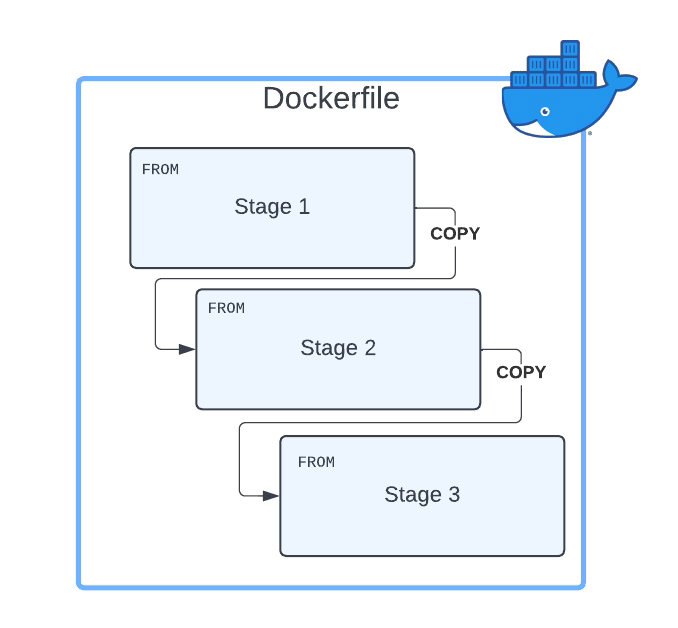
Implies introducing security policies, practices, and tools to ensure that the DevOps cycles provide security along this process. We already commented on including security components to provide a more secure deployment process. We even have specific articles about these tools, such as scanners, docker registries, etc.

Why DevSecOps is important?

DevSecOps, or to be more explicit, including security practices as part of the DevOps process, is critical because we are moving to hybrid and cloud architectures where we incorporate new design, deployment, and development patterns such as containers, microservices, and so on.

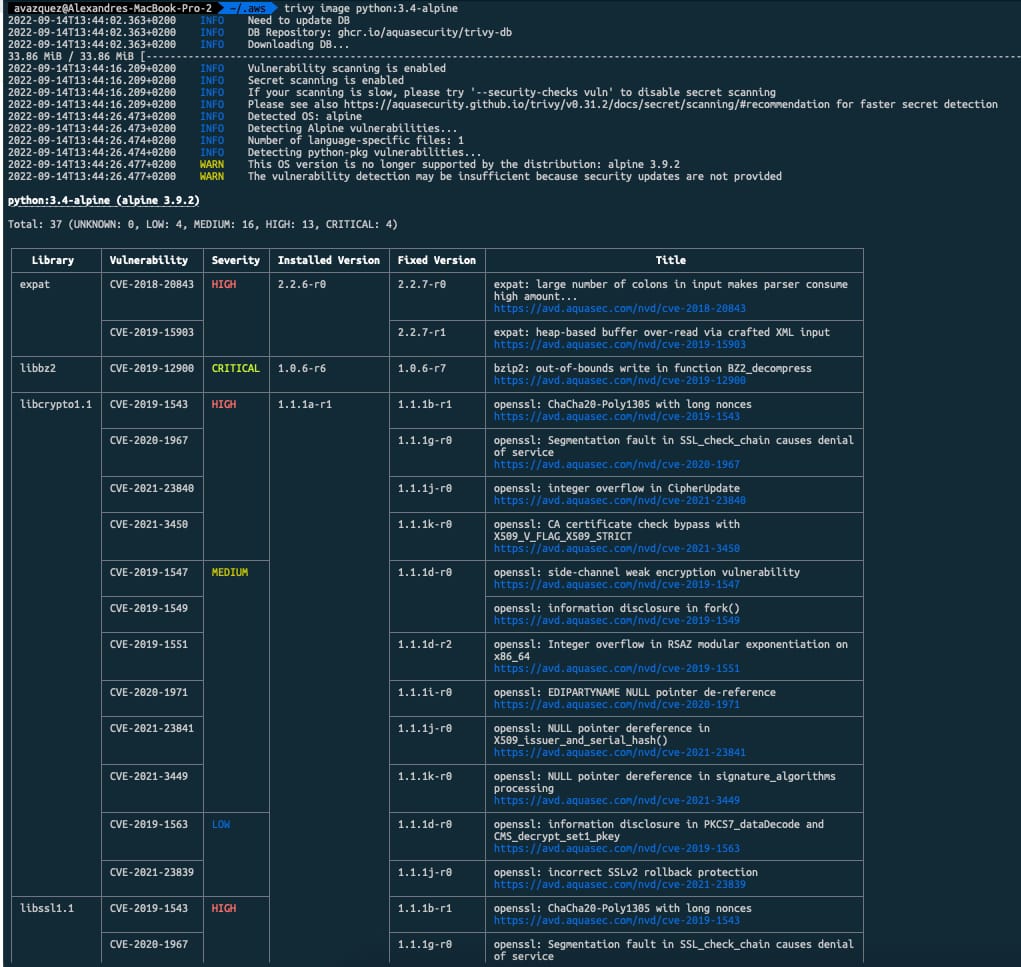
This situation makes that we are moving from one side to having hundreds of applications in the most complex cases to thousands of applications, and to have dozens of servers to thousands of containers, each of them with different base images and third-party libraries that can be obsolete, have a security hole or just be raised new vulnerabilities such as we have seen in the past with the Spring Framework or the Log4J library to shout some of the most recent global substantial security issues that the companies dealt with.

So, even the most extensive security team cannot be at pace checking manually or with a set of scripting all the different new challenges to the security if we don’t include them as part of the overall process of the development and deployment of the components. This is where the concept of shift-left security is usually considered, and we already covered that in this article you can read here.

DevSecOps vs DevOps: Is DevSecOps just updated DevOps?

So based on the above definition, you can think: “Ok, so when somebody talks about DevOps as not thinking about security”. This is not true.

In the same aspect, when we talk about DevOps, it is not explicitly all the detailed steps, such as software quality assurance, unit testing, etc. So, as happens with many extensions in this industry, the original, global or generic concept includes the contents of the wings as well.

So, in the end, DevOps and DevSecOps are the same things, especially today when all companies and organizations are moving to the cloud or hybrid environments where security is critical and non-negotiable. Hence, every task that we do, from developing software to access to any service, needs to be done with Security in mind. But I used both concepts in different scenarios. I will use DevSecOps when I would like to explicitly highlight the security aspect because of the audience, the context, or the topic we are discussing to do differentiation.

Still, in any generic context, DevOps will include the security checks will be retained for sure because if it is not, it is just useless. Me.

 Summary

So, in the end, when somebody speaks today about DevOps, it implicitly includes the security aspect, so there is no difference between both concepts. But you will see and also find it helpful to use the specific term DevSecOps when you want to highlight or differentiate this part of the process.

Trivy: Get To Scan Docker Local Images with Success

Scan Docker images or, to be more honest, scan your container images is becoming one of the everyday tasks to be done as part of the development of your application. The change of pace of how easily the new vulnerabilities arise, the explosion of dependencies that each of the container images has, and the number of deployments per company make it quite complex to keep the pace to ensure that they can mitigate the security issues.

We already covered this topic some time ago when the Docker Desktop tool introduced the scan option based on an integration with Synk and, more recently, with the latest release of Lens. This is one of the options to check the container images of the “corporate” version of the tool. And since some time also, the central registries from the Cloud have Provided such an ECR, including the Scanning option as one of the capabilities for any image deployed there.

But what happens if you are already moving from Docker Desktop to another option, such as podman or Rancher Desktop? How can you scan your docker images?

Several scanners can be used to scan your container images locally, and some of them are easier than others to set up. One of the main knowns is Clair which is also being used as part of the RedHat Quay registry and has a lot of traction. It works on a client-server mode that is great to be used by different teams that require a more “enterprise” deployment, usually closely related to a Registry. Still, it doesn’t play well to be run locally as it requires several components and relationships.

As an easy option to try locally, you have Trivy. Trivy is an exciting tool developed by AquaSecurity. You may remember the company as this is the one that is behind other developments related to security in Kubernetes, such as KubeBench, that we already covered in the past.

In its own words, “Trivy is a comprehensive security scanner. It is reliable, fast, and straightforward to use and works wherever you need it.”

How to Install Trivy?

The installation process is relatively easy, and documented for every significant platform here. Still, in the end, it relies on binary packages available such as RPM, DEB, Brew, MacPorts, or even a Docker image.

How To Scan Docker Images With Trivy ?

Once it is installed, you can just run the commands such as this:

 trivy image python:3.4-alpine

This will do the following tasks:

  • Update the repository DB with all the vulnerabilities
  • Pull the image in case this is not available locally
  • Detect the languages and components present in that image
  • Validate the images and generate an output

What Output Is Provided By Trivy?

As a sample, this is the output for the python:3.4-alpine as of Today:

Scan Docker Images With Trivy

You will get a table with one row per library or component that has detected a vulnerability showing the Library name and the exposure related to it with the CVE code. CVE code is usually how vulnerabilities are referred to as they are present in a common repository with all their descriptions and details of them. In addition to that, it shows the severity of the vulnerability based on the existing report. It also provides the current version detected on the image and in case there is a different version that fixed that vulnerability, the initial version that has solved that vulnerability, and finally, a title to provide a little bit more context about the vulnerability:

If a Library is related to more than one vulnerability, it will split the cells on that row to access the different data for each vulnerability.

Helm Dependency: Discover How it Works

Helm Dependency is a critical part of understanding how Helm works as it is the way to establish relationships between different helm packages. We have talked a lot here about what Helm is, and some topics around that, and we even provided some tricks if you create your charts.

So, as commented, Helm Chart is nothing more than a package that you put around the different Kubernetes objects that need to be deployed for your application to work. The usual comparison is that it is similar to a Software Package. When you install an application that depends on several components, all of those components are packaged together, and here is the same thing.

What is a Helm Dependency?

A Helm Dependency is nothing more than the way you define that your Chart needs another chart to work. For sure, you can create a Helm Chart with everything you need to deploy your application, but something you would like to split that work into several charts just because they are easy to maintain or the most common use case because you want to leverage another Helm Chart that is already available.

One use case can be a web application that requires a database, so you can create on your Helm Chart all the YAML files to deploy your web application and your Database in Kubernetes, or you can have your YAML files for your web application (Deployment, Services, ConfigMaps,…) and then say: And I need a database and to provide it I’m going to use this chart.

This is similar to how it works with the software packages in UNIX systems; you have your package that does the job, like, for example, A, but for that job to be done, it requires the library L, and to ensure that when you are installing A, Library L is already there or if not it will be installed you declare that your application A depends on Library L, so here is the same thing. You declare that your Chart depends on another Chart to work. And that leaves us to the next point.

How do we declare a Helm Dependency?

This is the next point; now that we understand what a Helm Dependency is conceptually and we have a use case, how can we do that in our Helm Chart?

All the work is done in the Chart.yml file. If you remember, the Chart.yml file is the file where you declare all the metadata of your Helm Chart, such as the name, the version of the chart, the application version, location URL, icon, and much more. And usually has a structure like this one:

apiVersion: v2
name: MyChart
description: My Chart Description
type: application
version: 0.2.0
appVersion: "1.16.0"

So here we can add a section dependencies and, in that section is where we are going to define the charts that we depend on. As you can see in the snippet below:

apiVersion: v2
name: MyChart
description: My Chart Description
type: application
version: 0.2.0
appVersion: "1.16.0"
dependencies:
- name: Dependency
  version: 1.0.0
  repository: "file:///location_of_my_chart"

Here we are declaring Dependency as our Helm Dependency. We specify the version that we would like to use (similar to the version we say in our chart), and that will help us to ensure that we will provide the same version that has been tested as part of the resolution of the dependency and also the location using an URL that can be an external URL is this is pointing to a Helm Chart that is available on the internet or outside your computer or using a File Path in case you are pointing to a local resource in your machine.

That will do the job of defining the helm dependency, and this way, when you install your chart using the command helm install, it will also provide the dependence.

How do I declare a Helm Conditional Dependency?

Until now, we learned how to declare a dependency, and each time I provision my application, it will also provide the dependence. But usually, we would like to have a fine-grained approach to that. Imagine the same scenario as above: We have our Web Application that depends on the Database, and we have two options, we can provision the database as part of the installation of the web application, or we can point to an external database and in that case, it makes no sense to provision the Helm Dependency. How can we do that?

So, easy, because one of the optional parameters you can add to your dependency is condition and do exactly that, condition allow you to specify a flag in your values.yml that in the case is equal to true, it will provide the dependency but in the case is equal to false it will skip that part similar to the snippet shown below:

 apiVersion: v2
name: MyChart
description: My Chart Description
type: application
version: 0.2.0
appVersion: "1.16.0"
dependencies:
- name: Dependency
  version: 1.0.0
  repository: "file:///location_of_my_chart"
  condition: database.enabled 

And with that, we will set the enabled parameter under database in our values.yml to true if we would like to provision it.

How do I declare a Helm Dependency With a Different version?

As shown in the snippets above, we offer that when we declare a Helm Dependency, we specify the version; that is a safe way to do it because it ensures that any change done to the helm chart will not affect your package. Still, at the same time, you cannot be aware of security fixes or patches to the chart that you would like to leverage in your deployment.

To simplify that, you have the option to define the version in a more flexible way using the operator ~ in the definition of the version, as you can see in the snippet below:

apiVersion: v2
name: MyChart
description: My Chart Description
type: application
version: 0.2.0
appVersion: "1.16.0"
dependencies:
- name: Dependency
  version: ~1.0.0
  repository: "file:///location_of_my_chart"
  condition: database.enabled 

This means that any patch done to the chart will be accepted, so this is similar that this chart will use the latest version of 1.0.X. Still, it will not use the 1.1.0 version, so that allows to have more flexibility, but at the same time keeping things safe and secured in case of a breaking change on the Chart you depend on. This is just one way to define that, but the flexibility is enormous as the Chart versions use “Semantic Versions,” You can learn and read more about that here: https://github.com/Masterminds/semver.

Multi-Stage Dockerfile: Awesome Approach To Optimize Your Container Size

Multi-Stage Dockerfile is the pattern you can use to ensure that your docker image is at an optimized size. We already have covered the importance of keeping the size of your docker image at a minimum level and what tools you could use, such as dive, to understand the size of each of your layers. But today, we are going to follow a different approach and that approach is a multi-stage build for our docker containers.

What is a Multi-Stage Dockerfile Pattern?

The multi-Stage Dockerfile is based on the principle that the same Dockerfile can have different FROM sentences and each of the FROM sentences starts a new stage of the build.

Multi-Stage Dockerfile Pattern

Why Multi-Stage Build Pattern Helps Reducing The Size of Container Images?

The main reason the usage of multi-stage build patterns helps reduce the size of the containers is that you can copy any artifact or set of artifacts from one stage to the other. And that is the most important reason. Why? Because that means that everything you do not copy is discarded and you are not carrying all these not required components from layer to layer and generating a bigger unneeded size of the final Docker image.

How do you define a Multi-Stage Dockerfile

First, you need to have a Dockerfile with more than one FROM. As commented, each of the FROM will indicate the start of one stage of the multi-stage dockerfile. To differentiate them or reference them, you can name each of the stages of the Dockerfile by using the clause AS alongside the FROM command, as shown below:

 FROM eclipse-temurin:11-jre-alpine AS builder

As a best practice, you can also add a new label stage with the same name you provided before, but that is not required. So, in a nutshell, a Multi-Stage Dockerfile will be something like this:

FROM eclipse-temurin:11-jre-alpine AS builder
LABEL stage=builder
COPY . /
RUN apk add  --no-cache unzip zip && zip -qq -d /resources/bwce-runtime/bwce-runtime-2.7.2.zip "tibco.home/tibcojre64/*"
RUN unzip -qq /resources/bwce-runtime/bwce*.zip -d /tmp && rm -rf /resources/bwce-runtime/bwce*.zip 2> /dev/null


FROM  eclipse-temurin:11-jre-alpine 
RUN addgroup -S bwcegroup && adduser -S bwce -G bwcegroup

How do you copy resources from one stage to another?

This is the other important part here. Once we have defined all the stages we need, and each is doing its part of the job, we need to move data from one stage to the next. So, how can we do that?

The answer is by using the command COPY. COPY is the same command you use to move data from your local storage to the container image, so you will need a way to differentiate that this time you are not copying it from your local storage but another stage, and here is where we are going to use the argument --from. The value will be the name of the stage we learned in the previous section to declare. So a complete COPYcommand will be something like the snippet shown below:

 COPY --from=builder /resources/ /resources/

What is the Improvement you can get?

That is the essential part and will depend on how your Dockerfiles and images are created, but the primary factor you can consider is the number of layers your current image has. The bigger the number of layers, the more significant that you can probably save on the amount of the final container image in a multi-stage dockerfile.

The main reason is that each layer will duplicate part of the data, and I am sure you will not need all of the layer’s data in the next one. And using the approach comments in this article, you will get a way to optimize it.

 Where can I read more about this?

If you want to read more, you would need to know that the multi-stage dockerfile is documented as one of the best practices on the Docker official web page, and they have a great article about this by Alex Ellis that you can read here.

How To Inject Secrets in Pods To Improve Security with Hashicorp Vault in 5 Minutes

Introduction

This article will cover how to inject secrets in Pods using Hashicorp Vault. In previous articles, we covered how to install Hashicorp Vault in Kubernetes, configure and create secrets in Hashicorp, and how tools such as TIBCO BW can retrieve them. Still, today, we are going to go one step ahead.

The reason why Inject secrets in pods is very important is that it allows the application inside the pod to be transparent around any communication to Hashicorp. After all, for the applications, the secret will be just a regular file located in a specific path inside the container. It doesn’t need to worry if this file came from a Hashicorp Secret or a total of different resources.

This injection approach facilitates the Kubernetes ecosystem’s polyglot approach because it frees any responsibility for the underlying application. The same happens with injector approaches such as Istio or much more.

But, let’s explain how this approach works to inject secrets in Pods using Hashicorp Vault. As part of the installation alongside the vault server we have installed (or several ones if you have done a distributed installation), we have seen another pod under the name of value-agent-injector, as you can see in the picture below:

Inject Secrets In Pods: Vault Injector Pod

This agent will be responsible for listening to the new deployments you do and, based on the annotations this deployment has, will launch a sidecar alongside your application and send the configuration to be able to connect to the vault and download the secrets required and mount it as files inside your pod as shown in the picture below:

To do that, we need to do several steps as part of the configuration as we are going to include in the upcoming sections of the article

Enabling Kubernetes Authentication in Hashicorp

The first thing we need to do at this stage is to enable the Kubernetes Authentication in Hashicorp. This method allows clients to authenticate with a Kubernetes Service Account Token. We do that with the following command:

 Vault auth enable kubernetes

Vault accepts a service token from any client in the Kubernetes cluster. During authentication, Vault verifies that the service account token is valid by querying a token review Kubernetes endpoint. Now, we need to configure this authentication method providing the location our the Kubernetes API, and to do that, we need to run the following command:

 vault write auth/kubernetes/config \
    kubernetes_host="https://$KUBERNETES_PORT_443_TCP_ADDR:443"

Defining a Kubernetes Services Account and Defining a Policy

Now, we will create a Kubernetes Service Account that will run our pods, and this service account will be allowed to retrieve the secret we generated in the previous post.

To do that, we will start with the creation of the service account by running this command from outside the pod:

kubectl create sa internal-app

This will create a new service account under the name of internal-app, and now we are going to generate a policy inside the Hashicorp Vault server by using this command inside the vault server pod:

 vault policy write internal-app - <<EOF
path "internal/data/database/config" {
  capabilities = ["read"]
}
EOF

And now, we associated this policy with the service account by running this command also inside the vault server pod:

  vault write auth/kubernetes/role/internal-app \
    bound_service_account_names=internal-app \
    bound_service_account_namespaces=default \
    policies=internal-app \
    ttl=24h

And that’s pretty much all the configuration we need to do at the Vault side to be able to inject secrets in pods using Hashicorp Vault. Now, we need to configure our application accordingly by doing the following modifications:

  • Specify the ServiceAccountName to the deployment to be the one we created previously: internal-app
  • Specify the specific annotations to inject the vault secrets and the configuration of those secrets.

Let’s start with the first point. We need to add the serviceAccountName to our Kubernetes Manifest YAML file as shown below:

Inject Secrets In Pods: Service Account Name definition

And regarding the second point, we would solve it by adding several annotations to our deployment, as shown below:

Inject Secrets In Pods: Annotations

The annotations used to inject secrets in pods are the following ones:

  • vault.hashicorp.com/agent-inject: ‘true’: This tells the vault injector that we would like to inject the sidecar agent in this deployment and have the Vault configuration. This is required to do any further configuration
  • vault.hashicorp.com/role: internal-app: This is the vault role we are going to use when we’re asking for secrets and information to the vault to be sure that we only access the secrets we have allowed based on the policy we created in the previous section
  • vault.hashicorp.com/agent-inject-secret-secret-database-config.txt: internal/data/database/config: This will be one annotation per secret we plan to add, and it is composed of three parts:
    • vault.hashicorp.com/agent-inject-secret- this part is fixed
    • secret-database-config.txt this part will be the filename that is created under /vault/secrets inside our pod
    • internal/data/database/config This is the path inside the vault of our secret to being linked to that file.

And that’s it! If we deploy now our deployment we will see the following things:

  • Our deployment application has been launched with three containers instead of one because two of them are Hashicorp Vault related, as you can see in the picture below:
  • vault-agent-init will be the container that establishes the connection to the vault-server because any container starts and does the first download and injecting secrets in the pod based on the configuration provided.
  • vault-agent will be the container running as a watcher to detect any modification on the related secrets and update them.

And now, if we go to the main container, we will see in the /vault/secrets path the secret has been finally injected as expected:

And this is how easily and without any knowledge about the underlying app we can inject secrets in pods using Hashicorp Vault.

Best USB Charger To Keep In Your BackPack: A 2022 Edition

Introduction

There are so many different kinds of USB chargers you need to use in your daily life of very different types. We already covered some of the best complete chargers for Apple devices but today we are going to talk about the cables, but it s the same story: type c usb charger, USB PD charger, lightning charger, micro USB charger, and even more important there so many brands and qualities and factors that make complex.

So, today I would like to talk about the different cables that I used or am using today, especially on my backpack to bring always with me to help me with the complicated duty to have always the batteries of my devices charged and try to pack as minimal as possible. I would like to share with you a link and a price range as well so you can choose what works best for you in case you are looking for a USB charger.

Baseus 3 in 1 Type C USB Charger for iPhone 13 12 Retractable Fast Charger Cable 100W USB Type C Cable for Macbook Pro Samsung Xiaomi

I will start with my current favorite because it covers the main things that I need, first of all, is a type c charger from the source, so you will need to have an adapter c plug to charge it, or a device such as a type c laptop or similar to provide the energy from.

On the other side, it has 3 options: another type c charger, a lightning charger for apple devices, and a micro USB charger for this low battery or quite old devices that still need this way of charging.

Regarding its length is around 1.1 m but it is also retractile so you can always have it collapsed when you are not using it or when the target device is close to you always will use a minimum size on your backpack. You have several colors (the one I chose is black because I am pretty much a black device kind of person) but you can choose from black to green or pink or blue depending on your preference.

The great thing is that the USB c charger can provide up to 100 W so which means that this cable can charge your laptop or big device if needed and that’s a very important thing when you are planning to buy one of these USB chargers

The main problem with this product is the price because all these capabilities come with a price, the cost is around 25$ for this version, but they also provide other options in case you don’t need all these features.

If you would like to have a USB port instead of a USB c port in origin, they have another version that has the same capabilities but the charge goes up to 66W so it would be not useful to charge your devices on the other hand it would be easier to use it as pretty much everything today has a USB A port (your car, an AC adapter, or even your toothbrush case such as the one using some models of Oral B toothbrush. Here is the link for the 66W version that is also available in several colors and the price comes down to 15$ in this case:

3A PD 60W USB Type C To USB C 3.1 Gen2 10Gbps Data Cable USB C QC3.0 Fast Charge Video SSD Short USB Cord Wire For MacBook Pro

Awesome small PD USB c to USB c with less than 13 cm that is the perfect size to plug my laptop to my external battery to plug my MacBook pro when I am outdoors and I don’t have access to any other option. Has the support for Power Delivery so that’s an awesome option to have a minimal cable to pack with your battery always together and the price is also competitive such as 5$

Other options in case you are looking for longer cables as I used to replace the original ones from my MacBook that it hasn’t been of the best quality you can take a look at this also a very competitive price of $2 for 2 cables of 1 m long:

Portable Magnetic Wireless Charger for Apple Watch 7 6 5 4 3 2 1 Fast Charging Pad Station for Samsung Galaxy Watch S3 S4 Active

Let’s also include a mini cable charger for an apple watch or Samsung watch if you already have one. This small device will help you to charge your smartwatch quite easily as it has two ports: one USB A and another USB C so you can choose the port that works best for you. Sometimes you will use the USB C port of your laptop other types the USB A that is available at the airport or at your AC adapter and you will provide a new charge to your smartwatch to continue to use it on the go. All of that is at a price of around $6.

OpenLens vs Lens: A New Battle Starts in January 2023

OpenLens vs Lens: A New Battle Starting in January 2023

Introduction

We already talked about Lens several times in different articles but today I am bringing it here OpenLens because after the release of Lens 6 in late July a lot of questions have arrises, especially regarding its change and the relationship with the OpenLens project, so I thought it could be very interesting to bring some of this data all together in the same place so any of you is quite confused. So I would try to explain and answer the main questions you can have at the moment.

What is OpenLens?

OpenLens is the open source project that is behind the code that supports the main functionality of Lens, the software to help you manage and run your Kubernetes Clusters. It is available on GitHub here (https://github.com/lensapp/lens) and it is totally open-source and distributed over an MIT License. In its own words this is the definition:

This repository ("OpenLens") is where Team Lens develops the Lens IDE product together with the community. It is backed by a number of Kubernetes and cloud-native ecosystem pioneers. This source code is available to everyone under the MIT license

OpenLens vs Lens?

So the main question you could have at the moment is what is the difference between Lens and OpenLens. The main difference is that Lens is built on top of OpenLens including some additional software and libraries with different licenses. It is developed by the Mirantis team (the same company that owns the Docker Enterprise) and it is distributed under a traditional EULA.

OpenLens vs Lens: A New Battle Starting in January 2023

Is Lens going to be private?

We need to start by saying that since the beginning Lens has been released under a traditional EULA, so on that front there is not much difference, we can say that OpenLens is Open Source but Lens is Freeware or at least was freeware at that point. But on 28th July we had the release of Lens 6 where the difference between projects started to arise.

As commented on the Mirantis Blog Post a lot of changes and new capabilities have been included but on top of that also the vision has been revealed. As the Mirantis team says they don’t stop at the current level Lens has today to manage the Kubernetes cluster they want to go beyond providing also a Web version of Lens to simplify even more the access, also extend its reach beyond Kubernetes, and so on.

So, you can admit that this is a very compelling vision and very ambitious at the same time and that’s why also they are doing some changes to the license and model, which we are going to talk about below.

Is Lens still free?

We already commented that Lens was always released under a traditional EULA so it was not Open Source like other projects such as its core in OpenLens, but was free to use. With the release on July 28th, this is changing a bit to support their new vision.

They are releasing a new subscription model depending on the usage you are doing of the tool and the approach is very similar to the one they did at the time with Docker Desktop if you remember that we handle that on an article too.

  • Lens Personal subscriptions are for personal use, education, and startups (less than $10 million in annual revenue or funding). They are free of charge.
  • Lens Pro subscriptions are required for professional use in larger businesses. The pricing is $19.90 per user/month or $199 per user/year.

The new license applied with the release of Lens 6 on 28th July but they have provided a Grace Period until January 2023 so you can adapt to this new model.

Should I stop using Lens now?

This is, as always, up to you, but things are going to be the same until January 2023 and at that point, you need to formalize your situation with Lens and Mirantis. If you are under the situation of a Lens Personal license because you are working for a startup or open-source, you can continue to do so without any problem. If that’s not the case, it is up to the company if the additional features they are providing now and also the vision to the future justify the investment you need to do on the Lens Pro license.

You will always have the option to switch from Lens to OpenLens it will not be 100% the same but the core functionalities and approach at this moment will continue to be the same and the project for sure will be very very active. And also as Mirantis already confirmed in the same blog post: “There are no changes to OpenLens licensing or any other upstream open source projects used by Lens Desktop.” So you cannot expect the same situation happens if you are switching to OpenLens or already using OpenLens.

How can I install OpenLens?

Installation of OpenLens is a little bit tricky because you need to generate your build from the source, but to ease that path has been several awesome people that are doing that on their GitHub repositories such as Muhammed Kalkan that is providing a repo with the latest versions with only Open Source components for the major platforms (Windows, macOS X (Intel and Silicon) or Linux) available here:

What Features I am Losing if I switch to OpenLens?

For sure there will be some features that you will be losing if you switch from Lens to OpenLens which are the ones that are provided using the licensed pieces of software. Here we include a non-exclusive list of our experiences using both products:

  • Account Synchronization: All the capabilities of having all your Kubernetes Cluster under your Lens Account and sync will not be available on OpenLens. You will rely on the content of the kubeconfig file
  • Spaces: The option to have your configuration shared between different users that belongs to the same team is not available on OpenLens.
  • Scan Image: One of the new capabilities of the Lens 6 is the option to scan the image of the containers deployed on the cluster, but this is not available on OpenLens.

Hadolint: Best Practices for your Dockerfiles In 3 Different Models

Introduction

Hadolint is an open-source tool that will help you ensure that all the Dockerfiles you create follow all the Dockerfile best practices available in an automated way. Hadolint, as the number already suggested, is a linter tool and, because of that, can also help you to teach you all these best practices when creating Dockerfiles yourself. We already talked about it the optimization of container image size, but today we are going to try to cover it more in-depth.

Hadolint is a smaller tool written in Haskell that parses the Dockerfile into an AST and performs rules on top of the AST. It stands on the shoulders of ShellCheck to lint the Bash code inside RUN instructions, as shown in the picture below:

There are several ways to run the tool, depending on what you try to achieve, and we will talk a little bit about the different options.

Running it as a standalone tool

This is the first way we can run it as a complete standalone tool that you can download from here , and it will need to do the following command.

 hadolint <Dockerfile path>

It will run against it and show any issue that is found, as you can see in the picture below:

Hadolint execution

For each of the issues found, it will show the line where the problem is detected, the code of the Dockerfile best practice check that is being performed (DL3020), the severity of the check (error, warn, info, and so on), and the description of the issue.

To see all the rules that are being executed, you can check them in the GitHub Wiki , and all of them are based on the Dockerfile best practices published directly from Docker on its official web page here.

For each of them, you will find a specific wiki page with all the information you need about the issue and why this is something that should be changed, and how it should be changed, as you can see in the picture below:

Hadolint GitHub Wiki page

Ignore Rules Capability

You can ignore some rules if you don’t want them to be applied because there are some false-positive or just because the checks are not aligned with the Dockerfile best practices used in your organization. To do that, you can include an —ignore parameter with the rule to be applied:

 hadolint --ignore DL3003 --ignore DL3006 <Dockerfile>

Running it as Docker Container

Also, the tool is available as a Docker container in the following repos:

docker pull hadolint/hadolint
# OR
docker pull ghcr.io/hadolint/hadolint

And this will help you to be introduced to your Continuous Integration and Continuous Deployment or just to be used in your local environment if you prefer not to install software locally.

 Running it inside VS Code

Like many linters, it is essential to have it close to your development environment; this time is nothing different. We would like to have the Dockerfile best practice relative to the editor while we are typing for two main reasons:

  • As soon as you get the issue, you will fix it faster so the code always will have better quality
  • As soon as you know of the issue, you will not make it again in newer developments.

You will have a Hadolint as part of the Extensions: Marketplace, and you can install it:

Hadolint VS Code Extension


Once you have that done, each time you open a Dockerfile, you will validate against all these Dockerfile best practices, and it will show the issues detected in the Problems view, as you can see in the picture below:

Hadolint: VS Code Extension Execution

And those issues will be re-evaluated as soon as you modify and save the Dockerfile again, so you will always see the live version of the problem detected against the Dockerfile best practices.

TIBCO BW Hashicorp Vault Configuration: More Powerful and Better Secured in 3 Steps

Introduction

This article aims to show the TIBCO BW Hashicorp Vault Configuration to integrate your TIBCO BW application with the secrets stored in Hashicorp Vault, mainly for the externalization and management of password and credentials resources.

As you probably know, in the TIBCO BW application, the configuration is stored in Properties at different levels (Module or Application properties). You can read more about them here. And the primary purpose of that properties is to provide flexibility to the application configuration.

These properties can be of different types, such as String, Integer, Long, Double, Boolean, and DateTime, among other technical resources inside TIBCO BW, as shown in the picture below:

TIBCO BW Hashicorp Vault Configuration: BW Property Types

The TIBCO BW Hashicorp Vault integration will affect only those properties of Password type (at least up to 2.7.2/6.8.1 BW version). The reason behind that is that those properties are the kind of data relevant to the information that is sensitive and needs to be secure. Other concepts can be managed through standard Kubernetes components such as ConfigMaps.

BW Application Definition

We are going to start with a straightforward application, as you can see in the picture below:

TIBCO BW Hashicorp Vault Configuration: Property sample

Just a simple timer that will be executed once and insert the current time into the PostgreSQL database. We will use Hashicorp Vault to store the password of the database user to be able to connect to it. The username and the connection string will reside on a ConfigMap.

We will skip the part of the configuration regarding the deployment of the TIBCO BW application Containers and link to a ConfigMap you have an article covering that in detail in case you need to follow it, and we will focus just on the topic regarding TIBCO BW Hashicorp Vault integration.

So we will need to tell TIBCO BW that the password of the JDBC Shared Resource will be linked to Hashicorp Vault configuration, and to do that, the first thing is to have tied the Password of the Shared Resources to a Module Property as shown in the picture below:

TIBCO BW Hashicorp Vault Configuration: Password linked to Module Property

Now, we need to tell this Module Property that is Linked to Hashicorp Vault, and we will do that on the Application Property View, selecting that this property is linked to a Credential Management Solution as shown in the picture below:

TIBCO BW Hashicorp Vault Configuration: Credential Management Configuration for Property

And it is now when we establish the TIBCO BW Hashicorp Vault relationship. We need to click directly on the green plus sign, and we will have a modal window asking for the technology of credentials management that we’re going to use and the data needed for each of them, as you can see in the following picture:

TIBCO BW Hashicorp Vault Configuration: Credential Management Configuration for Property

We will select Hashicorp Vault as the provided. Then we will need to provide three attributes that we already commented on in the previous article when we start creating secrets in Hashicorp Vault:

  • Secret Name: this is the secret name path after the root path of the element.
  • Secret Key: This is the key inside the secret itself
  • Mount Path: This is the root path of the secret

To get more details about these three concepts, please look at our article about how to create secrets in Hashicorp Vault.

So with all this, we have pretty much everything we need to connect to Hashicorp Vault and grab the secret, and from the TIBCO BW BusinessStudio side, everything is done; we can generate the EAR file and deploy it into Kubernetes because here it is the last part of our configuration.

 Kubernetes Deployment

Until this moment, we have the following information already provided:

  • BW Process that has the login to connect to the Database and insert information
  • Link between the password property used to connect and the Hashicorp Secret definition

So, pretty much everything is there, but one concept is missing. How will the Kubernetes Pod connect to Hashicorp once the pod is deployed? Until this point, we didn’t provide the Hashicorp Vault server location of the authentication method to connect to it. This is the missing part of the TIBCO BW Hashicorp Vault integration and will be part of the Kubernetes Deployment YAML file.

We will do that using the following environment properties in this sample:

TIBCO BW Hashicorp Vault Configuration: Hashicorp Environment Variables
  • HASHICORP_VAULT_ADDR: This variable will point to where the Hashicorp Vault server is located
  • HASHICORP_VAULT_AUTH: This variable will indicate which authentication options will be used. In our case, we will use the token one as we used in the previous article
  • HASHICORP_VAULT_KV_VERSION: This variable indicates which version of the KV storage solution we are using and will be two by default.
  • HASHICORP_VAULT_TOKEN: This will be just the token value to be able to authentication against the Hashicorp Vault server

If you are using other authentication methods or just want to know more about those properties please take a look at this documentation from TIBCO.

With all that added to the environment properties of our TIBCO BW application, we can run it, and we will get an output similar to this one, and that shows that the TIBCO BW Hashicorp Vault integration has been done and the application was able to start without any issue

TIBCO BW Hashicorp Vault Configuration: Running sample

Create Secrets in Hashicorp Vault Using 2 Easy Ways

Introduction

Create secrets in Hashicorp Vault is one of the most important and relevant things you can do once you have installed Hashicorp Vault on your environment, probably by recovering and getting these secrets from the components they need it. But in today’s article, we will focus on the first part so you can learn how easily you can create secrets in Hashicorp Vault.

In previous articles we commented on the importance of Hashicorp Vault and the installation process, as you can read here. Hence, at this point, we already have our vault ready to start working with it wholly initialized and unseal to be able to start serving requests.

Create Secrets in Hashicorp Vault using Hashicorp Vault CLI Commands

All the commands we will do will use a critical component named Hashicorp Vault CLI, and you will notice that because all of our commands will start with vault. To be honest, we already started with that in the previous article; if you remember, we already run some of these commands to initialize or unseal the vault, but now this will be our main component to interact with.

The first thing we need to do is to be able to log into the vault, and to do that; we are going to use the root token that was provided to us when we initialized the vault; we are going to store this vault in an environment variable so it will be easy to work with it. All the commands we are going to run now are going to be inside the vault agent server pod, as shown in the picture below:

Create Secrets in Hashicorp Vault: Detecting Vault Server Pod

Once we are inside of it, we are going to do the log command with the following syntax:

 vault login 

And we will get an output similar to this one:

Create Secrets in Hashicorp Vault: Login in Hashicorp Vault

If we do not provide the token in advance, the console will ask for the token to be typed afterward, and it will be automatically hidden, as you can see in the picture below:

Create Secrets in Hashicorp Vault: Login without Token provided

After this point, we are already logged into the vault, so we can start typing commands to create secrets in Hashicorp Vault. Let’s start with that process.

To start with our process for creating secrets in Hashicorp Vault, we first need to make or be more accurate to the Hashicorp Vault syntax to enable a secret path that you can think about as the root path to which all your secrets will be related to. If we are talking about having secrets for different applications, each path can be each of the applications, but the organization of secrets can be other depending on the context. We will cover that in much more detail in the following articles.

To enable the secret path to start the creation of secrets in Hashicorp Vault, we will type the following command:

 vault secrets enable -path=internal kv-v2

That will enable a secret store of the type kv-v2 (key-value store in its v2), and the path will be “internal,” so everything else that we create after that will be under this “internal” root path.

And now, we’re going to do the creation of the secret in Hashicorp Vault, and as we are using a key-value store, the syntax is also related to that because we are going to “put” a secret using the following command:

 vault kv put internal/database/config username="db-readonly-username" password="db-secret-password"

That will create inside the internal path a child path /database/config where it will store two keys:

  • username that will have the value db-readonly-username
  • password that will have the value db-secret-password

As you can see, it is quite easy to create new secrets on the Vault linked to the path, and if you want to retrieve its content, you can also do it using the Vault CLI, but this time using the get command as shown in the snippet below:

 vault kv get internal/database/config

And the output will be similar to the one shown below:

Create Secrets in Hashicorp Vault: Retrieving Secrets from the Vault

This will help you interact with your store’s content to retrieve, add or update what you already have there. Once you have everything ready there, we can move to the client side to configure it to gather all this data as part of its lifecycle workflow.

Create Secrets in Hashicorp Vault using REST API

The Hashicorp Vault CLI simplifies the interaction with the vault server, but all the interaction between the CLI and the server happens through a REST API that the server exposes and the CLI client consumes. It provides a simplified syntax to the user and translates the parameters provided into REST requests to the server, but you can use also REST requests to go to the server directly. Please look at this article in the official documentation to get more details about the REST API.