Save time and money on your application platform deploying applications differently in Kubernetes.
We have come from a time where we deploy an application using an apparent and straight-line process. The traditional way is pretty much like this:
Wait until a weekend or some time where the load is low, and business can tolerate some service unavailability.
We schedule the change and warn all the teams involved for that time to be ready to manage the impact.
We deploy the new version and we have all the teams during the functional test they need to do to ensure that is working fine, and we wait for the real load to happen.
We monitor during the first hours to see if something wrong happens, and in case it does, we establish a rollback process.
As soon as everything goes fine, we wait until the next release in 3–4 months.
But this is not valid anymore. Business demands IT to be agile, change quickly, and not afford to do that kind of resource effort each week or, even worse, each day. Do you think that it’s possible to gather all teams each night to deploy the latest changes? It is not feasible at all. So, technology advance to help us solve that issue better, and here is where Canarying came here to help us.
Introducing Canary Deployments
Canary deployments (or just Canarying as you prefer) are not something new, and a lot of people has been talking a lot about it:
bliki: CanaryRelease
A canary release occurs when you roll out a new version of some software to a small subset of your user base to see if there are any problems before you make it available to everyone.
Google - Site Reliability Engineering
Release engineering is a term we use to describe all the processes and artifacts related to getting code from a repository into a running production system. Automating releases can help avoid many of the traditional pitfalls associated with release engineering: the toil of repetitive and manual task…
It has been here for some time, but before, it was neither easy nor practical to implement it. Basically is based on deploying the new version into production, but you still keeping the traffic pointing to the old version of the application and you just start shifting some of the traffic to the new version.Canary release in Kubernetes environment graphical representation Based on that small subset of requests you monitor how the new version performs at different levels, functional level, performance level, and so on. Once you feel comfortable with the performance that is providing you just shift all the traffic to the new version, and you deprecate the old versionRemoval of old version after all traffic has been shifted to the newly deployed version. The benefits that come with this approach are huge:
You don’t need a big staging environment as before because you can do some of the tests with real data into the production while not affecting your business and the availability of your services.
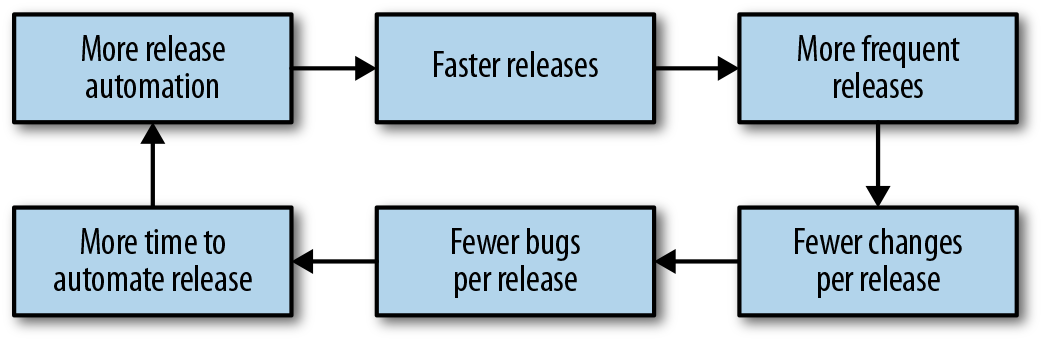
You can reduce time to market and increase the frequency of deployments because you can do it with less effort and people involved.
Your deployment window has been extended a lot as you do not need to wait for a specific time window, and because of that, you can deploy new functionality more frequently.
Implementing Canary Deployment in Kubernetes
To implement Canary Deployment in Kubernetes, we need to provide more flexibility to how the traffic is routed among our internal components, which is one of the capabilities that get extended from using a Service Mesh. We already discussed the benefits of using a Service Mesh as part of your environment, but if you would like to retake a look, please refer to this article:
Technology wars: API Management Solution vs Service Mesh
Service Mesh vs. API Management Solution: is it the same? Are they compatible? Are they rivals? Photo by Alvaro Reyes on Unsplash When we talk about communication in a distributed cloud-native world and especially when we are talking about container-based architectures based on Kubernetes platform like AKS, EKS, Openshift, and so on, two technologies generate a lot […]
We have several technology components that can provide those capabilities, but this is how you will be able to create the traffic routes to implement this. To see how you can take a look at the following article about one of the default options that is Istio:
Integrating Istio with BWCE Applications
Introduction Services Mesh is one the “greatest new thing” in our PaaS environments. No matter if you’re working with K8S, Docker Swarm, pure-cloud with EKS or AWS, you’ve heard and probably tried to know how can be used this new thing that has so many advantages because it provides a lot of options in handling […]
But be able to route the traffic is not enough to implement a complete canary deployment approach. We also need to be able to monitor and act based on those metrics to avoid manual intervention. To do this, we need to include different tools to provide those capabilities: Prometheus is the de-facto option to monitor workloads deployed on the Kubernetes environment, and here you can get more info about how both projects play together.
Kubernetes Service Discovery for Prometheus
In previous posts, we described how to set up Prometheus to work with your TIBCO BusinessWorks Container Edition apps, and you can read more about it here. In that post, we described that there were several ways to update Prometheus about the services that ready to monitor. And we choose the most simple at that […]
And to manage the overall process, you can have a Continuous Deployment tool to put some governance around that using options like Spinnaker or using our of the extensions for the Continuous integration tools like GitLab or GitHub:
Using Spinnaker for Automated Canary Analysis
Automated canary analysis lets you partially roll out a change then evaluate it against the current deployment to assess its performance.
Summary
In this article, we covered how we can evolve a traditional deployment model to keep pace with innovation that businesses require today and how canary deployment techniques can help us on that journey, and the technology components needed to set up this strategy in your own environment.
Maximizing the productivity of working with Kubernetes Environment with a tool for each persona
We all know that Kubernetes is the default environment for all our new applications we developed we will build. The flavor of that Kubernetes platform can be of different ways and forms, but one thing is clear, it is complex.
The reasons behind this complexity is being able to provide all the flexibility but it is also true that the k8s project never has put much effort to provide a simple way to manage your clusters and kubectl is the point of access to send commands leaving this door open to the community to provide its own solution and these are the things that we are going to discuss today.
Kubernetes Dashboard: The Default Option
Kubernetes Dashboard is the default option for most of the installations. It is a web-based interface that is part of the K8s project but not deployed by default when you install the cluster
K9S: The CLI option
K9S is one of the most common options for the ones that love a very powerful command-line interface with a lot of options at your disposal
It is a mix between all the power of a command-line interface with all the keyboard options at your disposals with a very fancy graphical view to have a quick overview of the status of your cluster at glance.
Lens — The Graphical Option
The lens is a very vitaminized GUI option that goes beyond that just showing the status of the K8S cluster or allowing modifications on the components. With integration with other projects such as Helm or support for the CRD. It provides a very pleasant experience of managing clusters with multi-cluster support as well. To know more about Lens you can take a look at this article that we cover its main features:
Lens Could Be the Tool That You Were Missing to Master Kubernetes-Based Development and Management
Find the greatest way to manage your Kubernetes development cluster Photo by Agence Olloweb on Unsplash. I need to start this article by admitting that I am an advocate of Graphical User Interfaces and everything that provides a way to speed up the way we do things and be more productive. So when we talk […]
Octant — The Web Option
Octant provides an improved experience compared with the default web option discussed in this article using the Kubernetes dashboard. Built for extension with a plug-in system that allows you to extend or customize the behavior of octant to maximize your productivity managing K8S clusters. Including CRD support and graphical visualization of dependencies provides an awesome experience.
Summary
The have provided in this article different tools that will help you during the important task to manage or inspect your Kubernetes cluster. Each of them with its own characteristics and each of them focuses on different ways to provide the information (CLI, GUI and Web) so you can always find one that works best for your situation and preferences.
KEDA provides a rich environment to scale your application apart from the traditional HPA approach using CPU and Memory
Autoscaling is one of the great things of cloud-native environments and helps us to provide an optimized use of the operations. Kubernetes provides many options to do that being one of those the Horizontal Pod Autoscaler (HPA) approach.
HPA is the way Kubernetes has to detect if it is needed to scale any of the pods, and it is based on the metrics such as CPU usage or memory.
Sometimes those metrics are not enough to decide if the number of replicas we have available is enough. Other metrics can provide a better perspective, such as the number of requests or the number of pending events.
Kubernetes Event-Driven Autoscaling (KEDA)
Here is where KEDA comes to help. KEDA stands for Kubernetes Event-Driven Autoscaling and provides a more flexible approach to scale our pods inside a Kubernetes cluster.
It is based on scalers that can implement different sources to measure the number of requests or events that we receive from different messaging systems such as Apache Kafka, AWS Kinesis, Azure EventHub, and other systems as InfluxDB or Prometheus.
KEDA works as it is shown in the picture below:
We have our ScaledObject that links our external event source (i.e., Apache Kafka, Prometheus ..) with the Kubernetes Deployment we would like to scale and register that in the Kubernetes cluster.
KEDA will monitor the external source, and based on the metrics gathered, will communicate the Horizontal Pod Autoscaler to scale the workload as defined.
Testing the Approach with a Use-Case
So, now that we know how that works, we will do some tests to see it live. We are going to show how we can quickly scale one of our applications using this technology. And to do that, the first thing we need to do is to define our scenario.
In our case, the scenario will be a simple cloud-native application developed using a Flogo application exposing a REST service.
The first step we need to do is to deploy KEDA in our Kubernetes cluster, and there are several options to do that: Helm charts, Operation, or YAML files. In this case, we are going to use the Helm charts approach.
So, we are going to type the following commands to add the helm repository and update the charts available, and then deploy KEDA as part of our cluster configuration:
After running this command, KEDA is deployed in our K8S cluster, and it types the following command kubectl get all will provide a situation similar to this one:
Now, we are going to deploy our application. As already commented to do that we are going to use our Flogo Application, and the flow will be as simple as this one:
Flogo application listening to the requests
The application exposes a REST service using the /hello as the resource.
Received requests are printed to the standard output and returned a message to the requester
Once we have our application deployed on our Kubernetes application, we need to create a ScaledObject that is responsible for managing the scalability of that component:
ScaleObject configuration for the application
We use Prometheus as a trigger, and because of that, we need to configure where our Prometheus server is hosted and what query we would like to do to manage the scalability of our component.
In our sample, we will use the flogo_flow_execution_count that is the metric that counts the number of requests that are received by this component, and when this has a rate higher than 100, it will launch a new replica.
After hitting the service with a Load Test, we can see that as soon as the service reaches the threshold, it launch a new replica to start handling requests as expected.
Autoscaling being done using Prometheus metrics.
All of the code and resources are hosted in the GitHub repository shown below:
This post has shown that we have unlimited options in deciding the scalability options for our workloads. We can use the standard metrics like CPU and memory, but if we need to go beyond that, we can use different external sources of information to trigger that autoscaling.
The market is shifting at a speed that is needed to be ready to change very quickly, customers are becoming more and more demanding and we need to be able to deliver what they are expecting, and to do so we need an architecture that is responsive enough to be able to adapt at the pace that is required.
Event-Driven Architectures (usually just referred to as EDA) are architectures where events are the crucial part of it and we design components ready to handle those events in the most efficient way. An architecture that is ready to react to what’s happening around us instead of just setting a specific path for our customers.
This approach provides a lot of benefits to enterprises because of its characteristics but also at the same time it requires a different mindset and a different set of components in place.
What is an Event?
Let’s start with the beginning. An event is anything that can happen and it is important to you. If you think about a scenario where a user is just navigating through an e-commerce website, everything that he has is an event. If we land on the e-commerce site because he had a referral link, that is an event.
Events not only happen in virtual life but in real life too. A person just walking into the lobby of the hotel is an event, going in front of the reception desk to do the check-in is another, just walking to his room is another… everything is an event.
Events in isolation provide a small piece of information but together they can provide a lot of valuable information about the customers, their preferences, their expectations, and also their needs. And all of that will help us to provide the most customized experience to each one of our customers.
EDA vs Traditional Architectures
Traditional architectures work in pull mode, which means that a consumer sends a request to a service, that services need other components to do the logic, it goes the answer and it answers back. Everything is pre-defined.
Events work in a different way because they work on the push mode, Events are being sent and that’s it, it could trigger one action, many actions, or none. You have a series of components waiting, listening until the event or the sequence of events they need to activate appears in front of them and when it does, it just triggers its logic and as part of that execution generates one or more events to be able to be consumed again.
Pull vs Push mode for Communication.
To be able to build an Event-Driven Architecture the first thing we need is to have Event-Driven Components. We need software components that are activated based on events and also generate events as part of their processing logic. At the same time, this sequence of events also becomes the way to complete complex flows in a cooperation mode without the need or a master-mind component that is aware of all the flow from end to end.
You just have components that know that when happens this, they need to do their part of the job and other components will listen to the output of that components and be activated.
This approach is called Choreography because it works the same way in a ballet company where each of the dancers can be doing different moves but each of them knows exactly what they should do and all together in sync generate the whole piece.
Layers of an Event-Driven Architecture
Now that we have software components that are being activated using events we need some structure around that in our architecture to cover all the needs in the management of the events, so we need to handle the following layers:
Layers of the Event Driven-Architecture
Event Ingestion: We need a series of components that helps us to introduce and receive events in our systems. As we explained there are tons and tons of ways to send events so it is important that we offer flexibility and options in that process. Adapters and API are crucial here to make sure all the events can be gathered and be part of the system.
Event Distribution: We need an Event Bus that acts like our Event Ocean where all the events are flowing across to be able to activate all the components that are listening to that event.
Event Processing: We need a series of components to listen to all the events that are sent and make them meaningful. These components should act as security guards: They filter the events that are not important, they also enrich the events they receive with context information from other systems or data sources, and they transform the format of some events to make it easy to understand to all the components that are waiting for those events.
Event Action: We need a series of components listening to those events and ready to react to what is seen in the Event Bus as soon as detect that they expect to start doing their logic and send the output again to the bus to be used for somebody else.
Summary
Event-Driven Architecture can provide a much more agile and flexible ecosystem where companies can address the current challenges to dispose a compelling experience to users and customers and at the same time provide more agility to the technical teams being able to create components that work in collaboration but loosely coupled making the components and teams more autonomous.
KubeEye supports you in the task of ensuring that your cluster is performing well and ensure all your best practices are being followed.
Kubernetes has become the new normal to deploy our applications and other serverless options, so the administration of these clusters has become critical for most enterprises, and doing a proper Kubernetes Health Check is becoming critical.
This task is clear that it is not an easy task. As always, the flexibility and power that technology provides to the users (in this case, the developers) also came with a trade-off with the operation and management’s complexity. And this is not an exception to that.
We have evolved, including managed options that simplify all the underlying setup and low-level management of the infrastructure behind it. However, many things need to be done for the cluster administration to have a happy experience in the journey of a Kubernetes Administrator.
A lot of concepts to deal with: namespaces, resource limits, quotas, ingress, services, routes, crd… Any help that we can get is welcome. And with this purpose in mind, KubeEye has been born.
GitHub – kubesphere/kubeeye: KubeEye aims to find various problems on Kubernetes, such as application misconfiguration, unhealthy cluster components and node problems.
KubeEye aims to find various problems on Kubernetes, such as application misconfiguration, unhealthy cluster components and node problems. – GitHub – kubesphere/kubeeye: KubeEye aims to find variou…
KubeEye is an open-source project that helps to identify some issues in our Kubernetes Clusters. Using their creators’ words:
KubeEye aims to find various problems on Kubernetes, such as application misconfiguration(using Polaris), cluster components unhealthy and node problems(using Node-Problem-Detector). Besides predefined rules, it also supports custom defined rules.
So we can think like a buddy that is checking the environment to make sure that everything is well configured and healthy. Also, it allows us to define custom rules to make sure that all the actions that the different dev teams are doing are according to the predefined standards and best practices.
So let’s see how we can include KubeEye to do a health check of our environment. The first thing we need to do is to install it. At this moment, KubeEye only offers a release for Linux-based system, so if you are using other systems like me, you need to follow another approach and type the following commands:
After doing that, we end up with a new binary in our PATH named `ke`, and this is the only component needed to work with the app. The second step we need to do to get more detail on those diagnostics is to install the node problem detector component.
This component is a component installed in each node of the cluster. It helps to make more visible to the upstream layers issues regarding the behavior of the Kubernetes cluster. This is an optional step, but it will provide more meaningful data, and install that, we need to run the following command.
ke install npd
And now we’re ready to start checking our environment, and the order is as easy as this one.
ke diag
This will provide an output similar to this that is compounded by two different tables. The first one will be focused on the Pod and the issues and events raised as part of the platform’s status, and the other will focus on the rest of the elements and kinds of objects for the Kubernetes Clusters.
Output from the ke diag command
The table for the issues at the pod level has the following fields:
Namespace where the pod belongs to.
Severity of the issue.
Pod Name that is responsible for the issue
EventTime of where this event has been raised
Reason for the issue
Message with the detailed description of the issue
The second table for the other objects has the following structure:
Namespace where the object that has an issue that is being detected is deployed.
Severity of the issue.
Name of the component
Kind of the component
Time of where this issue has been raised
Message with the detailed description of the issue
Command’s output can also show other tables if some issues are detected at the node level.
Today we cover a fascinating topic as it is the Kubernetes Administration and introduce a new tool that helps your daily task.
I truly expect that this tool can be added to your toolbox and ease the path for a happy and healthy Kubernetes Cluster administration!
Development Security is one of the big topics of today’s development practice. All the improvements that we got following the DevOps practices have generated many issues and concerns from the security perspective.
The explosion of components that the security teams need to deal with, container approaches, and polyglot environments gave us many benefits from the development and the operational perspective. Still, it made the security side of it more complex.
This is why there have been many movements regarding the “Shift left” approach and including security as part of the DevOps process creating the new term for DevSecOps that is becoming the new normal.
DevOps tech: Shifting left on security | Google Cloud
Security is everyone’s responsibility. The 2016 State of DevOps Report (PDF) research shows that high-performing teams spend 50 percent less time remediating security issues than low-performing teams. By better integrating information security (InfoSec) objectives into daily work, teams can achieve…
So, today what I would like to bring to you is a set of tools that I have just discovered that are created with the approach of making your life easier from the development security perspective because also developers need to be part of this and not leave all the responsibility to a different team.
This set of tools is name Anchore Toolbox, and they are open source and free to use, as you can see on the official webpage (https://anchore.com/opensource/)
So, what Anchore can provide to us? At the moment, we are talking about two different applications: Syft and Grype.
Syft
GitHub – anchore/syft: CLI tool and library for generating a Software Bill of Materials from container images and filesystems
CLI tool and library for generating a Software Bill of Materials from container images and filesystems – GitHub – anchore/syft: CLI tool and library for generating a Software Bill of Materials from…
Syft is a CLI tool and go library for generating a Software Bill of Materials (SBOM) from container images and filesystems. Installation is as easy as just executing the following command:
curl -sSfL https://raw.githubusercontent.com/anchore/syft/main/install.sh | sh -s -- -b /usr/local/bin
And after doing that, we need to type syft to see all the options at our disposal:
Syft help menu with all the options available
So, in our case, I will use to generate a bill of materials from an existing Docker image from bitnami/kafka to show how this works. I need to type the following command:
syft bitnami/kafka
And after a few seconds to have the image loaded and analyzed, I get as the output the list of all and each of the packages that this image has installed and the version of each of them as shown in the picture below. One great thing is that it shows not only the operating system packages like what we have installed using apk or apt but also other components like java libraries as well so we can have a complete bill of materials for this container image.
[0019] WARN unexpectedly empty matches for archive ‘/opt/bitnami/kafka/libs/kafka_2.12–2.7.0-javadoc.jar’
[0019] WARN unexpectedly empty matches for archive ‘/opt/bitnami/kafka/libs/kafka_2.12–2.7.0-javadoc.jar’
[0019] WARN unexpectedly empty matches for archive ‘/opt/bitnami/kafka/libs/scala-java8-compat_2.12–0.9.1.jar’
[0019] WARN unexpectedly empty matches for archive ‘/opt/bitnami/kafka/libs/scala-java8-compat_2.12–0.9.1.jar’
[0019] WARN unexpectedly empty matches for archive ‘/opt/bitnami/kafka/libs/kafka_2.12–2.7.0-test-sources.jar’
[0019] WARN unexpectedly empty matches for archive ‘/opt/bitnami/kafka/libs/kafka_2.12–2.7.0-test-sources.jar’
[0019] WARN unexpectedly empty matches for archive ‘/opt/bitnami/kafka/libs/jackson-module-scala_2.12–2.10.5.jar’
[0019] WARN unexpectedly empty matches for archive ‘/opt/bitnami/kafka/libs/jackson-module-scala_2.12–2.10.5.jar’
[0019] WARN unexpectedly empty matches for archive ‘/opt/bitnami/kafka/libs/kafka-streams-scala_2.12–2.7.0.jar’
[0019] WARN unexpectedly empty matches for archive ‘/opt/bitnami/kafka/libs/kafka-streams-scala_2.12–2.7.0.jar’
[0019] WARN unexpectedly empty matches for archive ‘/opt/bitnami/kafka/libs/kafka_2.12–2.7.0-test.jar’
[0019] WARN unexpectedly empty matches for archive ‘/opt/bitnami/kafka/libs/kafka_2.12–2.7.0-test.jar’
[0019] WARN unexpectedly empty matches for archive ‘/opt/bitnami/kafka/libs/scala-collection-compat_2.12–2.2.0.jar’
[0019] WARN unexpectedly empty matches for archive ‘/opt/bitnami/kafka/libs/scala-collection-compat_2.12–2.2.0.jar’
[0020] WARN unexpectedly empty matches for archive ‘/opt/bitnami/kafka/libs/kafka_2.12–2.7.0.jar’
[0020] WARN unexpectedly empty matches for archive ‘/opt/bitnami/kafka/libs/kafka_2.12–2.7.0.jar’
[0020] WARN unexpectedly empty matches for archive ‘/opt/bitnami/kafka/libs/kafka_2.12–2.7.0-sources.jar’
[0020] WARN unexpectedly empty matches for archive ‘/opt/bitnami/kafka/libs/kafka_2.12–2.7.0-sources.jar’
[0020] WARN unexpectedly empty matches for archive ‘/opt/bitnami/kafka/libs/scala-logging_2.12–3.9.2.jar’
[0020] WARN unexpectedly empty matches for archive ‘/opt/bitnami/kafka/libs/scala-logging_2.12–3.9.2.jar’
NAME VERSION TYPE
 java-archive
acl 2.2.53–4 deb
activation 1.1.1 java-archive
adduser 3.118 deb
aopalliance-repackaged 2.6.1 java-archive
apt 1.8.2.2 deb
argparse4j 0.7.0 java-archive
audience-annotations 0.5.0 java-archive
base-files 10.3+deb10u8 deb
base-passwd 3.5.46 deb
bash 5.0–4 deb
bsdutils 1:2.33.1–0.1 deb
ca-certificates 20200601~deb10u2 deb
com.fasterxml.jackson.module.jackson.module.scala java-archive
commons-cli 1.4 java-archive
commons-lang3 3.8.1 java-archive
...
Grype
GitHub – anchore/grype: A vulnerability scanner for container images and filesystems
A vulnerability scanner for container images and filesystems – GitHub – anchore/grype: A vulnerability scanner for container images and filesystems
Grype is a vulnerability scanner for container images and filesystems. It is the next step because it checks the image’s components and checks if there is any known vulnerability.
To install this component again is as easy as type the following command:
curl -sSfL https://raw.githubusercontent.com/anchore/grype/main/install.sh | sh -s -- -b /usr/local/bin
After doing that, we need to type grype to have the help menu with all the options at our disposal:
Grype help menu with all the options available
Grype works in the following one. The first thing it does is load the vulnerability DB to check the different packages against this database to search for any known vulnerability. After doing that, follow the same pattern as syft and generate the bill of materials and check each of the components into the vulnerability database, and if there is a match. It just provides the ID of the vulnerability, the severity, and, if this is fixed into a higher version, provides the version where this vulnerability has been fixed.
Here you can see the output regarding the same image from bitnami/kafka with all the vulnerabilities detected
[0018] ERROR matcher failed for pkg=Pkg(type=java-archive, name=, version=): matcher failed to fetch by CPE pkg=’’: product name is required
[0018] ERROR matcher failed for pkg=Pkg(type=java-archive, name=, version=): matcher failed to fetch by CPE pkg=’’: product name is required
[0018] ERROR matcher failed for pkg=Pkg(type=java-archive, name=, version=): matcher failed to fetch by CPE pkg=’’: product name is required
[0018] ERROR matcher failed for pkg=Pkg(type=java-archive, name=, version=): matcher failed to fetch by CPE pkg=’’: product name is required
[0018] ERROR matcher failed for pkg=Pkg(type=java-archive, name=, version=): matcher failed to fetch by CPE pkg=’’: product name is required
[0018] ERROR matcher failed for pkg=Pkg(type=java-archive, name=, version=): matcher failed to fetch by CPE pkg=’’: product name is required
NAME INSTALLED FIXED-IN VULNERABILITY SEVERITY
apt 1.8.2.2 CVE-2011–3374 Negligible
bash 5.0–4 CVE-2019–18276 Negligible
commons-lang3 3.8.1 CVE-2013–1907 Medium
commons-lang3 3.8.1 CVE-2013–1908 Medium
coreutils 8.30–3 CVE-2016–2781 Low
coreutils 8.30–3 CVE-2017–18018 Negligible
curl 7.64.0–4+deb10u1 CVE-2020–8169 Medium
..
Summary
These simple CLI tools help us a lot in the needed journey to keep our software current and free of known vulnerabilities and improve our development security. Also, as these are CLI apps and also can run on containers, it is effortless to include those as part of your CICD pipeline so vulnerabilities can check in an automated way.
They also provided a plugin to be included in the most used CI/CD systems such as Jenkins, Cloudbees, CircleCI, GitHub Actions, Bitbucket, Azure DevOps, and so on.
Discover how the OSGI lcfg command can help you be sure which is the configuration at runtime.
Knowing the TIBCO BW configuration at runtime is became critical as you always need to know if the latest changes has been applied or just want to check the specific value for a Module Property as part of your development.
This article is part of my comprehensive TIBCO Integration Platform Guide where you can find more patterns and best practices for TIBCO integration platforms.
When we are talking about applications deployed on the cloud one of the key things is Configuration Management. Especially if we include into the mix things like Kubernetes, Containers, External Configuration Management System things got tricky.
Usual configuration when we are talking about a Kubernetes environment for configuration management is the use of Config Maps or Spring Cloud Config.
When you can upload the configuration in a separate step as deploying the application, you can get into a situation where you are not sure about what is the running configuration that a BusinessWorks application has.
To check TIBCO BW configuration there is an easy way to know exactly the current values:
We just need to get inside the container to be able to access the internal OSGI console that allows us to execute administrative commands.
We have spoken other times about that API but in case you would like to take a deeper look you just need to check this link:
And one of the commands is lcfg that allows knowing which configuration is being used by the application that is running:
Sample output for the lcfg command of a Running BusinessWorks Container Application
Summary
I hope you find this interesting, and if you are one of those facing this issue now, you have information not to be stopped by this one. If you would like to submit your questions feel free to use one of the following options:
Twitter: You can send me a mention at @alexandrev on Twitter or a DM or even just using the hashtag #TIBFAQs that I will monitor.
Email: You can send me an email to alexandre.vazquez at gmail.com with your question.
Instagram: You can send me a DM on Instagram at @alexandrev
Check out the properties that will let you an optimized use of your disk storage and savings storing your monitoring data
Prometheus has become a standard component in our cloud architectures and Prometheus storage is becoming a critical aspect. So I am going to guess that if you are reading this you already know what Prometheus is. If this is not the case, please take your time to take a look at other articles that I have created:
Prometheus Monitoring for Microservices using TIBCO
We’re living a world with constant changes and this is even more true in the Enterprise Application world. I’ll not spend much time talking about things you already know, but just say that the microservices architecture approach and the PaaS solutions have been a game-changer for all enterprise integration technologies. This time I’d like to […]
Kubernetes Service Discovery for Prometheus
In previous posts, we described how to set up Prometheus to work with your TIBCO BusinessWorks Container Edition apps, and you can read more about it here. In that post, we described that there were several ways to update Prometheus about the services that ready to monitor. And we choose the most simple at that […]
We know that usually when we monitor using Prometheus we have so many exporters available at our disposal and also that each of them exposes a lot of very relevant metrics that we need to track everything we need to and that lead to very intensive usage of the storage available if we do not manage accordingly.
There are two factors that affect this. The first one is to optimize the number of metrics that we are storing and we already provide tips to do that in other articles as the ones shown below:
How it optimize the disk usage in the Prometheus database?
Learn some tricks to analyze and optimize the usage that you are doing of the TSDB and save money on your cloud deployment. Photo by Markus Spiske on Unsplash In previous posts, we discussed how the storage layer worked for Prometheus and how effective it was. But in the current times, we are of cloud computing […]
The other one is how long we store the metrics called the “retention period in Prometheus.” And this property has suffered a lot of changes during the different versions. If you would like to see all the history please take a look at this article from Robust Perception:
How can you control how much history Prometheus keeps?
The main properties that you can configure are the following ones:
storage.tsdb.retention.time: Number of days to store the metrics by default to 15d. This property replaces the deprecated one storage.tsdb.retention.
storage.tsdb.retention.size: You can specify the limit of size to be used. This is not a hard limit but a minimum so please define some margin here. Units supported: B, KB, MB, GB, TB, PB, EB. Ex: “512MB”. This property is experimental so far as you can see in the official documentation:
What about setting this configuration in the operator for Kubernetes? In that case, you also have similar options available in the values.yaml configuration file for the chart as you can see in the image below:
values.yml for the Prometheus Operator Helm Chart
This should help you get an optimized deployment of Prometheus that ensures all the features that Prometheus has but at the same time an optimal use of the resources at your disposal.
Additional to that, you should also check the Managed Service options that some providers have regarding Prometheus, such as the Amazon Managed Services for Prometheus, as you can see in the link below:
Amazon Prometheus Service to Provide More Availability to Your Monitoring Solution
Learn what Amazon Managed Service for Prometheus provides and how you can benefit from it. Photo by Casey Horner on Unsplash Monitoring is one of the hot topics when we talk about cloud-native architectures. Prometheus is a graduated Cloud Native Computing Foundation (CNCF) open-source project and one of the industry-standard solutions when it comes to monitoring your […]
Learn about the new horizontally-scalable, highly available, multi-tenant log aggregation system inspired by Prometheus that can be the best fit for your logging architecture
Loki vs ELK is something you are reading and hearing each time more often as from some time it is a raise on the dispute of becoming the de-factor standard for log aggregation architectures.
When we talk about Cloud-Native Architecture, log aggregation is something key that you need to consider. The old practices that we followed in the on-premises virtual machine approach for logging are not valid anymore.
We already cover this topic in my previous post that I recommend you to talk a look in case you haven’t read it yet, but this is not the topic for today.
Three reasons why you need a Log Aggregation Architecture today
Log Aggregation are not more a commodity but a critical component in container-based platforms Photo by Olav Ahrens Røtne on Unsplash Log Management doesn’t seem like a very fantastic topic. It is not the topic that you see and says: “Oh! Amazing! This is what I was dreaming about my whole life”. No, I’m aware that […]
Elasticsearch as the core and the different derívate de stacks like ELK/EFK had gained popularity in the last years, being pretty much the default open-source option when we talked about log aggregation and one of the options. The main public cloud providers have also adopted this solution as part of their own offering as the Amazon Elasticsearch Service provides.
But Elasticsearch is not perfect. If you have already used it, you probably know about it. Still, because their features are so awesome, especially on the searching and indexing capabilities, it has been the kind of leader today. But other topics like the storage use, the amount of power you need to handle it, and the architecture with different kinds of nodes (master, data, ingester) increase its complexity for cases when we need something smaller.
And to fill this gap is where our main character for today’s post arrives: Loki or Grafana Loki.
Loki is a logging management system created as part of the Grafana project, and it has been created with a different approach in mind than Elasticsearch.
Loki is a horizontally-scalable, highly-available, multi-tenant log aggregation system inspired by Prometheus. It is designed to be very cost effective and easy to operate. It does not index the contents of the logs, but rather a set of labels for each log stream.
So as we can read in the definition from their own page above, it covers several interesting topics in comparison with Elasticsearch:
First of all, it addresses some of the usual pain points for ELK customers: It is very cost-effective and easy to operate.
It clearly says that the approach is not the same as ELK, you are not going to have a complete index of the payload for the events, but it is based on different labels that you can define for each log stream.
Prometheus inspires that, which is critical because it enabled the idea to use log traces as metrics to empower our monitoring solutions.
Let’s start with the initial questions when we show an interesting new technology, and we would like to start testing it.
How can I install Loki?
Loki is distributed in different flavors to be installed in your environment in the way you need it.
SaaS: provided as part of the hosting solution of Grafana Cloud.
On-Premises: Provided as a normal binary to be download to run in an on-premises mode.
Cloud: Provided a docker image or even a Helm Chart to be deployed into your Kubernetes-based environment.
GrafanaLabs teams also provide Enterprise Support for Loki if you would like to use it on production mode in your company. Still, at the same time, all the code is licensed using Apache License 2.0, so you can take a look at all the code and contribute to it.
Architecture wise is very similar to the ELK/EFK stack and follow the same approach of “collectors” and “indexers” as ELK has:
Loki itself is the central node of the architecture responsible for storing the log traces and their labels and provided an API to search among them based on their own language LogQL (a similar approach to the PromQL from Prometheus).
promtail is the agent component that runs in the edge getting all those log traces that we need that can be running on a machine on-prem or a DaemonSet fashion in our own Kubernetes cluster. It plays the same role as Logstash/Fluent-bit/Fluentd works in the ELK/EFK stack. Promtail provides the usual plugin mode to filter and transforms our log traces as the other solutions provide. At the same time, it provides an interesting feature to convert those log traces into Prometheus metrics that can be scraped directly by your Prometheus server.
Grafana is the UI for the whole stack and plays a similar role as Kibana in the ELK/EFK stack. Grafana, among other plugins, provides direct integration with Loki as a Datasource to explore those traces and include them in the Dashboards.
Summary
Grafana Loki can be a great solution for your logging architecture to cover address two points: Provide a Lightweight log aggregation solution for your environment and at the same time enable your log traces as a source for your metrics, allowing you to create detailed, more business-oriented metrics that use in your dashboards and your monitoring systems.
Discover SARChart and kSAR as critical utilities to be part of your toolbelt for administration or troubleshooting
There was a time when we didn’t have public cloud providers providing us with a bunch of kinds of services and a whole platform and experience unified, covering all the aspects of our technical needs when we talked about an IT environment and sysstat metrics were key there.
There was a time when AWS Cloud Watch, Azure Monitor, Prometheus were not a thing, and we need to deal with Linux servers without a complete portal providing all the metrics that we could need.
There was a time… that it is still the present for so many customers and organizations all over the world and they still need to deal with this situation, and probably you face this situation now or even in the future. So, let’s see what we can do regarding that.
Introducing sysstat
For several decades the standard way to extract the usage metrics from a Linux server was sysstat. Based on the words on its official web page, this is what sysstat is:
The sysstat utilities are a collection of performance monitoring tools for Linux. These include sar, sadf, mpstat, iostat, tapestat, pidstat, cifsiostat and sa tools
Sysstat is an ancient but reliable piece of software that its owner continue to update even today.. but keeping the same webpage since the beginning 🙂
Sysstat is old but powerful, and it has so many options that have to save my life in a lot of customers and provide a lot of handy information that I needed at that time. But today, I am going to talk about a specific utility from the whole lot, that is sar.
sar is the command to be able to query the performance metrics for an existing machine. Just typing the command sar is enough to start seeing awesome things. That will give you the CPU metrics for the whole day for each of the CPUs that your machine has and also split depending on the kind of usage (user, system, idle, all).
Execution of command sar in a local machine
But these metrics are not only the things that you can get. Other options available
sar -r: Provide memory metrics
sar -q: Provide the load metrics.
sar -n: Provide the network metrics.
sar -A: Provides ALL the metrics.
sar -f /var/log/sysstat/sa[day-of-the-month]: It will provide metrics for the day of the month instead of the current day.
There are a lot of options more that you can use on your daily basis, so if you need something concrete, take a look at the man page for the sar command:
sar(1) – Linux man page
The sar command writes to standard output the contents of selected cumulative activity counters in the operating system. The accounting system, based on …
But we are all visual people, right? It is true that seeing trends and evolutions is more complex in text mode and also seeing only daily data at a time. So take a look at the options to handle that challenge:
Java-based developed frontend using Swing library to represents the data from sar visually. It is a portable one, so you need the JAR file to execute it. And you can invoke it in several ways:
Providing the file you got from a machine that you executed the sar command.
Connecting using SSH to a remote machine and running the command that you need.
Graphical visualization of the sar metrics using kSAR
SARChart
What about when you are on a machine that you don’t have the rights to install any application, even a portable one as kSAR is, or maybe you only have your tablet available? In that case, we have SARChart.
SARChart is a web application that provides a graphical analysis of the sar files. So you only need to upload the file to get a complete graphical and well-looked analysis of your data covering all its aspects. Additionally, all the work is done at the client level without sending any of your data to any server.
CPU usage analysis provided by SARChart
Summary
I hope you find these tools interesting if you didn’t know about them, and I also hope that they can help you with your daily work or at least be part of your toolset to be at your disposal when you need them.